

A cold bedroom, a faint whistle near the sill, and a furnace that seems to run without a break can make a tube of exterior caulk look like the obvious fix. But that visible seam isn't always where the air is getting in. A lasting repair starts with finding the leak, then sealing the right joint without blocking the window's drainage path.
Table of Contents
- Why Resealing Matters More Than a New Bead of Caulk
- How a Window Actually Leaks
- Tools, Sealants, and Prep You Actually Need
- Removing Old Sealant and Prepping the Joint
- Applying the New Sealant the Right Way
- Condensation, Humidity, and When the Symptom Is Not a Draft
- Testing the Repair and Knowing When to Call a Pro
Why Resealing Matters More Than a New Bead of Caulk
Window-related air leakage can make rooms uncomfortable and add to the work your heating and cooling system has to do. ENERGY STAR estimates that air sealing a home and adding insulation can reduce heating and cooling costs by an average of 15%, or total household energy costs by about 11% nationally. Its weatherization strategy includes sealing around windows and doors as part of a broader effort to reduce air infiltration, not as a substitute for addressing other leaks around the home (ENERGY STAR's air-sealing guidance).
The catch is that a window can look neatly caulked from outdoors and still leak around the unit. The gap between the window frame and the surrounding wall, called the rough opening, can create an air path hidden behind interior trim. In an Oak Ridge National Laboratory study cited in a U.S. Department of Energy guide, a window installed with a 3/4-inch rough-opening gap had an equivalent leakage area of 28.2 cm² per m² before sealing. Caulking the gap from the interior reduced that to 0.5 cm² per m², about a 98.2% reduction (DOE Building America air-sealing guide). The finding is a practical reminder: a new exterior bead can improve the appearance without fixing the main air path.
Start with the leak, not the caulk. Figure out whether air is moving through the rough opening, a frame joint, or the operable sash before choosing a repair.
A sound reseal follows a simple order: inspect the window and surrounding wall, prepare the joint, choose materials that fit the gap, seal without interfering with drainage, then test the result. If you're also checking for other sources of drafts, this guide to energy-efficient window checks can help broaden the inspection. Air leaks can also be confused with moisture problems elsewhere in the home, so it's useful to consider attic moisture control when you're tracking unexplained dampness.
How a Window Actually Leaks
A window doesn't have just one seal. Air or water can get through the rough-opening gap around the installed unit, through joints within the frame or sash, or through a failed insulated-glass seal. Those paths call for different repairs, so it's worth identifying the symptom before taking off trim or cutting out caulk.
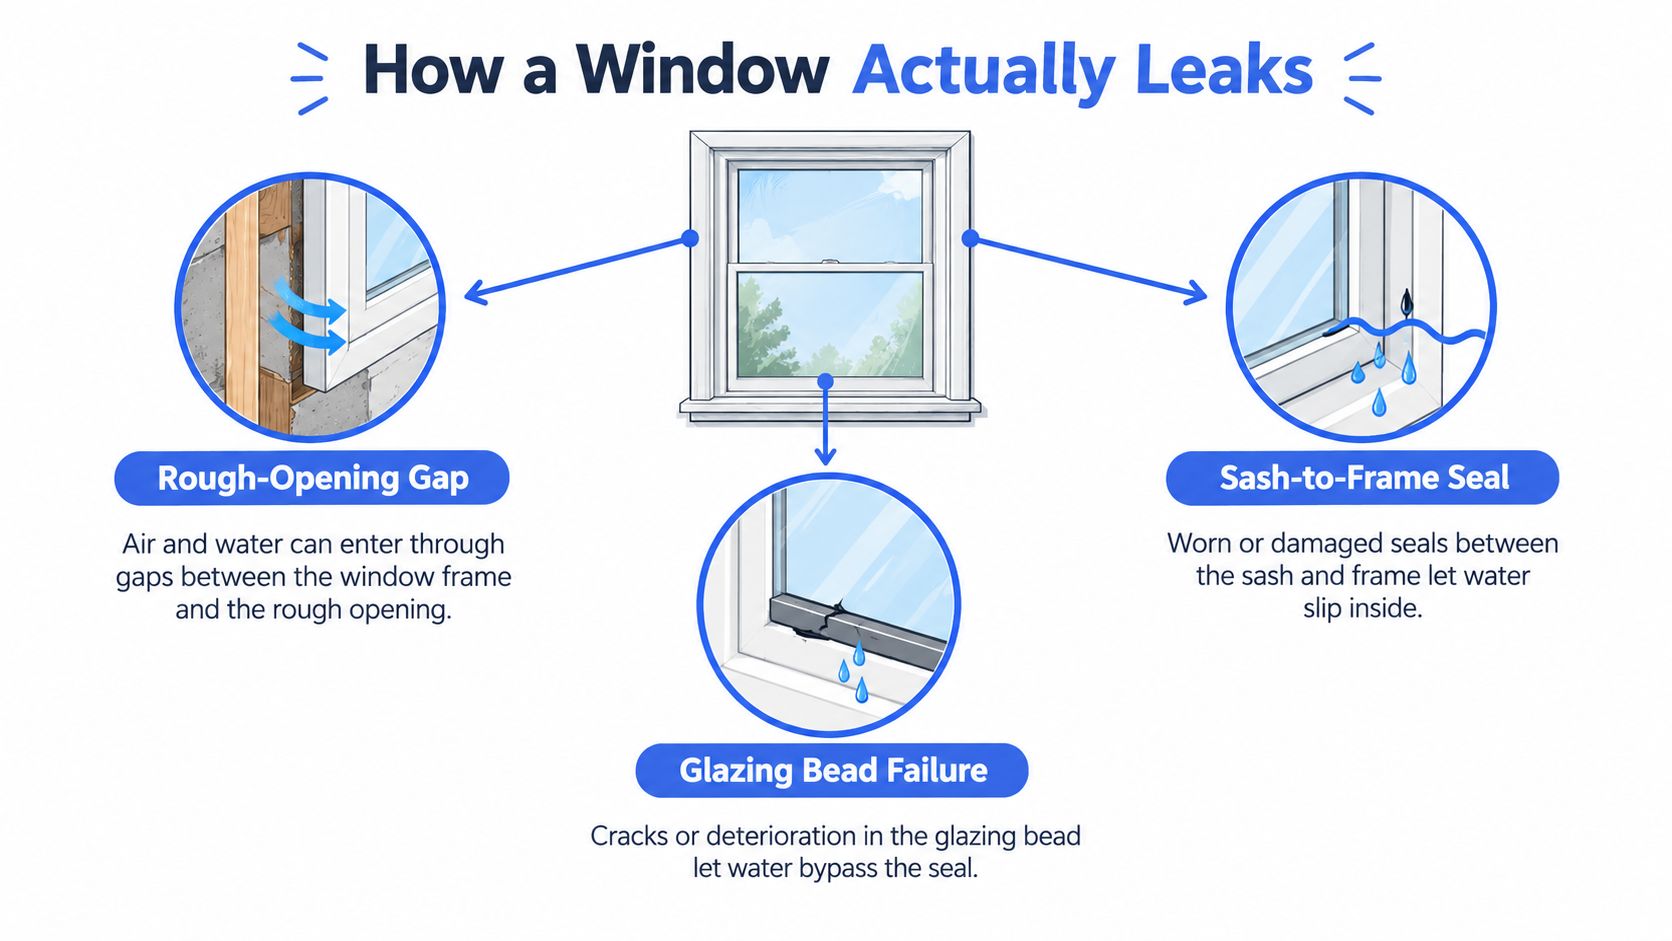
The rough opening is the space between the outside of the window unit and the framing in the wall. If that connection isn't airtight, air can move behind the casing even when the exterior seam appears intact. Dust streaks on interior trim, a draft that seems to come from behind the casing, or a smoke pencil's wisp being pulled toward the joint can all point to this hidden path. If you remove the interior trim carefully, look for daylight, damp sheathing, failed sealant, or fiberglass stuffed into the gap. Fiberglass can slow heat flow, but it isn't an air barrier by itself.
Frame and sash leaks show up differently. A draft that changes when the window is locked, or air movement concentrated at the meeting rail or sash edges, may indicate worn weatherstripping, a poor latch adjustment, or a frame joint that's opened up. A candle can help you notice movement, but don't use an open flame around curtains or other combustibles. A smoke pencil is safer and makes subtle air movement easier to see.
Separate the perimeter leak from a glass failure
Fog, haze, or moisture between the panes usually points to a failed insulated-glass seal. Exterior caulk won't restore the insulating gas or seal inside the glass unit. By contrast, water staining, peeling paint, or damaged trim below a window can result from either water intrusion or condensation, so the stain alone doesn't prove that the outside bead has failed. Inspect the window after rain and check whether the moisture appears on the room-side surface, between panes, or around the trim.
Choose a windy or cold day for an air-leak check. With the window closed and latched, move a smoke pencil slowly around the interior perimeter while another person closes exterior doors and windows. Look outdoors for cracked or loose sealant, damaged flashing, and places where water might be directed into the wall. If the leak seems to be behind the casing, remove the trim with care rather than covering the symptom with another exterior bead.
Use this decision check before starting:
- Perimeter reseal: The joint is visibly cracked or air moves at an accessible frame-to-wall seam.
- Rough-opening repair: The draft comes from behind the interior casing or the exposed gap contains failed material.
- Professional evaluation: You find wet or decayed framing, recurring water entry, a window that's out of square, or moisture between glass panes.
For other window-envelope details that can affect water entry, review this information on skylight flashing installation.
Tools, Sealants, and Prep You Actually Need
Gather the tools before opening a tube. For removal, use a caulk-removal tool, utility knife, and, where appropriate, an oscillating multi-tool with a suitable blade. For a rough-opening gap, keep backer rod in several sizes and choose a low-expansion foam labeled for windows and doors only if the cavity calls for it. Painter's tape, a sturdy caulk gun, a plastic tooling tool, and clean rags make application more controlled.
Sealant choice depends on the joint and the surfaces being joined. Silicone and polyurethane are often better choices than basic acrylic for exterior or moving joints because they generally shrink less after curing. Check the product label for material compatibility, cure instructions, and temperature limits. Application ranges differ by product, so don't assume a sealant is suitable for cold, hot, damp, or rapidly changing weather. For example, DAP lists one 100% silicone window-and-door sealant for surface temperatures from -35°F to 140°F, while another exterior window, door, and siding sealant has a 0°F-to-120°F application range (DAP silicone sealant specifications).

A smoke pencil is useful for confirming a suspected air path before you disturb the joint. A flashlight helps when inspecting behind trim, and gloves and eye protection matter when cutting or pulling old material. If the house is older and you're unsure what a painted surface or old sealant contains, don't sand or grind it; seek appropriate lead-safe guidance before disturbing it. Use a stable ladder for exterior work, and don't lean sideways to reach a seam.
A reliable caulk gun gives you better control over the bead and reduces hand fatigue. Cheap guns can make it harder to maintain steady pressure, which often leads to uneven application and wasted sealant. When comparing material categories, a focused adhesives, sealants, and tape selection can help you narrow down what suits the joint, but always follow the specific product's technical instructions.
Removing Old Sealant and Prepping the Joint
New sealant won't bond well to loose caulk, dust, or a damp surface. Take your time here. Start by scoring the old bead along both edges with a utility knife, keeping the blade angled away from the window frame and surrounding siding. Pull out the loosened sealant in strips with a removal tool. For stubborn material, use a remover that's compatible with the surfaces, and follow its label rather than applying heat near glass, finishes, or combustible materials.
Once the bead is out, inspect what it was covering. Look for soft wood, dark staining, separated joints, damaged flashing, and old foam that's brittle or pulling away from the frame. A small area of sound wood with localized surface damage may be repairable with an exterior-grade epoxy, but rot that extends into the sill or wall framing needs more than a sealant bead. Don't seal over wet material or a joint that's still moving.
Clean, dry, and sound
Remove dust and residue with a clean rag. Use a cleaner appropriate to the substrate and sealant manufacturer's instructions; isopropyl alcohol may be suitable for some surfaces, but it can damage certain finishes. Let the joint dry fully before applying anything. Installation guidance based on ASTM E2112-07 likewise calls for the perimeter substrate to be clean, dry, and smooth so flashing and sealant can adhere continuously (window installation guidance).
Check the flashing before closing the joint. A properly managed sill uses flashing to direct water back outdoors rather than into the wall. If the flashing is missing, torn, or clearly directing water inward, caulk won't correct that defect. Don't cover damaged flashing with a cosmetic bead; repair the water-management layer first or bring in a qualified professional.
Before moving on, confirm that the surfaces are clean and dry, the old loose sealant is gone, and any damaged material has been repaired. If you're sealing the rough opening from inside, keep the interior trim off until you've confirmed the gap is ready to be filled.
Applying the New Sealant the Right Way
With the joint clean and dry, start at the rough opening if that's where the draft is. For gaps under 1/2 inch, a compatible, permanently flexible sealant can usually bridge the joint. For wider, relatively uniform gaps, press in backer rod at a consistent depth, then apply sealant against it. This prevents the sealant from filling an oversized void and helps create an hourglass-shaped profile that can flex with normal movement. DOE guidance places the air seal toward the interior edge of the frame and connects it to the rough-opening air barrier (DOE guidance on sealing window rough openings).

Cut the nozzle to fit the joint, then keep the gun moving at a steady pace so the bead stays continuous. Tool the sealant firmly into contact with both sides of the joint, using a plastic tool or another method approved by the manufacturer. Painter's tape can help create a crisp edge, but remove it before the sealant skins over. Don't leave pinholes or thin spots at corners.
Low-expansion foam labeled for windows and doors can suit larger cavities where the product is approved for the application. Apply it cautiously: too much foam can bow the jamb, interfere with sash movement, or affect the window warranty. Fiberglass insulation alone won't stop air moving through the gap, and foam shouldn't be treated as a universal replacement for a properly detailed seal.
Finish outside without trapping water
At the exterior, renew compatible sealant at the head and sides where the design calls for it. Preserve the sill's drainage path. Many window installations need water to escape at the bottom, so don't run a continuous bead across the sill or block weep holes. Follow the window manufacturer's installation details if you know them. Keep the sash closed or positioned as directed while materials cure, then make sure it still opens, closes, and latches smoothly.
Condensation, Humidity, and When the Symptom Is Not a Draft
Water on the room-side glass doesn't automatically mean the exterior seal has failed. Indoor air contains moisture, and when that air meets glass or a frame cold enough to fall below its dew point, condensation forms. High indoor humidity, limited airflow at the glass, and cold surfaces can all contribute. If moisture is between panes, the insulated-glass seal is the more likely issue; if staining follows rain, investigate flashing and drainage instead of assuming the room needs a new caulk bead.
A winter humidity guide gives these recommended indoor relative-humidity ceilings by outdoor temperature (winter window-condensation guidance):
| Outdoor Temperature | Max Indoor Relative Humidity |
|---|---|
| 20–40°F | Below 40% |
| 10–20°F | Below 35% |
| 0–10°F | Below 30% |
| -10–0°F | Below 25% |
If the room-side glass keeps collecting water, measure indoor humidity and check whether bathroom and kitchen exhaust fans move air outdoors. Keep blinds or heavy curtains from trapping damp air against cold glass. A dehumidifier or better ventilation may address the cause more directly than resealing, but don't use humidity changes to dismiss a confirmed draft or water leak.
Three clues help sort the problem:
- Room-side condensation: Check indoor humidity, airflow, and the temperature of the glass before reaching for sealant.
- Moisture between panes: The insulating-glass unit may have failed; exterior caulk won't repair the internal seal.
- Water marks after rain or a draft at the frame: Inspect the perimeter, flashing, and rough opening for a genuine leak.
When the glazing itself is cloudy or the sash no longer performs properly, it helps to understand the warning signs that a window may need replacement. For more on the construction of double-paned windows, keep the glass unit's seal distinct from the seal between the frame and the wall.
Testing the Repair and Knowing When to Call a Pro
A smooth-looking bead doesn't prove the leak is fixed. Let the sealant cure according to its label, then check the same joints where you found air movement. With the window closed and latched, move a smoke pencil along the interior frame and rough-opening perimeter. The smoke should remain steady rather than being drawn through a gap. Blower-door testing offers a whole-house air-leakage benchmark and can help show whether the repair made a measurable difference, though it won't replace a close inspection of the window itself.

For a water check, use a gentle spray on the exterior seams and have someone watch indoors for leakage. Don't aim a pressure washer at the window or force water into joints. Afterward, inspect the bead for gaps, cracks, or edges that have pulled away. DOE installation guidance also recommends checking water and air tightness, confirming the unit remains plumb, level, and square, and verifying that it operates correctly (Building Science Education Solution Center guidance).
Common mistakes are easy to spot once you know what to look for:
- Dirty or wet substrate: Sealant lifts at the edges or fails to adhere.
- Rigid or shrinking caulk at a moving joint: Cracks reappear as the window and wall move.
- Fiberglass stuffed into the gap: The cavity looks full but air can still pass through the fibers.
- Too much foam: The jamb bows or the sash binds.
- Blocked drainage: Water can't exit through the intended sill path.
Call for an evaluation when the window itself is compromised. Visible sill rot, moisture between panes, a sash that won't latch squarely, or recurring leaks after a properly prepared reseal can point to a larger repair than caulk can handle.
Air sealing should also be considered alongside planned ventilation and combustion safety. A tighter home needs appropriate ventilation, and changes to air movement can affect combustion appliances. If you're unsure about those interactions, or if the leak returns after the repair, have a qualified building or window professional assess the assembly rather than adding another layer of sealant.
For Columbus and central Ohio homeowners, HIBCO ROOF LLC offers exterior inspections and repairs, including window, siding, gutter, and roof work when a leak involves more than a window bead. Contact the team for a free estimate if you've found damaged flashing, recurring water intrusion, or exterior deterioration around the opening.