
At 2 a.m., a summer thunderstorm can turn a quiet Columbus bedroom into an echo chamber. You hear the drip inside the chimney, then notice the damp mark near the fireplace or ceiling and wonder whether the missing chimney cover is the whole problem.
Sometimes it is. A properly selected cover can block direct rain, snow, animals, and debris at the flue opening. But a cover can't repair a cracked crown, failed flashing, or porous brick. The most reliable way to think about chimney covers to stop rain is as one part of a three-zone system, the cap, the crown, and the masonry.
Table of Contents
- Why Chimneys Are a Separate Rain Problem
- What a Chimney Cover Actually Does
- Types of Chimney Covers Compared
- When a Cover Alone Will Not Solve the Leak
- DIY Installation Versus Hiring a Pro
- Repair, Replace, or Upgrade a Chimney Cover
- Choosing the Right Chimney Cover for Your Home
Why Chimneys Are a Separate Rain Problem
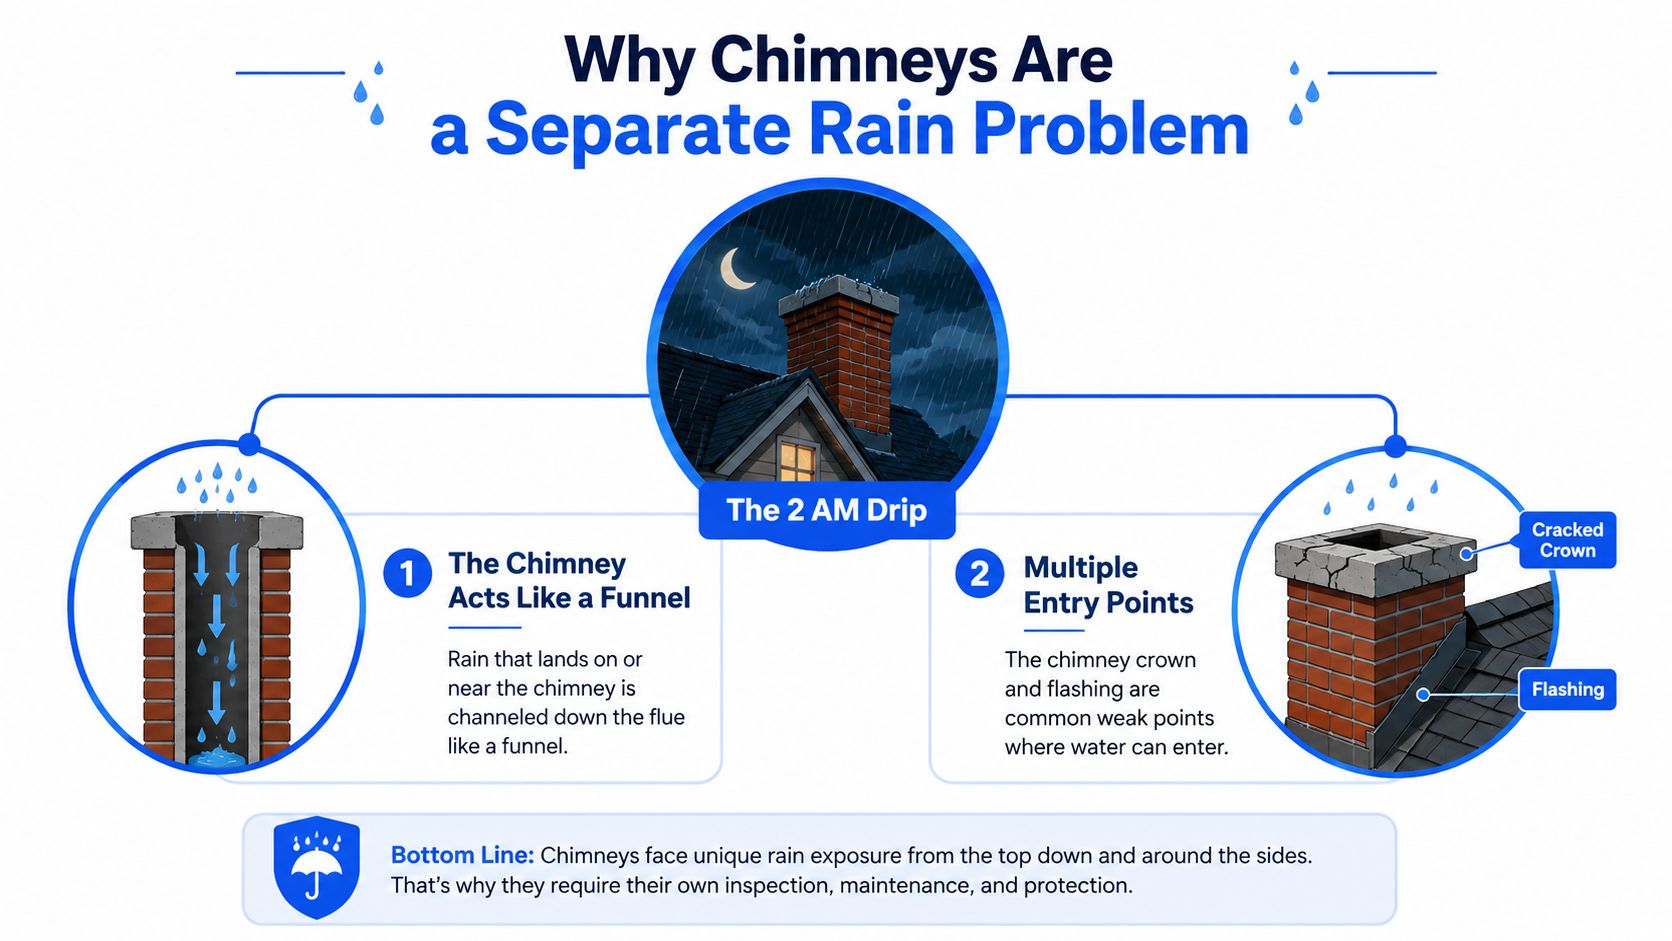
Roof shingles are designed to move water downslope and away from openings. A chimney behaves differently. It rises above the roof, exposes masonry on every side, and contains a flue that can funnel water directly toward the interior.
That explains why a homeowner can have a sound-looking roof and still hear water inside the chimney during a storm. Direct rainfall can enter an uncapped flue, wind-driven rain can reach cracks and joints from the side, and aged brick and mortar can absorb moisture. Masonry guidance identifies water intrusion as a leading cause of chimney deterioration in North American climates, where repeated wetting contributes to mortar-joint decay, liner damage, and freeze-thaw spalling. Masonry chimney weather-resistance guidance explains why the top assembly needs to move water outward instead of allowing it to run down the chimney.
The chimney creates its own drainage conditions
A masonry chimney isn't just another roof penetration. It's a vertical shaft with joints, transitions, and an opening that responds to wind pressure. During a storm, rain doesn't need a large visible hole. A loose cap, cracked mortar joint, porous brick, or failed seal can give water a route into the assembly.
Freeze-thaw weather makes the problem more persistent. Water enters a small crack, freezes, expands, and leaves the joint more vulnerable the next time rain arrives. The HIBCO guide to common roof leak causes is useful context because chimney leaks often look like ordinary roof leaks from inside the home, even when the source is higher up or several feet away from the visible stain.
Start with the three entry paths
When inspecting a wet chimney, separate the problem into three areas:
- The cap or cover: Protects the flue opening from direct precipitation and debris.
- The crown: Sheds water over the chimney top, but can crack, spall, or wick moisture into the masonry.
- The masonry and flashing: Can absorb water through joints or allow runoff behind the chimney-roof seal.
For brick that has begun absorbing water, homeowners may also benefit from practical background on how to seal brick walls in the, provided the product is appropriate for breathable masonry. A surface treatment won't compensate for a missing cap or failed flashing, but the right breathable approach can be part of a broader moisture-control plan.
What a Chimney Cover Actually Does
A chimney cover is a protective assembly placed over a flue, chimney crown, or factory-built chimney housing. People often use “cap,” “cover,” and “cowl” interchangeably, but the hardware can serve different purposes.
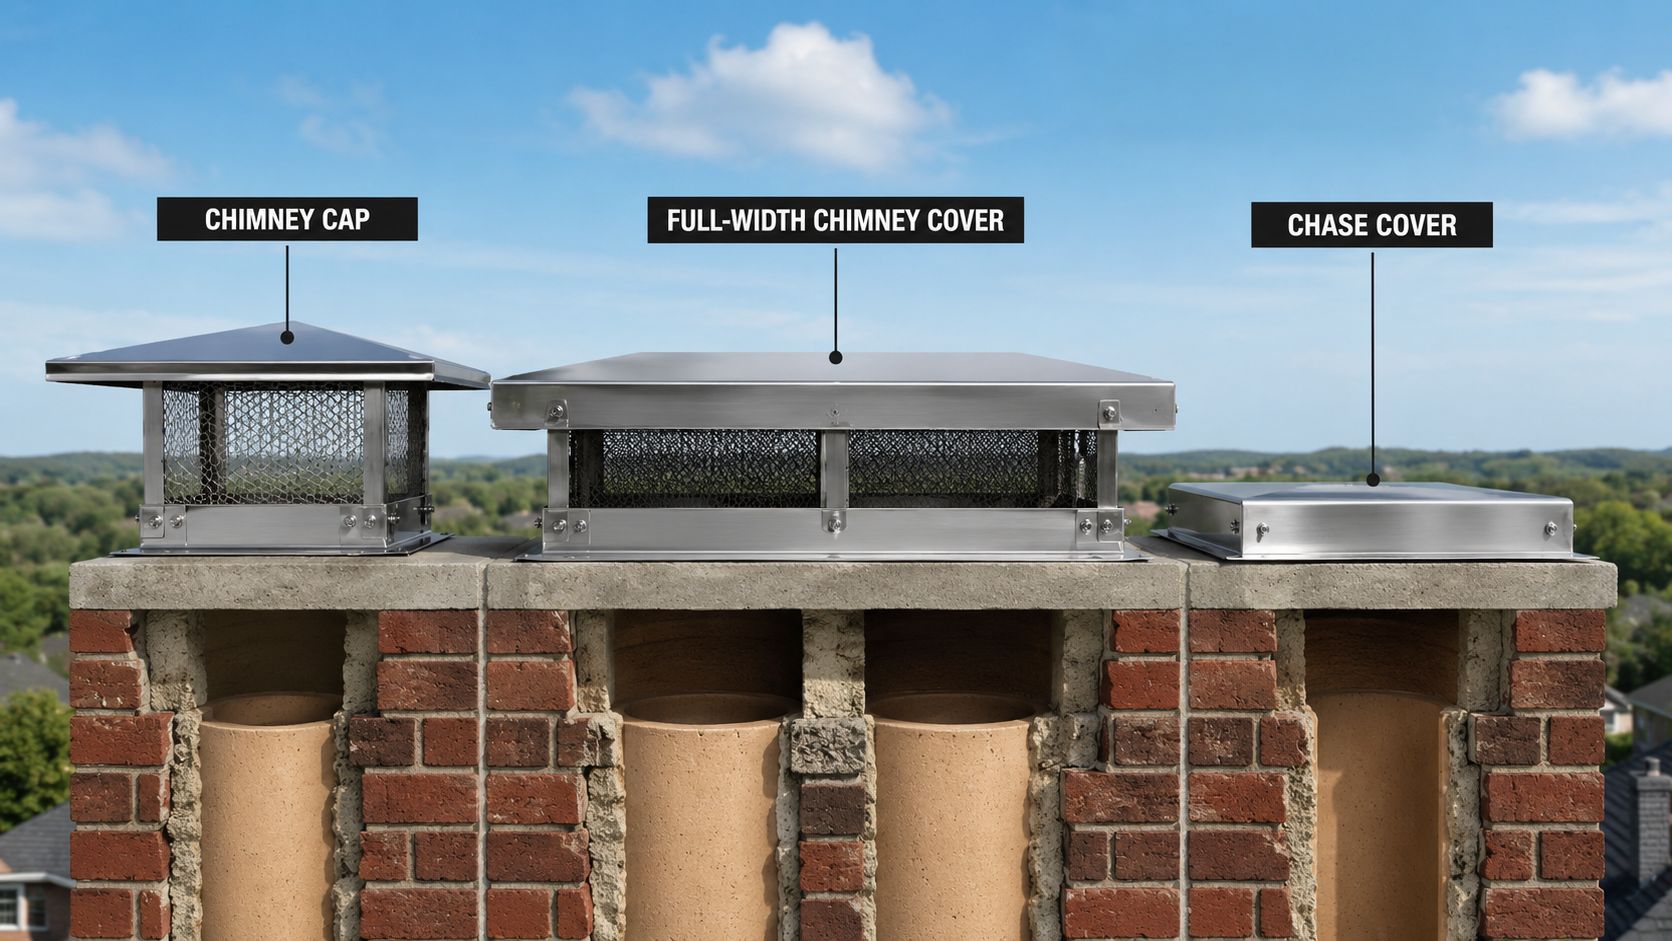
A single-flue chimney cap usually covers one flue tile and includes a mesh screen. A full-width cover spans the chimney crown and protects the top assembly around multiple flues. A chimney cowl is a shaped hood designed to deflect rain while supporting draft performance, downdraft control, or ventilation requirements.
How the cover blocks rain
The lid interrupts vertical rainfall before it reaches the flue. A projecting edge and drip edge then move water away from the chimney walls instead of letting it run down the masonry. Guidance for maximum weather resistance recommends that the cap extend beyond the chimney walls, slope away from the flue, and include a drip edge. Independent chimney cap geometry guidance also notes that flashing beneath concrete or masonry caps helps keep incidental water from wicking into brickwork.
The screen performs two jobs. It keeps animals and windblown debris out, and it stops nests from forming where they can hold moisture against the flue or masonry. NFPA 211 defines a chimney cap as protective housing intended to prevent rain, snow, birds, and animals from entering while reducing downdrafts. Its screening guidance balances exclusion and airflow, with openings that must not admit spheres larger than 1/2 inch and must not block spheres smaller than 3/8 inch. NFPA 211 screening guidance provides the relevant measurement.
What a cover can't fix
A cover is the first barrier, not a complete waterproofing system. It doesn't seal a cracked crown, replace step and counter flashing, or make porous brick waterproof.
Practical rule: If the cap looks sound but water still appears near the chimney, inspect the crown and roof junction before buying another lid.
The cap needs the correct balance between weather protection and exhaust space. For masonry chimneys, code guidance cited by rain-cap free-area requirements calls for net free area under the cap of at least four times the net free area of the flue outlet it serves. A cover that blocks too much outlet area can increase draft resistance, so a larger or heavier design isn't automatically safer.
Types of Chimney Covers Compared
The right cover depends on the number of flues, the condition of the crown, the chimney's use, and how the assembly handles wind and rain. Four configurations appear most often on masonry homes.
Single-flue caps
A single-flue cap attaches to one flue tile with a clamp, screw, or similar fastening method. It's a practical choice when one fireplace or appliance vents through one liner and the surrounding crown is in sound condition.
The main advantage is straightforward sizing. Consumer installation guidance lists common stainless-steel and copper models from 9-inch square up to 21-inch by 21-inch sizes, selected according to the flue opening dimensions. Chimney cap sizing guidance reinforces the point that measurement comes before ordering.
Multi-flue and top-mount covers
A multi-flue cover spans two or more openings and generally mounts to the crown. It protects more of the chimney top than separate small caps, which can be useful where a furnace flue and fireplace flue share one masonry stack.
Top-mount covers sit on the crown with a skirt that sheds water outward. They work well when flues differ in size or height, but the installer must preserve adequate outlet area and avoid covering a working flue too closely.
Outside-mount caps
An outside-mount cap fastens to the chimney brick rather than directly to the flue tile. The design leaves an air gap around the flue and can suit older masonry stacks where the tile is fragile, uneven, or unsuitable for direct fastening. The installer still needs to verify the masonry can hold the attachment and that the cover won't bridge cracks or unstable crown material.
| Cover Type | Mounting Location | Best For | Typical Cost (Installed) |
|---|---|---|---|
| Single-flue cap | One flue tile | One active flue with a sound crown | About $300 on average, with professional installation commonly ranging from roughly $75 to $500, depending on material and labor. Installation cost benchmarks |
| Multi-flue cover | Chimney crown | Multiple flues under one protective assembly | Custom pricing based on size, material, and labor |
| Top-mount cover | Crown surface | Multiple or differently sized flues | Custom pricing based on dimensions and mounting |
| Outside-mount cap | Exterior masonry | Older or irregular flue assemblies | Custom pricing based on access and fastening needs |
Galvanized steel keeps the initial price down but is more vulnerable to corrosion. Stainless steel handles wet weather with less maintenance and has become the default in much of our Columbus-area service work because it combines durability with a restrained appearance. Copper costs more but offers a distinctive finish and can be a sensible architectural choice when the homeowner wants the cap to age visibly with the house.
When a Cover Alone Will Not Solve the Leak
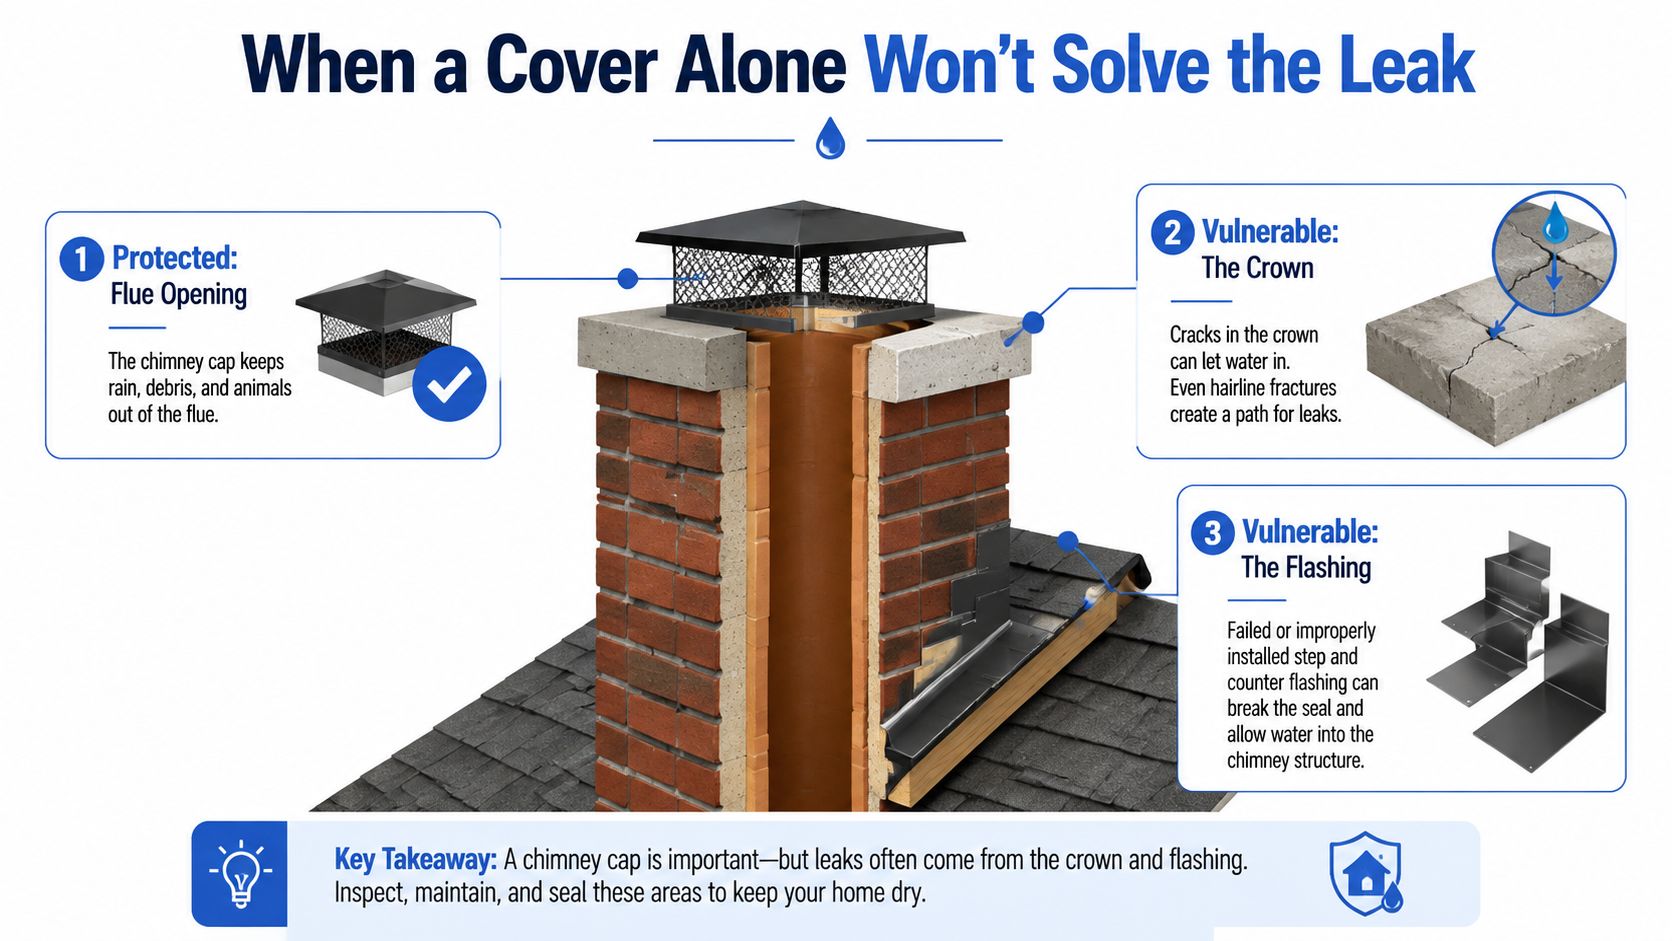
A chimney cover protects the opening at the top. It doesn't protect every surface that rain can reach. For most masonry chimneys, the other critical zones are the crown and the flashing where the chimney passes through the roof.
The crown is the concrete or masonry surface around the flue. It should slope away from the opening, extend beyond the chimney walls, and use a drip edge. A crack, spall, or poorly shaped edge can let water move sideways into the brick. Masonry guidance also recommends flashing beneath concrete or masonry caps and a flexible sealant joint around the flue, because rigid bonding can crack as materials expand and contract. Technical chimney cap guidance describes these details as part of the weather-resistant assembly.
Signs that point to the crown
Look for rust-colored streaks below the cap, white efflorescence rings, deteriorated mortar, or damp areas on the chimney breast. Water in the firebox can also appear when the cap looks intact, especially if the crown is directing water toward the flue or masonry.
A localized crown crack may respond to preparation, compatible repair material, and a breathable water-shedding treatment. A crown with widespread spalling, poor slope, or separated edges usually needs reconstruction rather than a smear of sealant. A new cast-in-place crown can provide the correct overhang, slope, drip edge, and movement joint when the existing top has lost its shape.
Signs that point to flashing
At the roof junction, inspect the step flashing, counter flashing, and the masonry cuts where the metal terminates. Lifted metal, open joints, cracked mortar, and old tar patches indicate that runoff may be traveling behind the flashing and into the attic.
A cap can be perfectly installed and still leave a chimney leak untouched if the water enters at the crown or roof junction.
Before spending money on a new cover, trace the entry zone. HIBCO's chimney leak repair information offers relevant guidance on inspecting the cap as part of a broader chimney leak diagnosis, rather than treating the cap as the only possible source.
DIY Installation Versus Hiring a Pro
A chimney cover can look like a simple weekend project. The hardware may involve only a few fasteners, but the job also involves roof access, precise measurement, draft clearance, weather exposure, and sometimes manufacturer or code requirements.
A short, low-slope roof on a single-story ranch can be a realistic DIY setting for a homeowner who is comfortable working safely at roof level. A steep roof, a chimney above the eaves, or a two-story stack changes the risk quickly. A fall is a more serious concern than the price difference between a stock cap and professional installation.
Four questions to answer first
Roof safety comes before hardware. If you can't establish stable footing and maintain safe access, don't climb to measure or install the cap.
Sizing must be exact. A cap that is too small can leave the flue exposed to rain. A top-mount cover that is too large or poorly configured can interfere with exhaust movement on an active fireplace.
The chimney type matters. Factory-built chimneys have manufacturer-specific components and clearances. A masonry cap shouldn't be substituted for a listed component designed for a prefab system.
The warranty may depend on installation. Before fastening a stainless or copper assembly, read the manufacturer's warranty terms. Some warranties require installation by an approved or listed contractor.
| Factor | DIY Install | Pro Install |
|---|---|---|
| Roof access | Reasonable only on a low, simple roof with safe access | Appropriate for steep, tall, or complex roofs |
| Measurement | Homeowner measures flue and crown dimensions | Installer verifies dimensions and mounting surface |
| Code and clearances | Homeowner must identify applicable requirements | Contractor evaluates venting, screening, and system type |
| Warranty | May be limited by installation terms | Documentation can support manufacturer requirements |
| Leak diagnosis | Usually focuses on the visible cap | Can assess cap, crown, masonry, and flashing together |
For a homeowner deciding whether to hire, the roofing contractor selection guide can help frame questions about licensing, insurance, written estimates, installation documentation, and cleanup. The practical rule is simple: DIY may suit a low-risk single-flue replacement, while a tall masonry chimney or uncertain leak source deserves a professional inspection and installation.
Repair, Replace, or Upgrade a Chimney Cover
Age alone doesn't tell you whether a cover should stay, be repaired, or be replaced. Weather exposure, material quality, fastening, screen condition, and the original fit matter more than a date stamped on an invoice.
Start at ground level, then inspect from a safe roof position or have someone evaluate it from above. A loose clamp, stripped screw, or separated fastener may be a straightforward repair if the metal and mesh remain sound.
Repair makes sense when the structure is sound
A repair is reasonable when the lid is straight, the screen remains intact, and the attachment has loosened without damaging the flue or crown. Replace failed fasteners with compatible hardware, correct the clamp or bracket, and check that the cover still sits evenly over the opening.
A repair won't restore metal that has already perforated. Rust holes in the mesh, corrosion through the lid, or a split seam leave openings for rain, animals, and debris.
Replacement is the answer for damage or poor fit
Bent lids after a storm, torn screening, rust perforations, and missing sections point toward full replacement. So does a cover that was undersized from installation day. If water can enter around the flue during ordinary rain, patching a badly fitted cover usually postpones the same problem.
Material selection affects the next service cycle. Replacing a failed galvanized cap with another low-cost galvanized cap may recreate the corrosion problem. Stainless steel resists wet-weather deterioration, while copper offers a longer-lasting architectural finish and reduces the chance of rust staining below the cover.
Upgrade when the chimney's job changes
An upgrade is appropriate when you add a solid-fuel appliance, change fuel type, or discover that the existing design restricts draft or allows downdraft. A rain cap must preserve flue performance, not just block precipitation.
The European standard EN 16475-7 treats rain caps as tested safety components. Its testing includes a 2.9 kN/m² compressive load, 1.5 kN/m horizontal wind traction, and 0.75 kN/m vertical traction, with no more than a 10% reduction in free area after testing. EN 16475-7 requirements illustrate why a cap should remain stable and open under weather loads instead of deforming into the outlet.
Choosing the Right Chimney Cover for Your Home
Choose the cover by matching chimney use, flue configuration, climate, and mounting surface. A wood-burning or gas flue needs a component with suitable screening, clearance, and outlet area. An unused decorative chimney may call for a ventilated solution or a top-sealing damper paired with a cover, because trapping moisture inside a dormant flue can create a different problem.
Start with the flue, not the catalog photograph. Measure the flue tile, record the overall crown width and length, and identify whether one flue or several share the stack. Standard products may fit a simple opening, while a multi-flue chimney often needs a custom cover that sits on the crown.
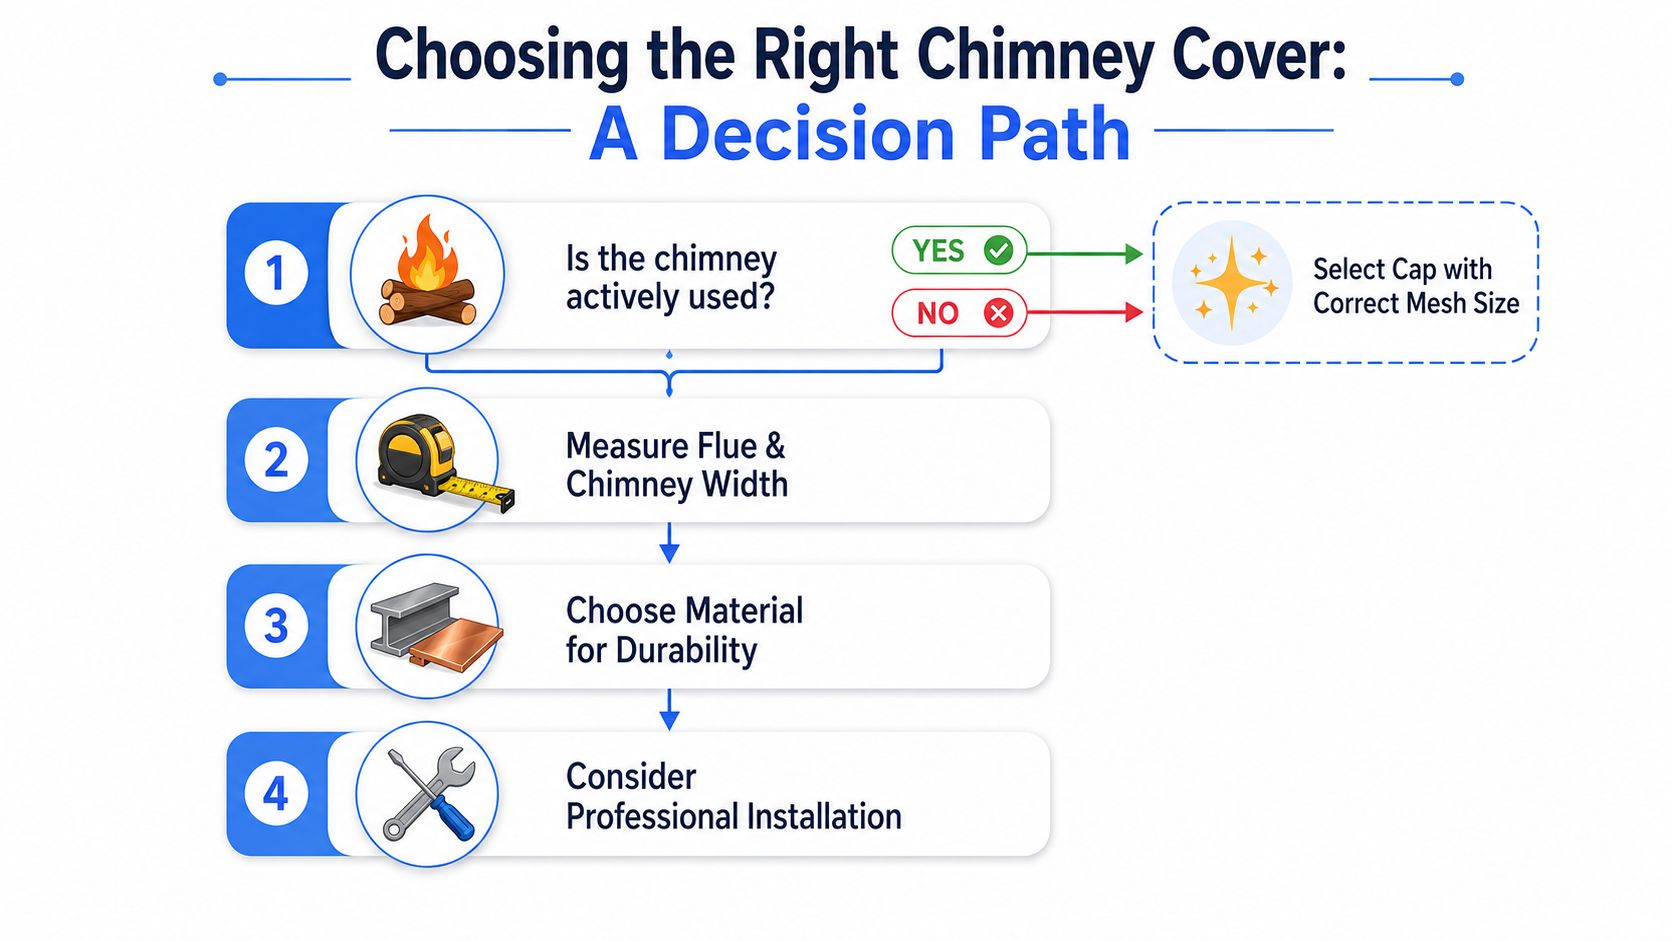
Use this decision path
- Confirm use. Active appliances need a cover compatible with the appliance and flue. Unused chimneys still need weather protection, but may require ventilation.
- Inspect the three zones. Don't cover a cracked crown or failed flashing and expect the leak to disappear.
- Measure before ordering. Record the opening dimensions and mounting area, then verify the required free area.
- Choose the material. Galvanized steel may suit a tight budget. Stainless steel offers stronger corrosion resistance for exposed wet conditions. Copper suits homeowners who want a premium visible finish.
- Match the installation to the roof. A simple low roof may support careful homeowner installation. A steep or tall masonry stack is better evaluated and installed by a professional.
For Columbus-area homeowners, HIBCO ROOF LLC provides roof inspections, chimney flashing work, leak diagnosis, and related exterior repairs, with free written estimates before work is authorized. If rain is already entering near your chimney, visit HIBCO ROOF LLC to request an evaluation of the cap, crown, masonry, and roof junction together.
HIBCO ROOF LLC can inspect the chimney-roof connection, identify whether the cap or another zone is allowing rain inside, and complete related flashing or roofing repairs. Visit HIBCO ROOF LLC to arrange a free, no-pressure estimate for your Columbus-area home.