
You notice it after a hard rain. A brown stain spreads on the ceiling near the fireplace, or a damp patch shows up on the wall beside the chimney chase. Maybe there's a drip inside the firebox and you're already thinking the chimney itself is failing.
That reaction is normal. It's also where a lot of homeowners lose money.
A chimney leak can come from several places, and the chimney often gets blamed for water that entered through the roof system nearby. I've seen homeowners price out masonry work when the underlying issue was metal flashing, a roof valley, or even moisture forming inside the flue instead of rain getting in from outside. Good chimney leak repair starts with slowing down and finding the exact entry point first.
If you treat every chimney stain like a brick problem, you can end up paying for the wrong repair twice. The smarter approach is to think like a diagnostician. Look at where the water appears, what conditions trigger it, and which part of the chimney-to-roof connection is most likely letting it through.
Table of Contents
- That Mysterious Stain Is Your Chimney Crying for Help
- How to Diagnose a Chimney Leak Like a Professional
- The Five Most Common Chimney Leak Causes
- Your Chimney Leak Repair Options Explained
- Estimating Chimney Repair Costs and Timelines
- DIY Repair vs Hiring a Professional Contractor
- Your Columbus Solution for Lasting Chimney Leak Repair
That Mysterious Stain Is Your Chimney Crying for Help
A chimney leak isn't usually found on the roof. Instead, it's discovered indoors, after the damage has already announced itself. A ceiling ring near the fireplace. Peeling paint on the wall beside the chimney. Damp drywall after wind-driven rain.
The first mistake is assuming the stain tells you exactly where the leak started. It doesn't. Water travels. It can slip behind flashing, run along roof decking, follow framing, and show up several feet away from the actual opening.
That's why chimney leak repair needs a calm process, not a fast guess.
The chimney is a system, not just a stack of brick
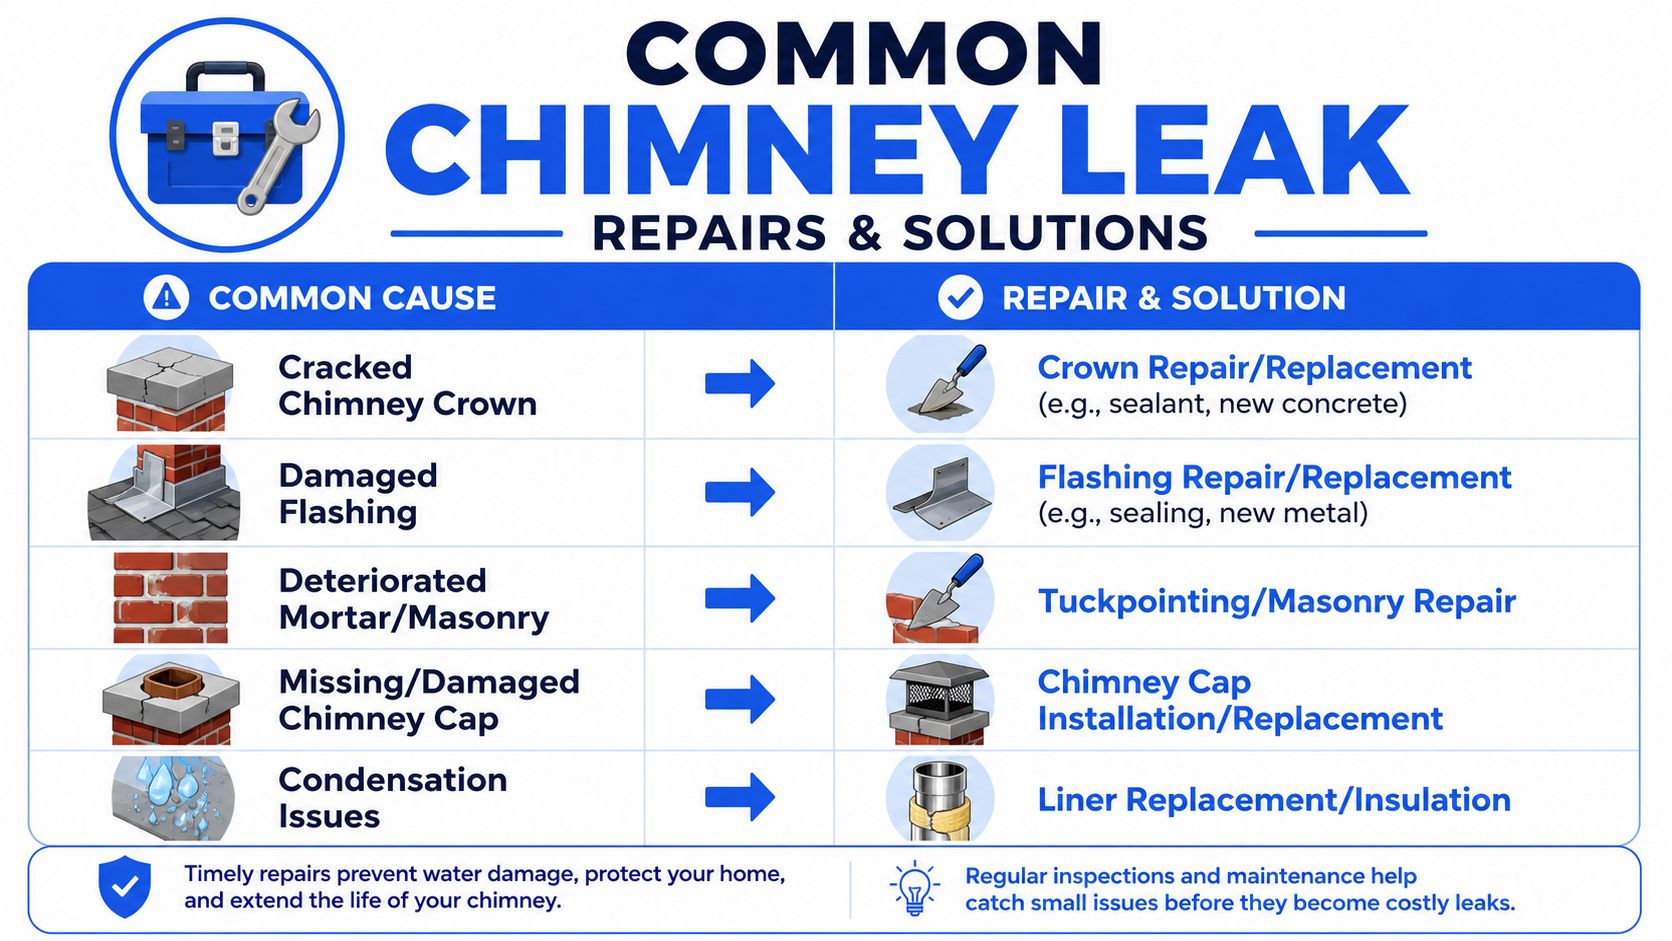
A chimney has several parts working together. The roof shingles shed water downhill. The flashing redirects water where the roof meets the chimney. The crown at the top throws water away from the masonry. The cap helps keep rain out of the flue. The mortar joints hold the brick assembly together.
If one part fails, the symptoms can look similar from inside the house.
Practical rule: A stain near the chimney doesn't automatically mean the bricks are leaking.
A homeowner might see drips in the firebox and think the flue is open to rain. Another might notice staining on an upstairs ceiling and assume the crown is cracked. Both could be wrong. The water may be entering lower, at the side flashing, or even in a roof valley beside the chimney where runoff concentrates.
Panic leads to patchwork
The usual chain of events goes like this:
- Rain appears indoors: You place a bucket, wipe up the floor, and hope it stops.
- A quick patch goes on: Someone smears caulk or roofing cement around visible seams.
- The leak returns: Weeks or months later, the stain grows again because the water path never changed.
Surface patching has its place, but it's rarely the full answer on a chimney. If metal is loose, if the crown sheds water poorly, or if the roof geometry is sending runoff behind the flashing, the leak keeps finding a way in.
Real confidence comes from knowing what's wet, where it started, and why it got there. Once that's clear, the repair usually becomes much more straightforward.
How to Diagnose a Chimney Leak Like a Professional
A good diagnosis follows a sequence. Start where the water shows up. Track upward and outward. Test the parts in a controlled order. Don't begin with a repair proposal. Begin with proof.
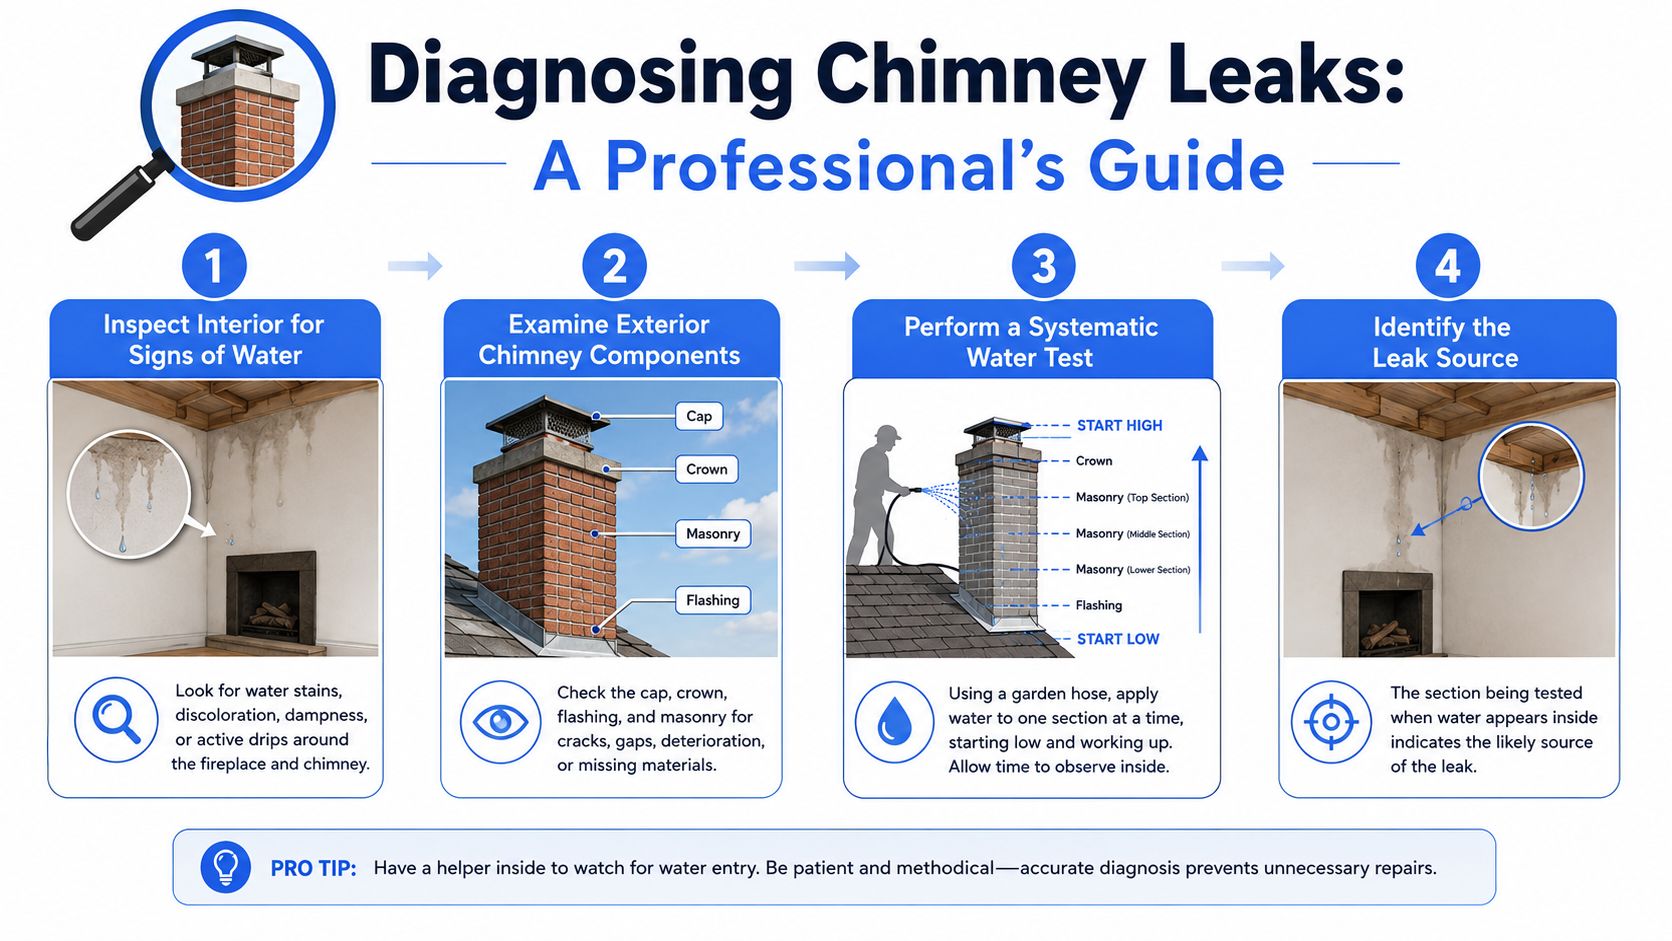
Start inside before you touch the roof
Look in the attic or top-floor area nearest the chimney. You're trying to answer simple questions.
- Where is the first visible moisture? Check decking, rafters, insulation, and the chimney chase.
- When does it happen? Only during rain points one way. Moisture that appears with furnace use can point another way.
- Does the stain sit above, beside, or below the chimney line? That helps narrow whether you're dealing with top-down water entry or a sidewall intersection issue.
If you're seeing classic indoor warning signs and want a broader leak checklist, this guide to signs of a roof leak is useful for separating chimney-area symptoms from general roof failure.
A ground inspection helps, but only to a point. Binoculars can reveal obvious gaps, rusted metal, missing cap sections, or broken mortar. They can't confirm the exact water path.
Use the water test the right way
The most reliable field method is a water test. The process is simple, but the order matters. Most chimney leaks are roof-related and start at the flashing, not the masonry. The best way to isolate the source is to run water at the chimney from the bottom upward while another person watches inside for the first sign of water. Professional inspections for this kind of diagnosis typically cost $160 to $750 according to this chimney diagnosis reference.
Done properly, the test works like this:
- Start low: Wet the base flashing area first.
- Pause and observe: Give water time to show inside.
- Move up gradually: Test side flashing, then counter-flashing, then higher chimney areas.
- Finish at the top: Crown and upper masonry come last.
If you soak the whole chimney at once, you learn almost nothing. Water can enter from several places and you won't know which one failed first.
Start at the lowest likely entry point. Work upward slowly. The first place that produces indoor water is usually the repair target.
Two causes homeowners often miss
Some leaks near chimneys aren't rain leaks in the usual sense.
One is condensation. In homes with gas or oil equipment, moisture can build up inside the chimney when the liner is incorrectly sized for the appliance. That internal moisture then drips and mimics a roof leak. It's a less obvious but equally problematic cause, as explained in this video discussion of chimney condensation leaks.
The other is the adjacent leak. Water can enter in the roof area next to the chimney, especially near a valley, then travel behind materials and appear indoors near the chimney. These leaks are notoriously hard to trace because the chimney gets blamed while the actual failure sits nearby under the roof covering.
When a contractor gives you a chimney diagnosis without tracing the path, testing in sequence, or considering condensation and adjacent roof geometry, that's a red flag. Accurate chimney leak repair starts with narrowing the source, not widening the estimate.
The Five Most Common Chimney Leak Causes
Most chimney-area leaks trace back to a short list of failure points. The trick is knowing what each part is supposed to do, and what its failure looks like from the ground, in the attic, and inside the house.
Why these five show up again and again
1. Damaged flashing
Flashing is the metal transition where the roof surface meets the chimney. It's the first place I suspect when a homeowner reports a leak near a chimney after rain. Flashing fails when seams open, metal rusts, edges lift, or old sealant dries out and cracks.
This is also where bad repairs pile up. A smear of roof cement may slow water for a while, but it doesn't replace properly integrated metal.
2. Cracked chimney crown
The crown is the top surface that sheds water away from the masonry below. When it cracks or holds water, moisture starts working down into the chimney structure. In cold weather, that trapped moisture can make crown damage worse over time.
A crown problem often shows itself as moisture staining on masonry faces or persistent dampness after storms.
3. Deteriorated mortar joints
Mortar is sacrificial. It weathers before the brick does. Once joints erode, water gets deeper into the assembly and can migrate to interior finishes or attic framing.
If the mortar is visibly recessed, sandy, or missing in spots, the chimney likely needs masonry repair rather than another round of sealant.
A lot of “chimney leaks” are really water-management failures at joints and transitions, not dramatic structural collapse.
Chimney leak cause cheat sheet
| Leak Source | Common Symptoms | Typical Repair | Complexity / Cost |
|---|---|---|---|
| Flashing failure | Ceiling stains near chimney, attic moisture at roof intersection, visible loose or rusted metal | Re-caulking minor failed seams or replacing part or all of the flashing assembly | Moderate to high depending on access and whether full re-flashing is needed |
| Cracked crown | Water intrusion after storms, visible top cracks, damp masonry below crown | Crown sealing for minor defects or crown rebuild when shape and surface have failed | Moderate |
| Deteriorated mortar joints | Crumbling joints, loose mortar, moisture in brick faces | Tuckpointing or repointing damaged joints | Moderate to high |
| Missing or damaged chimney cap | Water entering flue, debris or animal intrusion, wet firebox area | Cap installation or replacement | Lower to moderate |
| Flue liner or venting issue | Moisture that seems unrelated to rainfall, drips associated with appliance use | Liner correction or venting adjustment by the appropriate specialist | Moderate to high |
4. Missing or damaged chimney cap
The cap covers the flue opening and helps block direct rain entry, debris, and animals. When it's bent, missing, or poorly fitted, water can get in from above. The symptoms can fool homeowners because the leak appears to come “through the chimney” rather than at the roofline.
5. Damaged flue liner or condensation-related venting problem
Many roof-only inspections often fall short. A liner issue can create interior moisture that looks like an exterior leak. That's especially important when the problem appears during heating use, not just during rain.
Water management around the roof still matters too. Overflowing gutters can dump extra runoff into already vulnerable roof intersections, which is why routine exterior upkeep, including residential gutter cleaning, can help reduce the water load around chimney areas.
Your Chimney Leak Repair Options Explained
Once the leak source is nailed down, the repair options become easier to understand. Homeowners usually hear terms like “re-flashing,” “tuckpointing,” or “crown work” and aren't sure what they're paying for. Here's what those jobs mean in plain language.
What the repair terms actually mean
Re-caulking flashing seams is the lightest repair. It applies when the metal is still sound and the failure is limited to sealant at exposed joints. This can buy time, but it's not the answer for rusted, loose, or poorly integrated flashing.
Step flashing replacement means removing roofing materials as needed and replacing the metal pieces woven with the shingles along the chimney sides. Full re-flashing goes further. It addresses the complete metal transition around all sides of the chimney, including the pieces that direct water away at the uphill and downhill sides.
For flashing to work properly, the sheet metal should be at least 0.55 mm thick, have a minimum 10 cm overlap under the roof covering, and extend at least 15 cm up the chimney face, according to these masonry and flashing standards.
Tuckpointing or repointing is masonry joint repair. The damaged mortar gets removed from the joints and replaced with fresh mortar so water can't keep entering through open gaps. This fixes the joint, not the brick face itself.
What quality work looks like
Crown sealing works only for minor defects on an otherwise well-formed crown. The right product matters. Flexible crown sealers made for masonry move with temperature changes better than generic concrete sealants or silicone patches.
A crown rebuild is different. That means the top surface has failed enough that it needs to be re-formed so it sheds water. A proper crown repair needs a slope of at least 1/4 inch per foot and a drip edge so runoff doesn't wash straight down the brick faces, as detailed in this chimney crown repair guidance.
Other repairs are more targeted:
- Cap replacement: Best when rain is entering from the flue opening or the old cap is damaged.
- Cricket installation: Used when roof geometry behind a wider chimney traps or concentrates water.
- Liner correction: Needed when internal condensation is the source of the “leak.”
If a homeowner in Columbus wants a roof-focused evaluation of flashing and surrounding roof integration, HIBCO ROOF LLC is one local option that handles inspections and chimney flashing service as part of its residential repair work.
Estimating Chimney Repair Costs and Timelines
Costs vary because chimney leaks vary. A simple failed sealant joint is one thing. Rot, masonry deterioration, and a full rebuild are something else entirely.
What the numbers usually look like
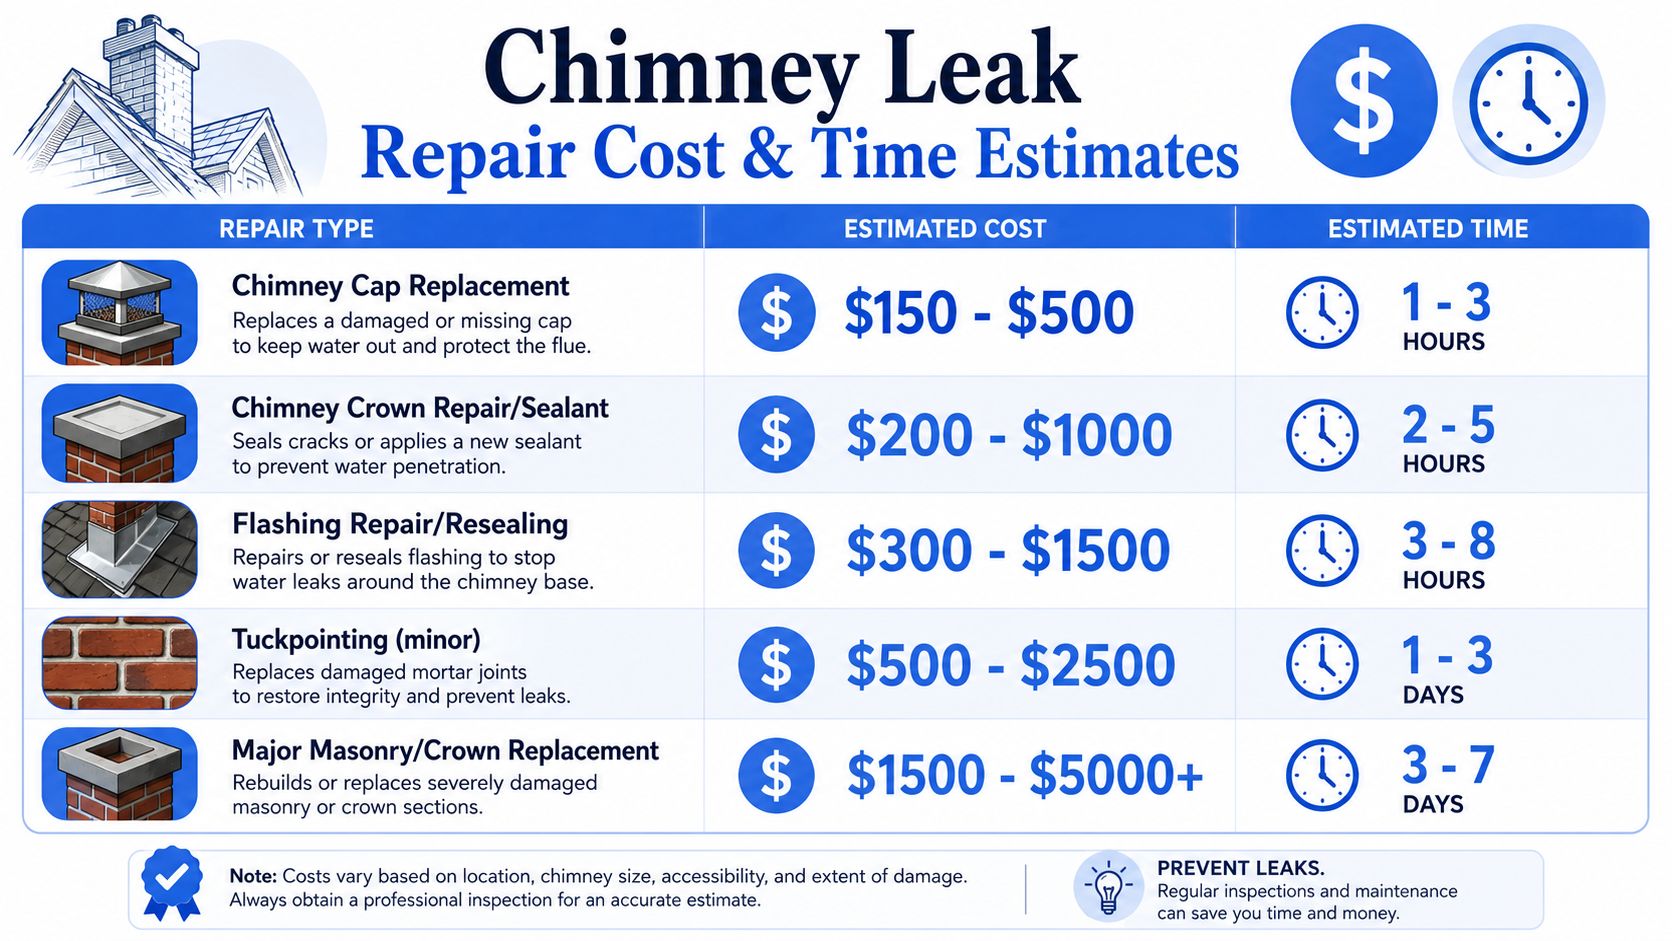
The average homeowner pays about $455 for chimney repair, with a typical range of $160 to $750, based on HomeAdvisor chimney repair cost data. For leak-specific work, the range broadens fast depending on the actual source.
Here are the figures that matter most:
- Troubleshooting and minor leak repair: $200 to $800
- Total leak-related costs can span: $100 to $2,000
- Re-caulking flashing seams: $200 to $500
- Replacing step flashing on one side: $400 to $900
- Full re-flashing on all four sides: $800 to $2,000
- Adding a cricket: $600 to $1,500
- Masonry crown rebuild: $400 to $1,200
- Full chimney rebuild: $3,000 to $15,000+
If you're comparing repair proposals against broader roof work, this guide to roof leak repair cost helps put chimney-area pricing in context.
Why one leak gets a small invoice and another gets a large one
A few variables push chimney leak repair costs up or down:
- Roof access: Steep roofs and awkward chimney locations increase labor difficulty.
- Diagnostic difficulty: Hard-to-trace leaks take longer to isolate before repair begins.
- Water damage extent: Wet decking, damaged underlayment, or interior repairs expand the scope.
- Repair type: Sealant work is quick. Full metal replacement and masonry restoration are not.
As for timelines, it's best to think qualitatively unless your contractor has seen the exact condition in person. Minor flashing or sealant repairs may be handled quickly. Full re-flashing, cricket work, or masonry restoration takes longer, especially when weather or material cure times affect scheduling.
DIY Repair vs Hiring a Professional Contractor
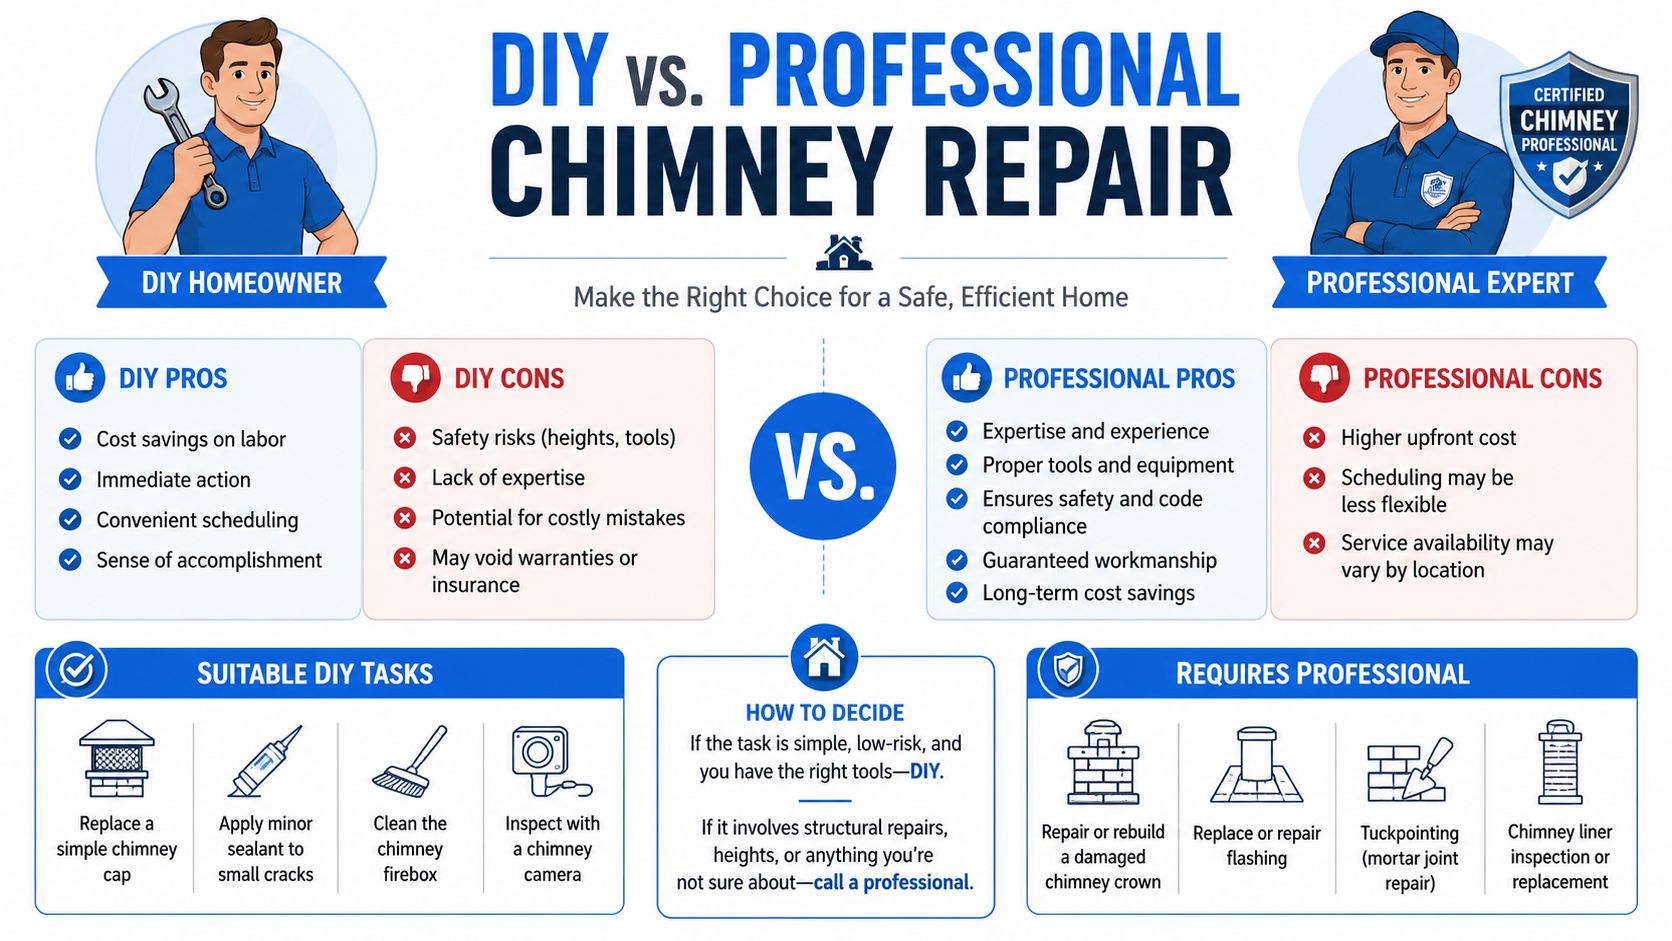
Chimney leaks are where confident DIY homeowners often get humbled. Not because they aren't handy, but because water at roof intersections doesn't behave in straight lines.
What a homeowner can safely do
A homeowner can often handle observation and basic prevention:
- Ground inspection: Use binoculars to look for obvious cap damage, missing mortar, or displaced metal.
- Interior documentation: Photograph stains, note when they appear, and track whether rain or appliance use triggers them.
- Simple roof housekeeping: Keep runoff paths clear and watch for debris buildup around roof transitions.
The DIY line gets very narrow once the leak involves the chimney-to-roof junction. DIY repair is considered viable only for a single, visible damaged shingle on a low-slope roof. Any leak involving flashing, valleys, chimneys, or steep roof areas should be handled by a professional because water follows more complex paths at those intersections, as explained in this asphalt shingle leak repair guidance.
When the ladder should stay in the garage
Professional help is the right choice when any of these apply:
- Flashing is involved: Metal integration has to work with shingles, underlayment, and masonry together.
- The leak is hard to trace: Adjacent valley leaks and concealed water travel can fool even experienced people.
- Masonry is failing: Tuckpointing, crown rebuilding, and liner issues require specialized repair methods.
- You may need documentation: For storm-related damage, photos, written findings, and repair scope matter.
The expensive mistake isn't always the leak itself. Sometimes it's the wrong repair done first.
If you're hiring out the work, this guide on how to choose a roofing contractor is worth reading before you sign an estimate. It helps you ask better questions about diagnosis, scope, and workmanship details.
Your Columbus Solution for Lasting Chimney Leak Repair
The best chimney leak repair doesn't start with a tube of sealant. It starts with a correct diagnosis. Check the flashing. Check the crown. Check the mortar. Then consider the less obvious possibilities, including nearby roof geometry and internal condensation.
A simple yearly routine prevents a lot of headaches:
- Inspect after major storms: Look for new staining indoors and visible exterior displacement.
- Watch runoff patterns: Heavy water flow near the chimney can expose weak transitions.
- Schedule routine inspection: Small crown cracks and failing sealant are easier to fix early.
- Maintain the whole drainage system: Roof edges, gutters, and ground drainage all affect how much water collects near vulnerable areas.
That last point matters more than many homeowners realize. Water problems often overlap. If runoff is also collecting around the house, this guide to making French drain decisions for your property is a practical read for thinking through drainage at the lot level, not just at the roof.
For homeowners in Columbus and central Ohio, a licensed and insured local roofer who understands chimney flashing, adjacent roof leaks, and targeted repair work can save a lot of wasted motion.
If you've got staining near a fireplace, drips in the firebox, or a leak that keeps coming back, HIBCO ROOF LLC offers free, no-pressure inspections and written estimates for Columbus-area homeowners. A focused inspection can identify whether the problem is flashing, crown failure, nearby roof integration, or another source, so you can fix the cause instead of guessing at the symptom.