

A small brown mark on the bedroom ceiling looks like a minor cosmetic problem until it spreads across the paint. Water rarely appears directly below the place it entered. It can run along rafters, soak insulation, travel across roof decking, and slide down a wall cavity before it reaches the ceiling.
That's why a stain deserves more than a coat of paint. This guide follows water's path from the roof and attic down through ceilings, walls, gutters, and the basement. Each sign includes the likely cause, a practical check you can make safely, and the point where a licensed professional should take over. If the source isn't obvious, you can also browse water leak services for broader leak-detection guidance.
Table of Contents
- 1. Roof Covering and Structural Wood Damage
- 2. Wet or Damp Attic Insulation and Wood Framing
- 3. Interior Ceiling Stains and Discoloration
- 4. Sagging, Soft, or Warped Drywall and Ceilings
- 5. Peeling Paint and Bubbling Wallpaper
- 6. Mold and Mildew Growth on Surfaces and in Cavities
- 7. Gutter Overflow, Pooling Water, and Debris Accumulation
- 8. Efflorescence and White Mineral Deposits on Basement or Foundation Walls
- 8-Point Comparison of Water Damage Signs
- Turn What You Find Into a Clear Repair Plan
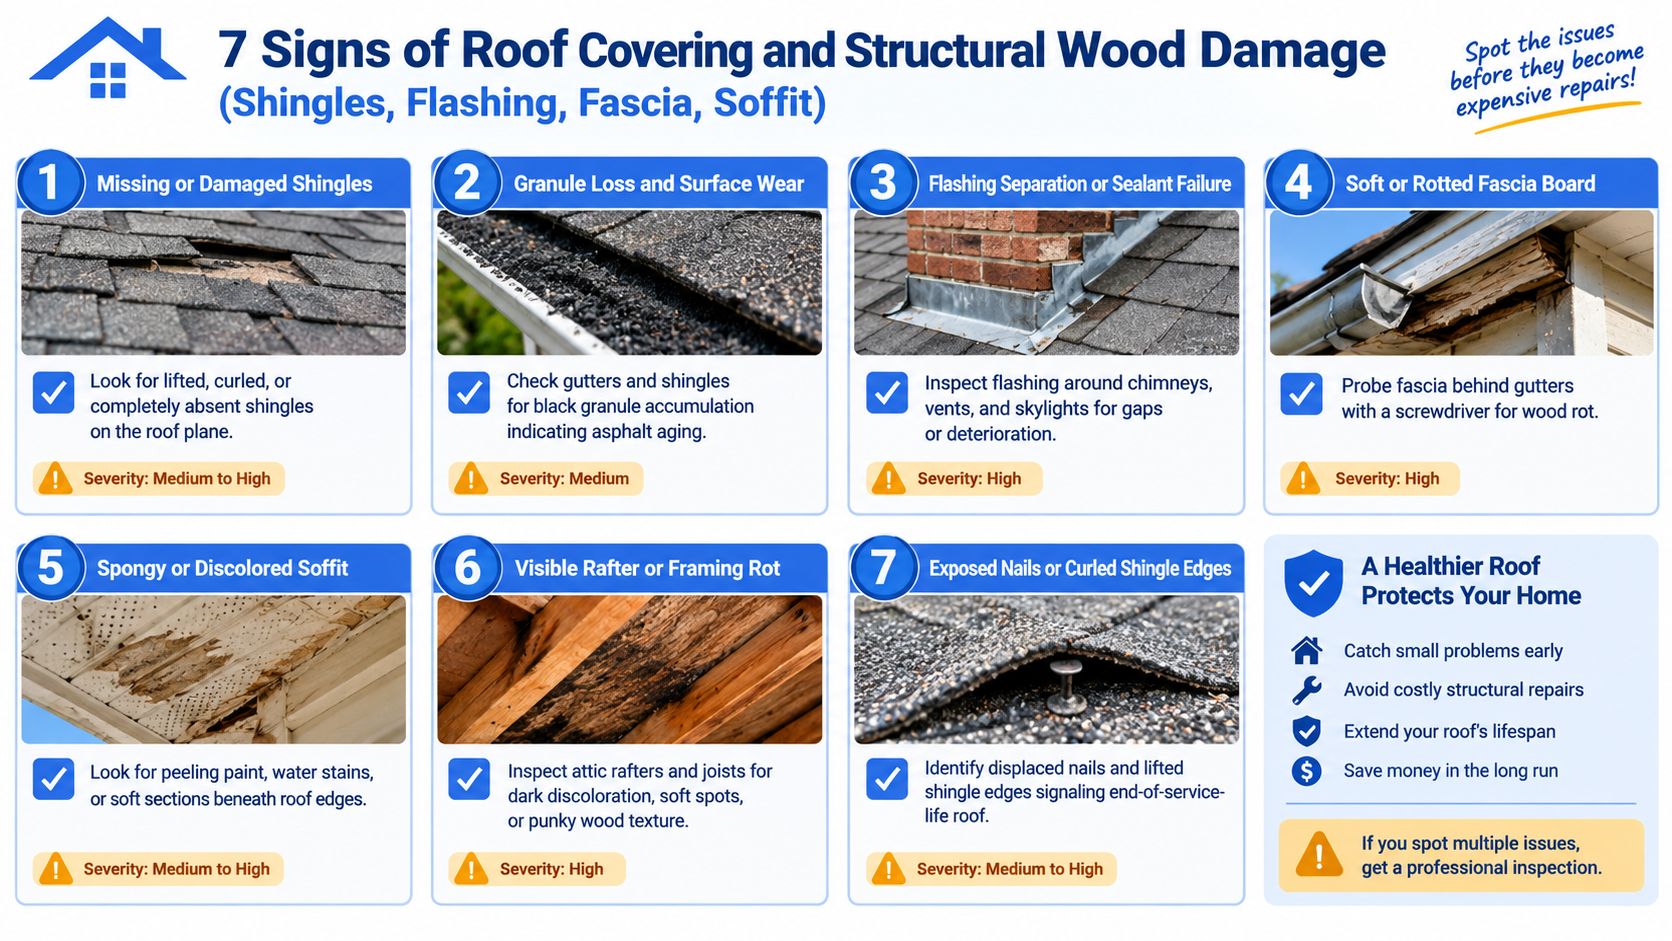
1. Roof Covering and Structural Wood Damage
Start outside, because the roof is the first line of defense. Missing shingles, lifted edges, cracked seal strips, separated flashing, and exposed fasteners indicate that water may be entering the roof system. A single shingle lifted during a windstorm can allow intrusion during the next rain, while hail dimples across several shingles can weaken the roof covering over a wider area.
Look closely at roof edges from the ground with binoculars. Check the fascia behind the gutters and the soffit below the eaves. Dark, soft, or spongy wood means the problem has continued beyond the roof covering. A screwdriver or awl should meet firm resistance in sound wood. If it sinks easily, rot may have spread behind the visible paint failure.
Practical rule: A small roof defect can produce a much larger hidden wet area. Photograph the roof, flashing, fascia, and soffit from several dated angles, but don't climb onto the roof to investigate.
Curled ridge-cap shingles may let water flow under their lifted edges and saturate attic framing. Separated flashing around a skylight can send water into a cavity instead of over the shingles. A gable-end section with lifted shingles and exposed nails needs prompt inspection, because the vulnerable area may be larger than the missing pieces suggest.
Don't attempt roof or flashing repairs without the right training and fall protection. Improper sealing can create another leak. A qualified roofer should remove deteriorated wood back to sound material, replace it with treated lumber or a moisture-resistant composite where appropriate, and correct the water source before closing the repair. For more detail on one common repair area, see this guide to fascia board replacement.
2. Wet or Damp Attic Insulation and Wood Framing
A damp attic often reveals the leak before the room below does. Insulation near the ridge may feel cold, compressed, or wet. Roof decking may show dark tracks, while rafters can develop soft spots around joints or fasteners. These patterns help separate a roof leak from general attic condensation.
For example, wet insulation under a bathroom exhaust vent, combined with frost or damp wood, points toward a vent that terminates in the attic rather than outdoors. Damp insulation in one rafter bay, with matching staining on the decking, points more strongly to an active roof penetration. Daylight visible through the roof is another clear reason to arrange a professional inspection.
Check moisture and ventilation together
A moisture meter can help compare the suspicious area with a dry control area nearby. The meter setting matters, and readings should be recorded by material because manufacturers use different scales. A reading that remains high after drying, or rises after rainfall, supports ongoing intrusion.
Inspect ridge vents and soffit vents from a safe position. Blocked ventilation can trap warm, humid air, while poor air sealing allows interior air to enter the attic and condense on cold surfaces. Don't treat wet insulation as a harmless inconvenience. It loses performance when compressed or saturated and can support mold growth.
Water-damaged insulation shouldn't be covered up before the leak and the drying process are complete.
Mark wet sections with tape so they can be found during removal. After the roof source is repaired, the attic needs to dry fully before replacement insulation is installed. If the moisture pattern involves roof decking, framing, or concealed cavities, use a professional inspection rather than relying only on touch. A detailed explanation of attic moisture control can help you understand the role of ventilation and air sealing.
3. Interior Ceiling Stains and Discoloration
Brown, yellow, or dark ceiling patches are among the most familiar signs of water damage. They form when water passes through the roof deck, insulation, and drywall before reaching the painted surface. The stain may appear below a failed flashing detail, a damaged shingle, a skylight, a plumbing penetration, or a roof valley.
Timing matters. A stain that appears after heavy rain and expands over the next day or two deserves an active-leak investigation. A ring-shaped mark near a roof penetration often points toward flashing failure. Multiple stains in one room may indicate a broader roof-system problem rather than several unrelated defects.
Track the stain before you repaint
Photograph the mark as soon as you notice it. Include a nearby wall, light fixture, or doorway so the location is easy to identify. Record the date, approximate size, weather conditions, and whether the mark darkens after rain.
You can safely inspect the attic area above the stain during daylight if the floor is accessible and you can avoid stepping between joists. Look for wet insulation, dark roof decking, rusted fasteners, or water tracks. The entry point may still be several feet away because water follows framing and sheathing.
Don't repaint a ceiling while the source is unresolved. Fresh paint can hide the evidence briefly, but it won't stop moisture from reaching the drywall. A professional should trace the roof assembly, assess whether the damage is localized, and determine whether the repair involves shingles, flashing, a pipe boot, a skylight, or a larger section of roofing. This overview of what causes roof leaks covers common entry points and failure patterns.
4. Sagging, Soft, or Warped Drywall and Ceilings
A ceiling that bows into a bowl or wave has absorbed enough water to weaken the gypsum core and paper facing. Soft drywall that gives under light pressure is also a warning sign. Cracked paint, separated joints, and a ceiling pulling away from fasteners show that the damage has moved beyond surface staining.
The likely source depends on the location. A sag centered near a bathroom vent may come from a roof penetration or attic condensation. A garage ceiling sagging along the roof edge may reflect gutter overflow or an edge leak. A bedroom ceiling that has slowly worsened through winter may involve recurring condensation, an ice-dam-related intrusion, or a roof defect that activates during specific weather.
Know when the room is unsafe
Don't press repeatedly on a sagging area. Water-damaged drywall can continue to weaken with additional saturation. If the bow is severe, furniture and occupants should stay out of the room until a professional assesses the ceiling. Don't cut into the ceiling near electrical fixtures unless power has been safely isolated and you know what lies above it.
A moisture meter can help identify the depth and spread of saturation, but it won't replace a structural inspection. The area above the drywall should be checked for wet insulation, rotted decking, damaged rafters, and mold. Replacing only the visible ceiling leaves the source and surrounding materials untreated.
Use moisture-resistant drywall in higher-risk locations, such as bathrooms or areas near roof penetrations, when the repair design calls for it. The more important step is repairing the roof, vent, plumbing, or drainage source before the new drywall goes in. Otherwise, the same sag may return after the finish has been restored.
5. Peeling Paint and Bubbling Wallpaper
Paint blisters and wallpaper bubbles form when moisture collects behind the finish. The water or vapor pushes the coating away from drywall, plaster, wood, or masonry. You may see this on an exterior wall beneath a roof leak, at an upper bedroom corner, along a soffit, or on a bathroom ceiling with poor exhaust ventilation.
A north-facing wall with peeling paint and a roof defect above it suggests water migration through the exterior assembly. Wallpaper lifting in an upper corner can point to attic moisture or condensation near a roof vent. Paint bubbling near a bathroom ceiling may reflect humidity that isn't being exhausted outdoors. Peeling along the soffit can follow gutter overflow or an ice dam.
Find the moisture behind the finish
Don't scrape, prime, and repaint as the first response. Use a moisture meter on the wall substrate and compare the reading with an unaffected nearby area. Inspect the attic and roof side for daylight, wet insulation, water tracks, or damaged flashing. Outside, check gutters for blockage, overflow, and poor pitch.
Bathroom and kitchen exhaust fans should discharge outdoors, not into the attic. Ridge and soffit vents should remain unobstructed. These checks help distinguish a roof leak from indoor humidity, but they don't prove the wall is dry.
A new finish is the last step, not the leak repair.
Once the source has been corrected, allow the substrate to dry completely before refinishing. Depending on the material and the extent of saturation, drying may take weeks. If bubbling returns after repainting, treat that recurrence as evidence of unresolved moisture rather than a paint failure.
6. Mold and Mildew Growth on Surfaces and in Cavities
Visible mold is a concrete sign that a surface has stayed wet or damp. It may appear black, green, or white on roof decking, attic framing, insulation, drywall, window trim, or basement walls. A concentrated patch near a roof penetration often follows a leak. Growth near a gable vent may point to ventilation or condensation problems.
A musty odor matters even when you can't see mold. The smell may come from a wall cavity, damp insulation, the underside of flooring, or another concealed area. Mold grows where moisture is present, so cleaning the visible patch without correcting the water source usually treats the symptom, not the cause.
Separate surface cleanup from hidden contamination
A small surface area on a nonporous material may be manageable with appropriate precautions, but extensive growth, porous materials, and concealed cavities call for qualified remediation. Don't disturb moldy insulation or run an HVAC system that could distribute particles through the home. Photograph the growth and its surrounding damage before cleanup begins.
EPA guidance recommends drying wet or damp materials within 24–48 hours when possible, and keeping indoor relative humidity below 60%, ideally between 30% and 50%. See the EPA guidance on mold, moisture, and your home for those moisture-control targets and the relationship between wet surfaces and mold growth.
The CDC notes that damp or moldy environments may cause stuffy noses, sore throats, coughing, wheezing, burning eyes, or skin rashes. People with asthma, allergies, weakened immune systems, or chronic lung disease may face greater risks. If occupants develop symptoms around a suspected damp area, arrange the building evaluation promptly and seek medical advice when needed.
7. Gutter Overflow, Pooling Water, and Debris Accumulation
Gutters should move roof water into downspouts and away from the house. During rain, water cascading over the front edge means the system can't handle the flow. A sagging gutter can hold water in the middle, while leaves and roof debris can block the outlet and force water behind the gutter onto the fascia.
Look for vertical water stains or mold on siding below the gutter. A soft fascia board beneath the gutter indicates repeated wetting. If a downspout releases water close to the foundation, the basement or crawlspace may show the consequences later, especially after heavy rain.
Check the drainage path from roof to soil
Inspect gutters from a ladder only if you can do so safely and maintain stable footing. Otherwise, use ground-level observation or hire a professional. During rainfall, watch whether water enters the downspout or spills over the edge. A downspout that discharges only a short distance from the foundation can leave water pooled against the basement wall.
Gutters need periodic cleaning, particularly where mature trees drop leaves. Leaf guards can reduce debris entry, but they don't eliminate the need to inspect the system. Check seams, outlets, hangers, and the fascia behind the gutter. After repairs, monitor the basement or crawlspace during later storms to see whether seepage changes.
Don't focus only on the gutter itself. Correct the roof-edge defect, repair damaged fascia, clear the downspout, and confirm that water has a safe discharge route. For larger properties or complex grading, review drainage systems for luxury homes as an example of how drainage planning extends beyond the gutter trough.
8. Efflorescence and White Mineral Deposits on Basement or Foundation Walls
White powder on a basement wall is the end of the water path, not the start. Efflorescence forms when moisture moves through concrete, brick, or block, carries dissolved minerals, and dries on the interior face. The deposit itself is usually not the failure. It is the signal that water has already crossed the wall.
Read the pattern before you clean it. A horizontal band that shows up after rain often points to wet soil and surface runoff pressing against that section of foundation. Vertical streaks, especially in a corner, usually mean water is following a crack, joint, or the wall-to-footing connection. If you brush it off and it keeps coming back, the moisture source is still active. That can mean poor exterior drainage, hydrostatic pressure, or a foundation detail that needs repair by a licensed pro.
Trace the moisture before cleaning
Start with photos. Then use a dry brush to remove loose material. Avoid pressure washing. It can scar masonry and drive more water into the wall. Do not cover the area with plastic or another non-breathable barrier. Trapped moisture will often show up somewhere else.
This is a good homeowner check. Walk the outside wall line after rain. Look for soil that settles toward the house, mulch piled against siding, or downspouts dropping water near the foundation. Use a level and tape measure to verify the slope and discharge distance before you change grading or move an outlet.
If the deposits return often, cleaning is not the repair. The next step may be exterior drainage work, interior drainage, crack repair, or waterproofing a basement in Boston when seepage is consistent. A breathable masonry sealer only makes sense after the water source is corrected and the wall has dried.
8-Point Comparison of Water Damage Signs
| Issue | Implementation Complexity 🔄 | Resource Requirements ⚡ | Expected Outcomes ⭐ / 📊 | Ideal Use Cases 📊 | Key Advantages 💡 |
|---|---|---|---|---|---|
| Roof Covering & Structural Wood Damage (Shingles, Flashing, Fascia, Soffit) | High, roof access, carpentry, possible structural repair | Moderate–High, roofing materials, treated lumber, licensed roofer; cost ranges $800–$15,000+ | High effectiveness when fully repaired/replaced; stops leaks and prevents further rot | Visible shingle/flashing failures, soft fascia/soffit, storm/hail damage | Visible, documentable for claims; repair prevents attic/structural failure |
| Wet or Damp Attic Insulation & Wood Framing | Moderate, attic access, moisture testing, possible decking repair | Moderate, moisture meter, insulation replacement, ventilation work | Restores thermal performance and reduces mold risk if dried and repaired | Damp insulation, condensation signs, localized attic leaks | Direct attic access aids source identification; early intervention limits damage |
| Interior Ceiling Stains & Discoloration | Low–Moderate, cosmetic work vs. leak diagnosis | Low–Moderate, repainting or ceiling repair plus roof/flashings as needed | Cosmetic restoration quick but will recur if source not fixed; indicates vertical leak path | Homeowner-visible stains, early leak evidence | Easy to detect and document; prompts inspection before major damage |
| Sagging, Soft, or Warped Drywall & Ceilings | High, structural concern; removal, temporary support, replacement | High, demolition, structural repair, new drywall, possible insulation/framing work | Restores safety and appearance; prevents collapse when corrected | Visible sagging/soft ceilings or rapidly worsening stains | Clear urgency for insurance/repairs; demonstrates significant water exposure |
| Peeling Paint & Bubbling Wallpaper | Low, diagnostic to confirm moisture source, then finish repairs | Low–Moderate, surface prep, repainting, possible ventilation fixes | Fast cosmetic improvement; underlying moisture must be resolved to prevent recurrence | Early-stage moisture migration on walls/ceilings | Early warning sign; low-cost fix if source addressed |
| Mold & Mildew Growth on Surfaces & in Cavities | High, containment, remediation protocols, possible material removal | High, licensed remediation, disposal, replacement materials, health precautions | Eliminates contamination and health risk if source moisture removed and remediation complete | Visible mold, musty odors, health complaints | Conclusive indicator of active moisture; guides comprehensive remediation and supports claims |
| Gutter Overflow, Pooling Water & Debris Accumulation | Low–Moderate, cleaning to re-pitching or replacement | Low–Moderate, cleaning, leaf guards, re-hanging or new gutters, downspout extensions | High impact on surface/foundation protection when fixed | Overflow during rain, sagging gutters, staining below eaves | Non-invasive fixes often prevent costly foundation/fascia damage |
| Efflorescence & White Mineral Deposits on Foundation Walls | Moderate, diagnostic grading and drainage assessment | Moderate–High, grading, gutter/downspout improvements, possible interior/exterior drains | Indicates and helps prevent ongoing foundation seepage when addressed | White powdery deposits, recurring damp spots on basement walls | Early, visible indicator of masonry water intrusion; directs targeted drainage solutions |
Turn What You Find Into a Clear Repair Plan
Treat the location, timing, and progression of each sign as evidence. A ceiling stain that darkens after rain points in a different direction than peeling paint beside a bathroom with poor ventilation. Wet insulation beneath one roof bay suggests a different investigation from efflorescence along a basement wall. The visible mark is only the starting point.
Photograph each sign with its date and exact location. Include wide shots and close-ups. Check the attic and exterior on the same day you spot a new stain, if conditions are safe. Compare suspicious areas with unaffected control areas, and keep written notes about weather, odors, moisture readings, and any change after drying.
Preserve evidence before cleanup
After storm-driven intrusion or flooding, document interior and exterior damage before discarding materials. FEMA recommends photographs and video, including closets and cabinets, appliance serial numbers, samples of damaged carpet or wallpaper, and receipts for repairs or replacement purchases. Consult your insurer before signing a cleaning, remediation, or maintenance agreement.
Coverage depends on the cause and the policy. The National Flood Insurance Program states that standard flood policies don't cover mold damage, and policyholders must take reasonable steps to limit mold growth. That makes documentation important, but safety comes first. If water has reached electrical components, the ceiling is severely sagging, or floodwater may be contaminated, leave the area and arrange a professional assessment.
Decide what you can verify
You can photograph stains, observe gutter overflow from the ground, record odor and timing, compare visible moisture, and check whether a downspout is discharging properly. You shouldn't climb a damaged roof, probe an unstable ceiling, disturb extensive mold, or assume a dry surface means a dry wall cavity.
EPA guidance identifies moisture meters as useful for drywall, wood, brick, concrete, and carpet, but meter readings must match the material and the instrument's scale. A professional can map readings, inspect concealed areas, trace the source above a stain, and determine whether damaged drywall, insulation, decking, fascia, or framing needs removal.
Collect written estimates before authorizing work. Ask each contractor to identify the source, the affected materials, the proposed repair, and the steps that will prevent recurrence. If roof, flashing, gutters, or siding show damage, HIBCO ROOF LLC is a licensed and insured contractor serving Columbus and central Ohio. The company offers free inspections and estimates, roof leak diagnosis, repairs, full roof replacements, storm and hail documentation, skylight and gutter work, and support with insurance claim documentation.
HIBCO ROOF LLC can inspect roof systems, trace water-intrusion signs, repair damaged shingles and flashing, and address related gutters, siding, windows, and skylights. If you've found a ceiling stain, wet insulation, bubbling paint, or storm damage in Columbus or central Ohio, visit HIBCO ROOF LLC to request a free inspection and written estimate.