You usually notice fascia problems the same way most Columbus homeowners do. A gutter starts pulling away. Paint along the roof edge bubbles. You see a dark stain on the trim and hope it's just cosmetic. Then the next hard rain hits, and you realize the roof edge is telling you something more serious.
Fascia board replacement looks simple from the ground. It isn't. The visible board matters, but the expensive mistakes usually happen behind it. Two problems get missed over and over: rotted sub-fascia behind the face board and bad fascia-to-soffit alignment that interferes with roof-edge ventilation. If you understand those two issues, you'll ask better questions and avoid a patch job that fails early.
Table of Contents
- How to Spot a Failing Fascia Board
- DIY Fascia Repair vs Professional Replacement
- The Professional Replacement Process Done Right
- Budgeting for Fascia Board Replacement in Columbus
- Choosing Your Columbus Fascia Replacement Contractor
- Protecting Your Home's Exterior for the Long Term
How to Spot a Failing Fascia Board
Start from the ground
Most fascia inspections should begin with a slow walk around the house. Stand back far enough to see the full roof edge, then look for small inconsistencies instead of one dramatic failure.
Use this checklist:
- Peeling or blistered paint often means moisture has been sitting in or behind the board.
- Dark streaks or water stains suggest repeated overflow or water getting behind the gutter.
- Cracks, splits, or open joints let water in fast, especially through end grain and seams.
- Wavy or uneven fascia lines can point to wood movement, poor fastening, or hidden decay.
- Insect activity near the roof edge can mean damp wood is already present.
If your fascia is wood, press carefully on suspicious areas only when you can do it safely from a stable ladder. A screwdriver or awl can tell you a lot. Sound wood resists pressure. Rotten wood feels soft, spongy, or breaks apart.
Practical rule: If you can push into the board easily, the paint wasn't the problem. Moisture was.
What the gutter is telling you
A failing gutter often points back to failing fascia. If a section sags, twists, or looks like it's pulling away from the house, don't assume the hanger hardware is the only issue. Gutters need solid backing. When the board behind them softens, the fasteners lose their grip.
Watch for these clues:
- Sagging gutters that dip in one section
- Overflow marks on siding below the gutter
- Gutter spikes or screws pulling loose
- Water running behind the gutter instead of into it
Good maintenance helps you catch these signs earlier. If you want a practical primer on protecting your home with proper gutter care, that resource does a good job connecting overflow problems to broader exterior damage.
The hidden problem behind the board
Here's the part many homeowners never hear until the fascia is off. Sometimes the visible board is only the cover layer. The framing behind it, often called the sub-fascia or the rafter foot area, may already be rotted.
That matters because replacing only the face board can leave underlying damage in place. The new fascia may look straight for a while, but it's still attached to weakened wood.
According to this fascia repair and installation guide, 30% of fascia failures are caused by unresolved sub-fascia rot that surface-only replacement ignores, which can lead to gutter detachment and even roof edge collapse.
Ask yourself three questions during an inspection:
- Is the gutter sagging in the same place where the fascia looks stained?
- Does the wood feel soft near the rafter ends or fastener locations?
- Has this area been repaired before but failed again?
If the answer is yes to any of those, don't think in terms of trim alone. Think in terms of roof-edge structure. That mindset is what separates a cosmetic patch from a real fascia board replacement.
DIY Fascia Repair vs Professional Replacement
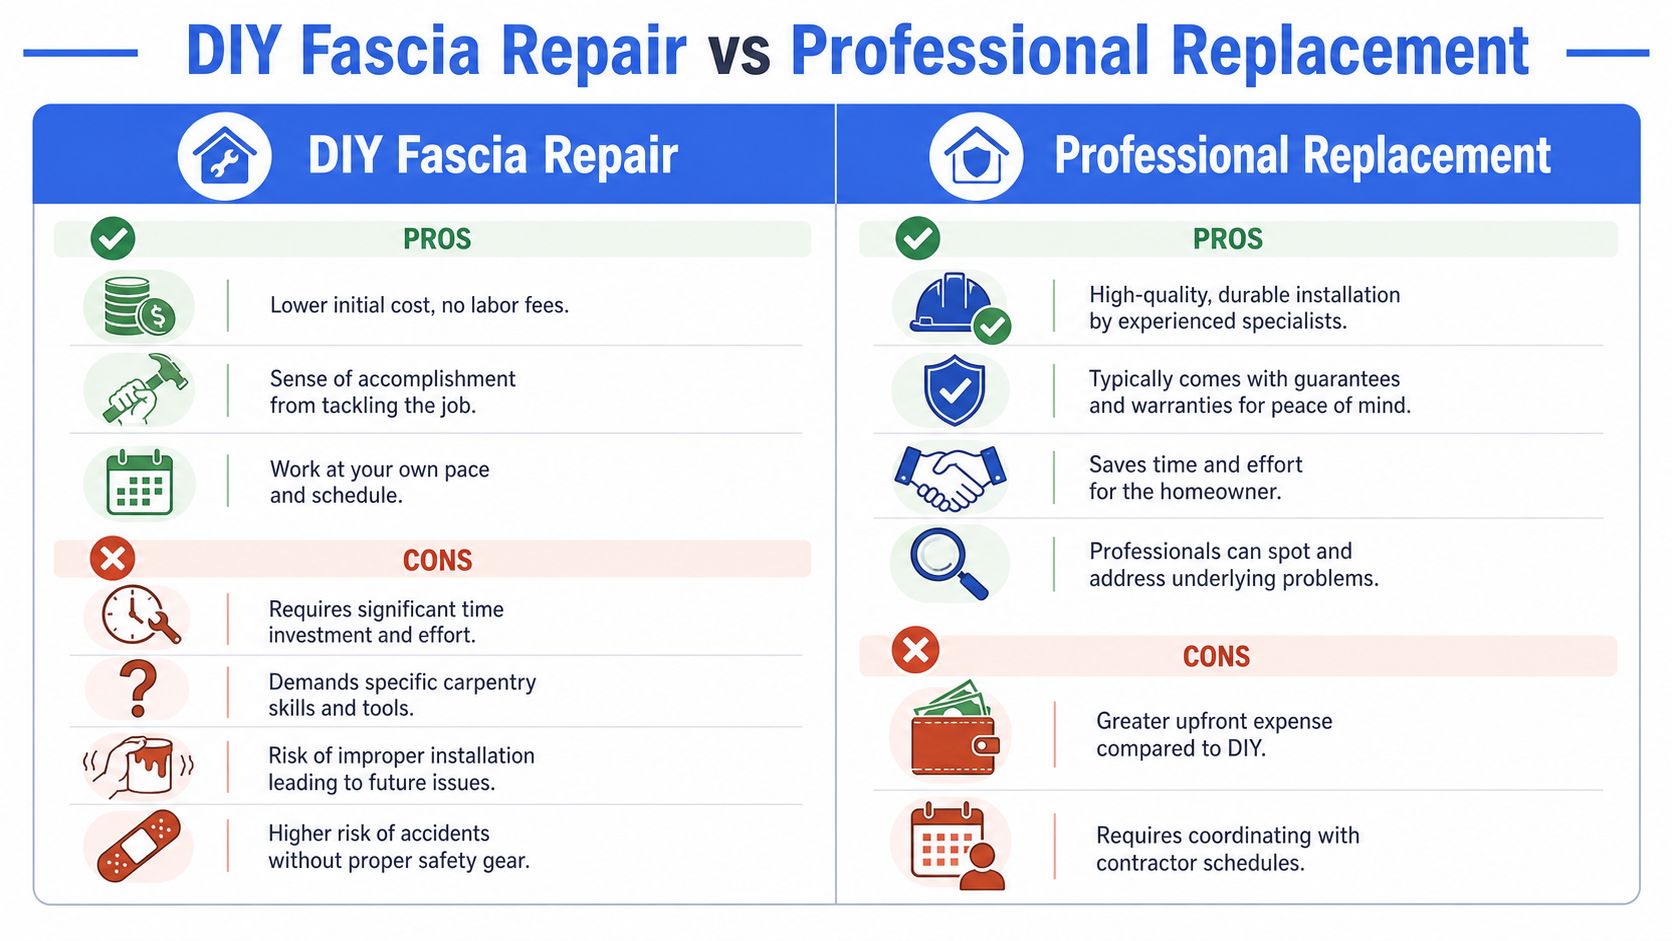
A lot of homeowners can handle basic exterior maintenance. Fascia work sits in a gray area. Some jobs are manageable. Others look simple until the gutter is off and the roof edge starts telling a different story.
Consider DIY if the problem is small and accessible
DIY can make sense when the damage is limited to a short section on an easily reached, single-story area and the surrounding wood is still solid. If you already own a pry bar, circular saw, drill, exterior fasteners, caulk gun, and painting tools, a minor repair may be realistic.
DIY is more reasonable when:
- The damaged section is isolated and doesn't run under a long gutter span.
- The ladder setup is safe on level ground with easy access.
- You can remove and reinstall the gutter correctly without bending it or changing pitch.
- You know how to cut and fasten trim stock cleanly so joints don't open up later.
If your house has vinyl siding details tying into the roof edge, it helps to understand how exterior trim pieces interact. This guide on how to replace vinyl siding corner trim is useful because it shows how one exterior component can affect the fit and finish of the next.
Hire a pro when the job affects structure or drainage
Professional replacement is the better call when you're dealing with long runs, second-story access, widespread rot, gutter problems, or anything that might involve sub-fascia framing.
Hire a pro when:
- The home is two stories or the roof edge is hard to access.
- The gutter is loose across a long section and may need to come off completely.
- The board is soft in multiple places, especially near seams and fasteners.
- You suspect rafter-tail or sub-fascia decay.
- The soffit or drip edge also looks damaged.
A lot of bad repairs fail for the same reason. Someone replaces the visible board, paints it nicely, and fastens the gutter back into weak backing. The work looks finished but isn't structurally sound.
Tight-looking trim can still be a bad repair if the substrate behind it is compromised.
Material choices change the decision
Material selection also shifts the DIY-versus-pro decision. The projected market outlook and replacement-cycle data in this fascia board market report notes that timber typically lasts 15 to 25 years, while uPVC and aluminum can last 25 to 30 years or more before visible issues call for intervention.
That creates a real trade-off:
| Material | What works well | What to watch |
|---|---|---|
| Wood | Easier to cut, patch, and paint | Needs careful sealing and regular upkeep |
| uPVC / vinyl | Lower maintenance and no rot in the same way wood rots | Expansion and joint details matter |
| Aluminum | Durable and weather-resistant | Installation details are less forgiving |
If you're only replacing a short, painted wood section on a ranch home, DIY may pencil out. If you're changing materials, matching profiles, dealing with long runs, or tying the work into gutters and soffits, professional fascia board replacement usually saves you from redoing the job.
The Professional Replacement Process Done Right
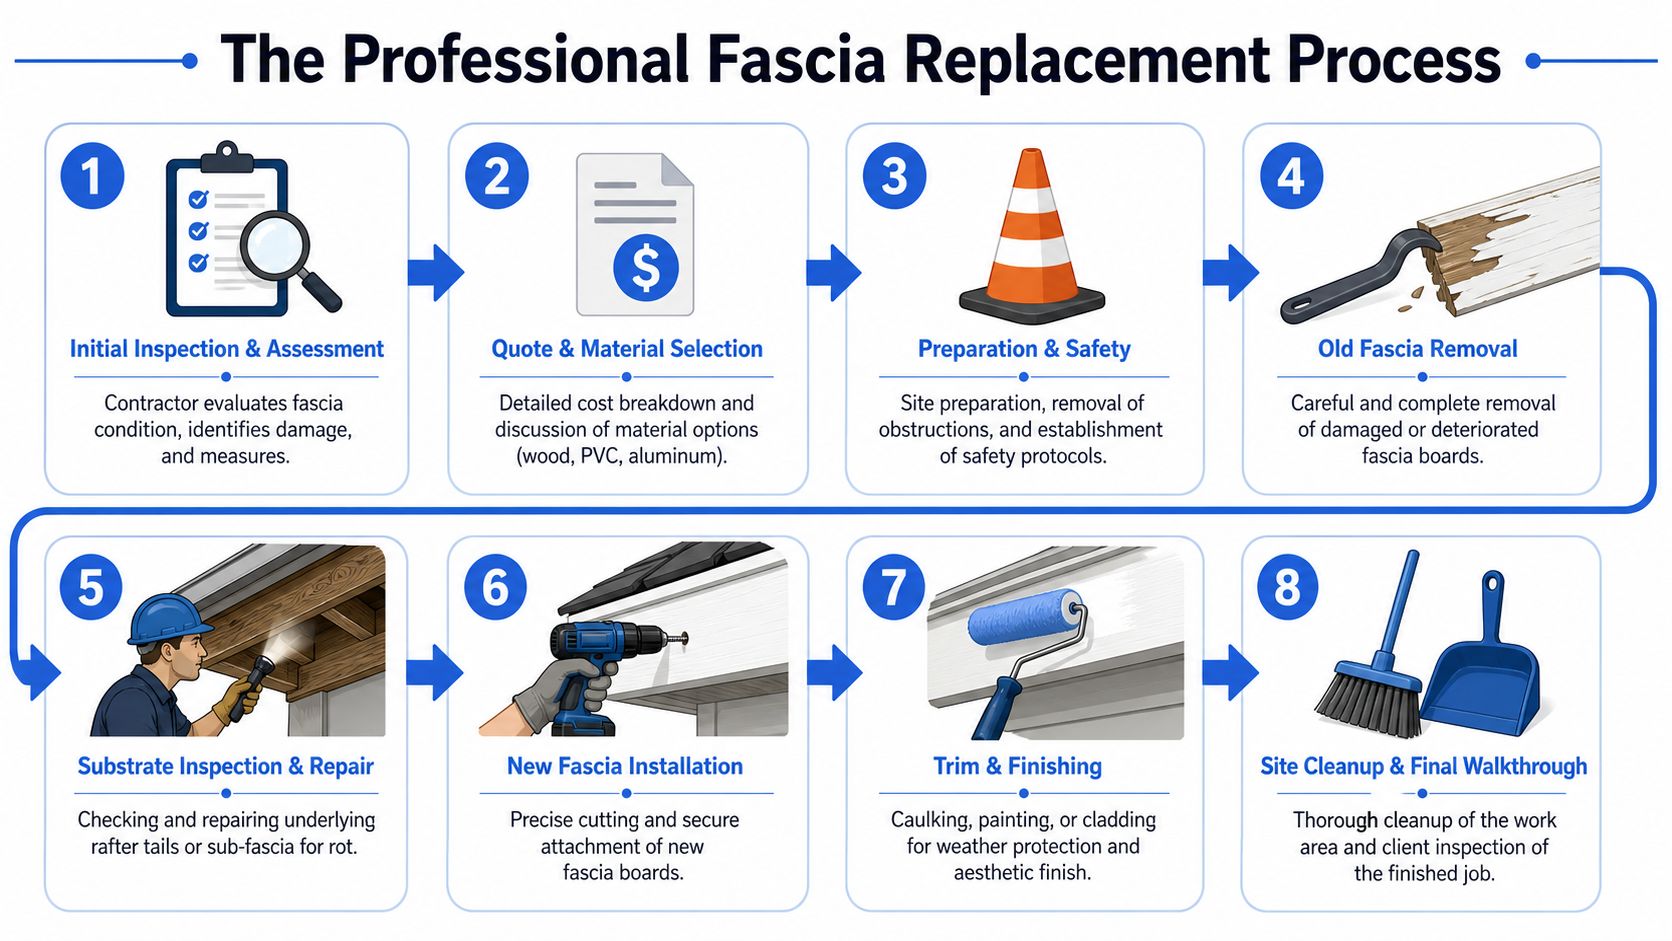
A solid fascia job follows a sequence. Good contractors don't skip around, because each step depends on the one before it. If the inspection is rushed, removal gets sloppy. If removal is sloppy, hidden damage gets missed. If hidden damage gets missed, the new board is already at a disadvantage.
What a proper sequence looks like
The technical process outlined in IKO's fascia repair and replacement guide calls for a seven-stage sequence:
- Inspect the existing fascia and confirm the replacement scope and board dimensions.
- Remove gutters and drip edge carefully so they can be reinstalled without damage.
- Pull the old fascia board free from the rafters using the right hand tools.
- Measure and cut the new board so each section spans at least two rafters.
- Seal all seams with silicone caulk or another exterior-grade sealant.
- Apply wood sealant, primer, and paint if the material requires finishing.
- Reinstall the drip edge and gutters at the correct mounting points.
That process is straightforward on paper. The quality comes from how carefully each step is executed.
The details that separate a durable job from a short-term fix
Several installation details matter more than homeowners realize.
- Board span matters. Each new piece should reach across at least two rafters. That gives both ends solid nailing support instead of leaving a floating weak point.
- Fastener spacing matters. Exterior nails or screws should be driven into rafters at about 16-inch intervals according to this step-by-step fascia guide. Wider spacing can leave the board uneven or weak.
- Seams matter. Open joints are where water starts winning. A clean seam with proper sealant lasts longer than a pretty seam left dry.
- Corners matter. Mitered corners look better, but only if they're cut cleanly and sealed correctly.
Pros also pay attention to material prep. Pressure-treated spruce, pine, or cedar rated for exterior exposure is commonly used where painted wood fascia is being replaced. If it's wood, the board needs sealing before weather gets to it.
A fascia board doesn't fail because one rainstorm was too much. It fails because water found an opening and kept coming back.
Why ventilation alignment matters
This is the overlooked issue I wish more homeowners knew about before hiring anyone. Fascia replacement doesn't happen in isolation. At the roof edge, the fascia, soffit, drip edge, and gutter all affect one another.
If the fascia-to-soffit relationship is wrong, airflow can suffer. Industry analysis cited in this fascia replacement article says 42% of new roof ventilation failures in central Ohio stem from improper fascia-to-soffit gap alignment during replacement. That's not a cosmetic issue. It can trap moisture where the roof edge needs to breathe.
The same source also notes practical details many crews skip, such as allowing a 2 to 3 mm expansion gap at joints and using H-section jointing strips where the system calls for them. That's especially relevant with low-maintenance trim materials that expand and contract differently than wood.
A homeowner doesn't need to master every technical detail. You do need to ask the right question: How will the new fascia integrate with the soffit, drip edge, and ventilation path? If the answer is vague, keep looking.
Budgeting for Fascia Board Replacement in Columbus
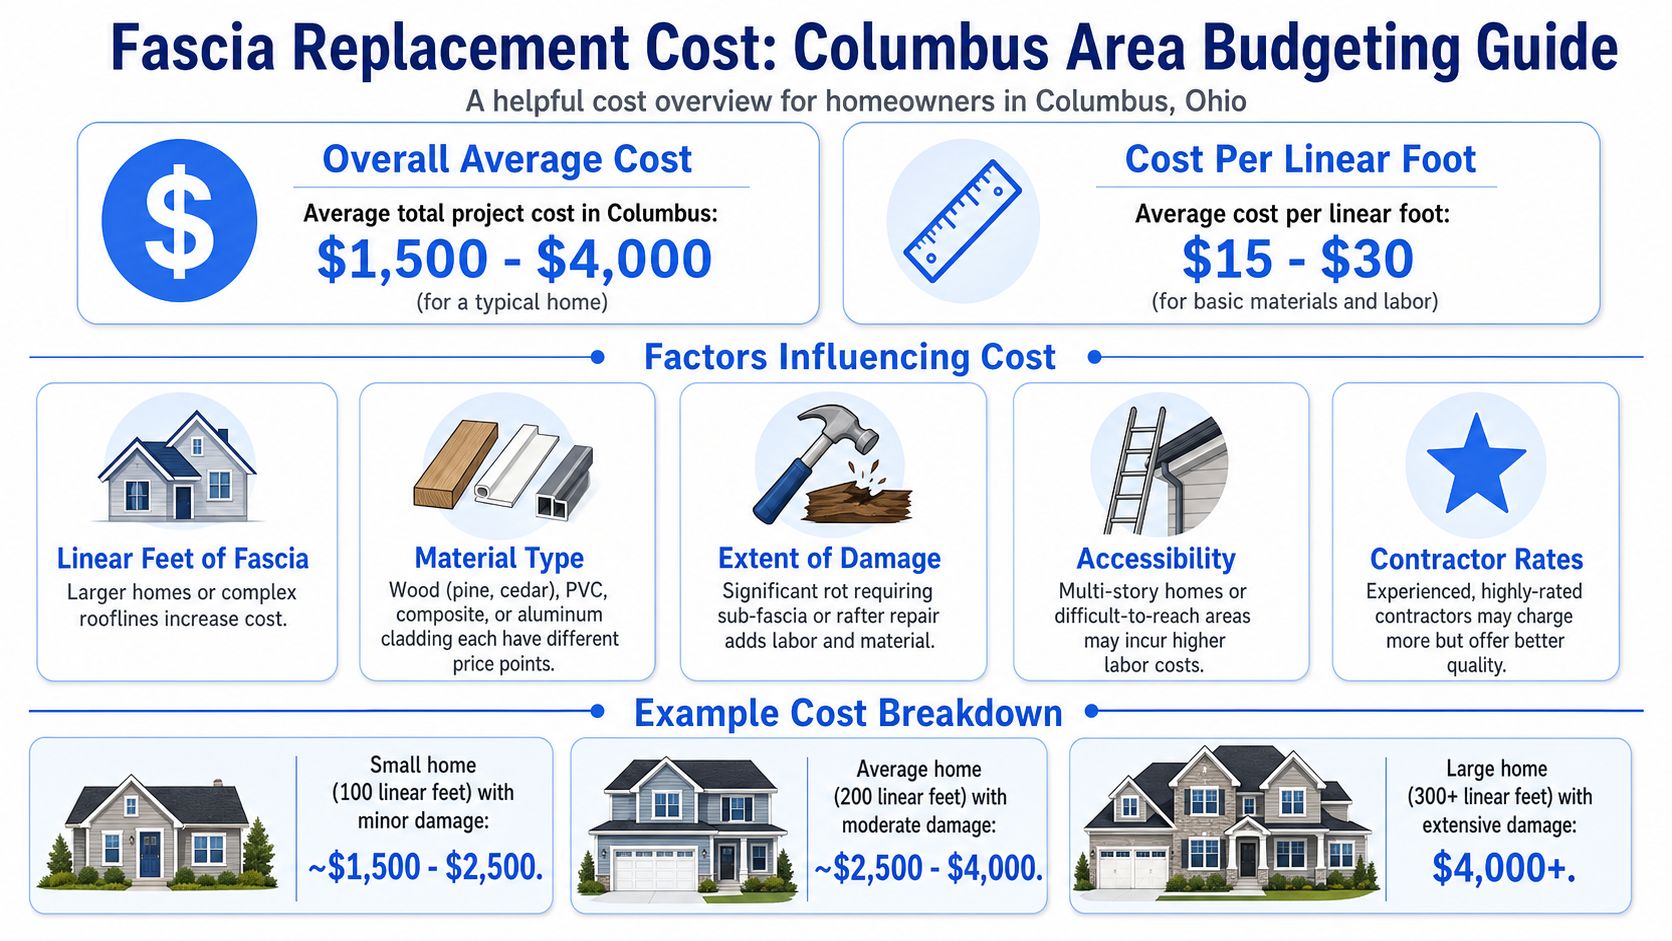
Homeowners usually want one number. Real projects don't work that way. Fascia pricing depends on footage, material, access, removal difficulty, finish work, and whether the damage stops at the visible board.
What the numbers actually tell you
For a baseline, Thumbtack's fascia board replacement cost guide states that the national average cost to fully replace fascia boards on a typical single-story home is about $2,500, with most projects ranging from $1,050 to $3,300. The same source places installation costs at $7 to $22 per linear foot.
That's useful, but it's still only a starting point.
A separate contractor pricing reference in McClelland's Roofing's fascia replacement article gives a similar broad range of $6 to $25 per linear foot installed, with many full replacements landing between $1,000 and $5,000. Broad overlap like that tells you something important. Labor conditions and scope drive the final number as much as material does.
Two Columbus area examples
Here's how I'd think about two common situations without pretending every house is identical.
| Home type | Likely budgeting considerations |
|---|---|
| Single-story ranch in Columbus | Usually simpler access, easier ladder placement, shorter setup time, and fewer labor complications if the damage is limited to one straight run. |
| Two-story home in Dublin with complex rooflines | More time spent on access, removal, staging, and careful gutter handling. Multiple elevations and corners often make the labor side more expensive than homeowners expect. |
Material choice changes the budget too. Thumbtack notes that wood fascia can run about $1 to $3 per linear foot, while aluminum can run about $8 to $20 per linear foot for material, with aluminum offering stronger weather resistance. If you're comparing options, that's the trade-off in plain terms: lower upfront cost versus longer-term durability.
Storm damage and insurance questions
In central Ohio, fascia often gets pushed onto the repair list after wind-driven rain, ice issues, or gutter damage from storms. When that happens, document the conditions before anything gets moved.
Take clear photos of:
- Detached or twisted gutters
- Stained soffit and fascia sections
- Visible rot, cracking, or separation
- Any water marks below the roof edge
Then ask for a written scope that separates visible fascia work from any hidden repairs found after removal. That's especially important when storm damage exposed a problem that had been developing for a while.
If your estimate doesn't say what happens when hidden wood damage appears after tear-off, the price discussion isn't finished yet.
Choosing Your Columbus Fascia Replacement Contractor
The cheapest bid often buys the shortest conversation about what's behind the fascia. That's exactly backwards. Roof-edge work should be handled by someone who treats the fascia, soffit, drip edge, gutter, and fastening surface as one system.
Use a contractor interview checklist
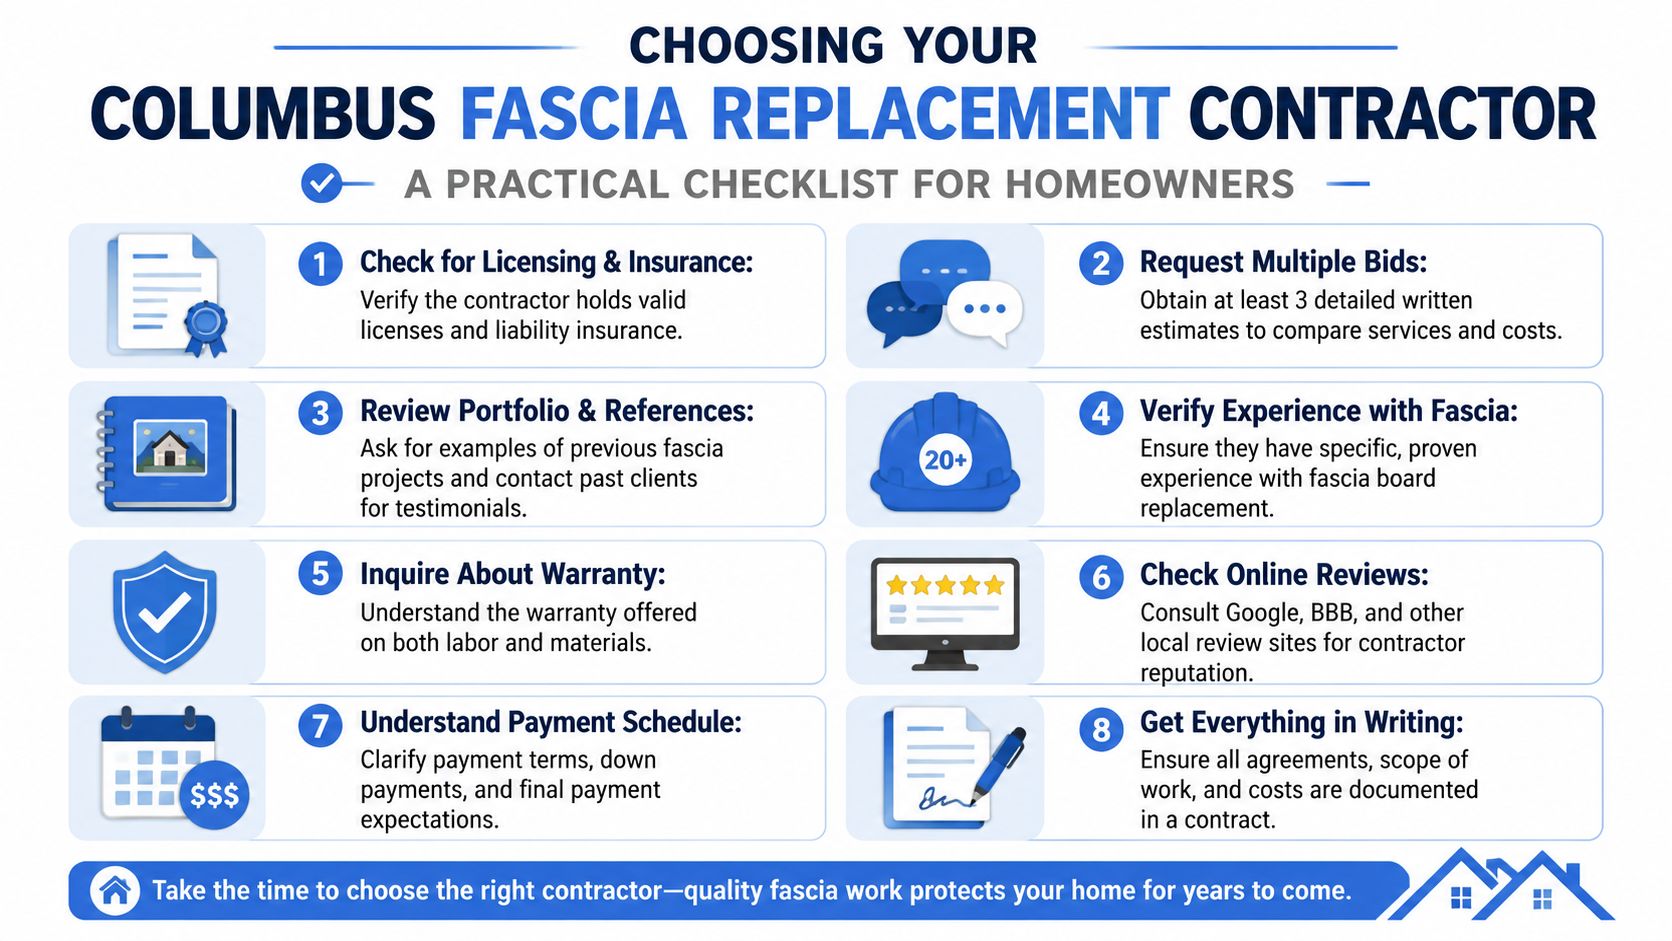
If you're vetting contractors, don't start with price. Start with process. A strong interview sounds more like a scope review than a sales call.
Ask questions like these:
- How do you inspect for hidden sub-fascia or rafter-tail rot?
- Will the gutters and drip edge be removed and reinstalled, or worked around?
- How do you handle fascia-to-soffit alignment?
- What material are you proposing, and why that material for this house?
- What does the written estimate include if hidden damage appears after removal?
- Are you licensed and insured for this work?
For a broader checklist on contractor vetting, this guide on how to choose a roofing contractor is worth reading because the same screening habits apply here.
What a strong written estimate should address
A proper estimate should describe more than board replacement. It should define the scope around the roof edge.
Look for these items:
- Removal details for gutters, drip edge, and damaged fascia
- Inspection language covering substrate or sub-fascia condition
- Replacement material and finish details
- Fastening and sealing approach
- Cleanup and disposal expectations
- Warranty terms for labor and materials
One reason to press on ventilation details is that the failure risk is real in this region. The central Ohio analysis cited earlier found that 42% of new roof ventilation failures were tied to improper fascia-to-soffit gap alignment. If a contractor shrugs off that connection, they're treating fascia as trim only. It isn't.
Good contractors also write clearly. If the estimate says “replace bad wood as needed” and nothing more, ask what that means. Which wood? How much? What happens at the soffit line? Where will the gutter fasten if the backing is bad? Specific answers usually signal real experience.
Protecting Your Home's Exterior for the Long Term
A good fascia board replacement does more than clean up the roofline. It protects the gutter attachment point, helps control water at the eaves, and supports the rest of the exterior envelope. That's why the job has to be thought through as a system, not as one trim board.
Simple habits that protect the repair
Once the work is done, long-term protection comes from simple habits done consistently.
- Keep gutters flowing. Clogs and overflow are still the fastest way to shorten the life of a roof-edge repair.
- Do a visual check at least once a year. Walk the perimeter and look for paint failure, joint movement, or new staining.
- Watch after heavy rain. If water runs behind the gutter or drips at seams, deal with it before it soaks the fascia again.
- Pay attention to roof-edge spacing details. If you're unsure how drip edge and gutter alignment should look, this article on the gap between drip edge and gutter helps explain what a proper setup should accomplish.
- Get help before small issues spread. If you're comparing maintenance services, it helps to compare gutter cleaning options so you can choose a routine that fits your home and tree cover.
The main takeaway is simple. Don't judge fascia by the paint alone. Ask what's happening behind it, and ask how the new work ties into drainage and ventilation. That's what keeps a repair from becoming the same problem twice.
If you're in Columbus or central Ohio and want a clear answer on whether you need a repair, partial replacement, or full roof-edge rebuild, HIBCO ROOF LLC offers free inspections and written estimates. They handle roofing, gutters, siding, and related exterior work, so the fascia gets evaluated as part of the whole system instead of as an isolated trim issue.