
You spot it from the driveway first. One shingle looks a little higher than the rest, like a tiny speed bump on an otherwise flat slope, and now you can't unsee it.
That's usually how nail pops on roof problems start for homeowners. They look small, but the issue isn't the bump itself, it's what that backed-out fastener can mean for the roof deck, the shingle seal, and the next hard freeze or thunderstorm.
Table of Contents
- Why That One Raised Shingle Deserves Your Attention
- What a Nail Pop Is and What It Is Not
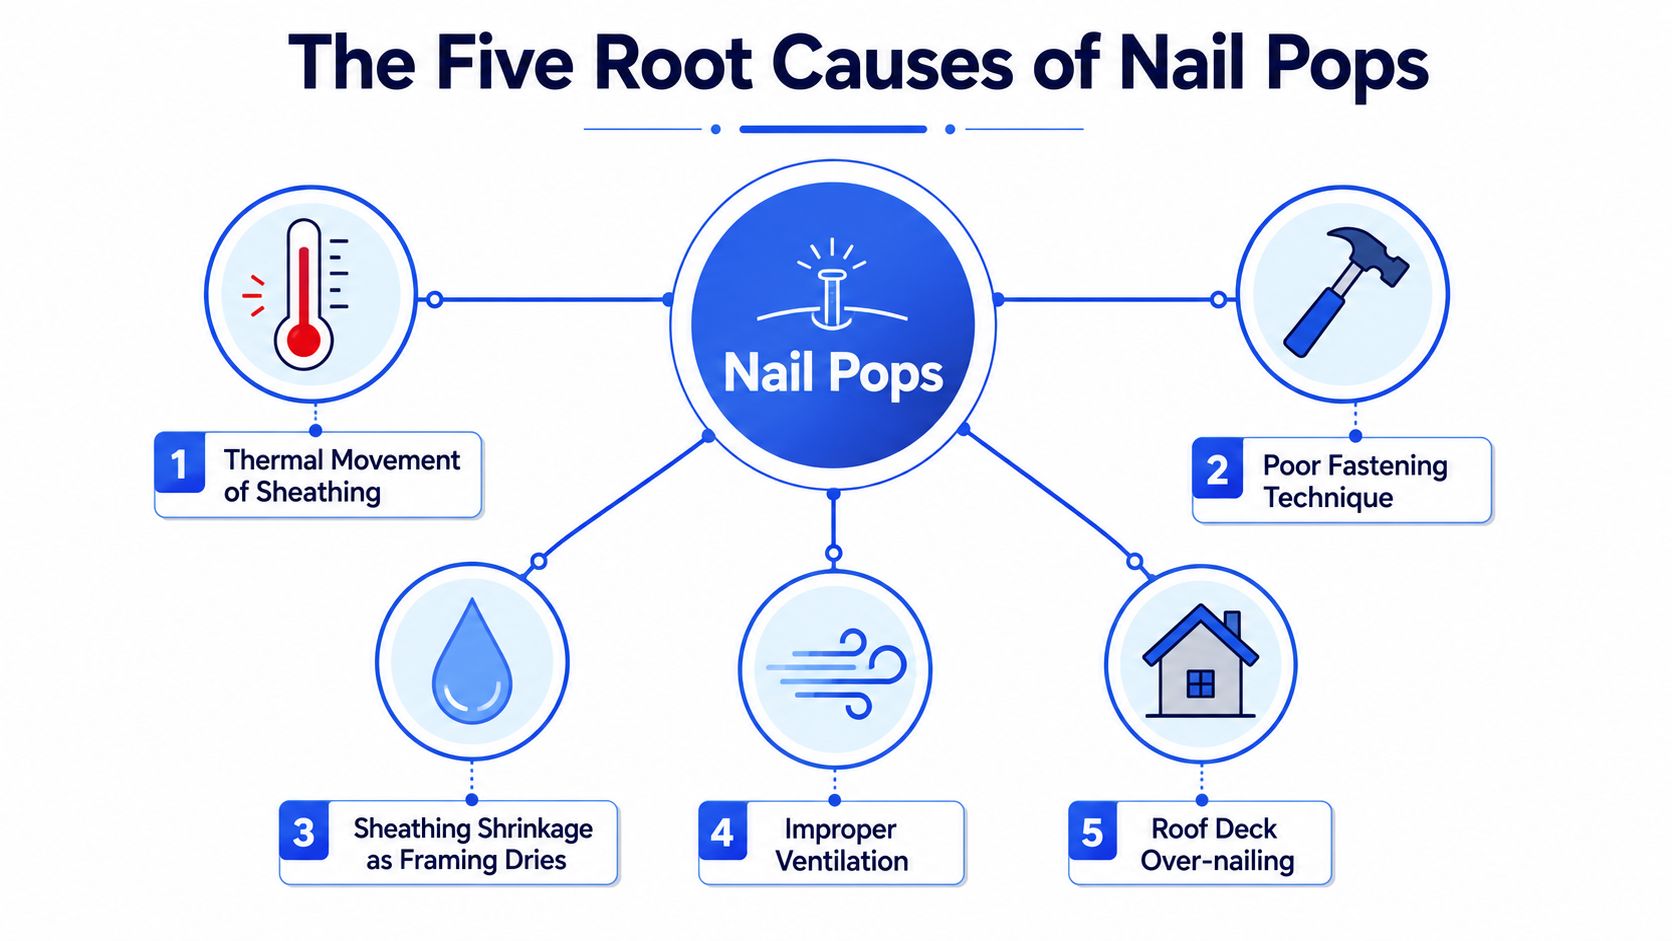
- The Five Root Causes Behind Most Nail Pops
- How Much Risk Nail Pops Really Add to Your Roof
- A Homeowner's Step-by-Step Roof Inspection Routine
- DIY Fixes Versus Professional Repair and Replacement Options
- Insurance, Storm Damage, and Deductible Realities
- Prevention, Maintenance, and Your Next Step in Central Ohio
Why That One Raised Shingle Deserves Your Attention
A homeowner in Columbus usually notices the first raised shingle the same way they notice a loose step or a flickering light. It doesn't look urgent, so it gets filed under “I'll deal with it later.” That's a mistake with roofs, because a visible bump is often the surface clue for something moving underneath.
A nail pop is more than a cosmetic oddity. It can be the first visible sign that a nail has backed out of the deck and broken the shingle seal, which turns a small defect into a direct moisture path, according to industry guidance on roof nail pops. In practical terms, that means the roof has already stopped behaving like a sealed system in that spot.
Practical rule: one isolated bump deserves a look, a cluster deserves a plan.
The reason I tell homeowners not to wait is simple. Roof decks keep moving with heat, humidity, and cold, and every cycle can nudge a loose fastener a little farther out of position. Once you've seen one raised shingle, the next freeze-thaw swing doesn't usually make the problem disappear, it makes the repair more likely to need extra labor or a wider shingle lift.
The other thing to watch is pattern. A single bump can be a one-off, but repeated bumps along a slope usually point to a broader issue, not a bad day for one nail. That distinction matters because a small, local repair is a different job from a roof that's telling you the deck, ventilation, or fastening pattern isn't right.
What a Nail Pop Is and What It Is Not
A nail pop is a roofing fastener that backs out of the sheathing far enough to lift the shingle above it. Once that happens, the shingle seal breaks and the nail head becomes a moisture entry point, which is why the defect matters even when the roof still looks mostly intact from the street, as described in this roofing guide on nail pops.
On the roof, the clue is usually a raised bump centered on a fastener line. Sometimes the shingle above it tilts slightly or shows a crease, and if the nail has moved far enough, the head can break through the shingle surface. That shape matters because it points to a fastener problem, not just a random surface flaw.
A nail pop is an early warning sign for roof health. One isolated bump can come from a single fastener that shifted, while a cluster of raised spots often points to a broader fastening or deck movement issue. That pattern tells you a lot before you decide whether a simple repair makes sense or a roofer should inspect the whole area.
What it can be confused with
Homeowners often mistake other roof conditions for nail pops, and that leads to the wrong repair. Shingle blistering can look like a bump, but blistering comes from trapped moisture within the shingle itself, not a backed-out fastener. Debris can cast a similar shadow from the driveway, especially after a storm, and normal deck movement can create slight unevenness without any nail backing out.
The fastest way to separate the look-alikes is to look for the center point. A true nail pop usually ties to one small raised spot on a nail line, while a blister or debris issue often does not line up as neatly with a fastener. If you are unsure, check the attic carefully and compare the area with the rest of the slope from the ground. A guess is less useful than a clear pattern.
For homeowners who want the basics on shingle construction, this overview of what roof shingles are helps put the fastener problem in context. A shingle roof depends on overlap, adhesion, and correct fastening, so once one of those parts shifts, the surrounding area becomes less forgiving.
The Five Root Causes Behind Most Nail Pops
Roof nail pops are usually a dimensional-stability problem, not a mystery. The decking expands with heat and humidity, then contracts as it cools and dries, and that repeated movement can slowly walk a fastener upward. Poor attic ventilation makes that worse because trapped heat and moisture speed up deck movement and reduce holding power, which is why poorly ventilated attics show up again and again in roofing guidance, including this explanation of roof nail pops.
The five drivers I look for on Central Ohio roofs
The most common drivers are straightforward, even if the damage they create isn't. Thermal movement of the sheathing is the big one. Poor fastening technique comes next, especially overdriven, underdriven, or angled nails. Sheathing shrinkage as framing dries shows up early after installation. Improper installation practices can multiply the issue across a whole slope. Storm or hail damage can expose or loosen areas that were already vulnerable.
Poor ventilation doesn't create every nail pop, but it makes a lot of them show up sooner.
Columbus weather doesn't help. Hot, humid summers followed by cold, dry stretches put roof decking through constant expansion and contraction. If the attic can't breathe, the roof runs hotter, the deck moves more, and the nails get worked over time. That's why a roof can look fine on day one and still develop visible pops early if the installation wasn't tight.
The practical ranking on local homes usually goes like this, thermal movement and ventilation issues at the top, fastening mistakes close behind, and storm-related damage where the roof has already taken a hit. Drying-related shrinkage matters most on newer roofs, while improper installation can be the hidden cause that doesn't announce itself until the second season.
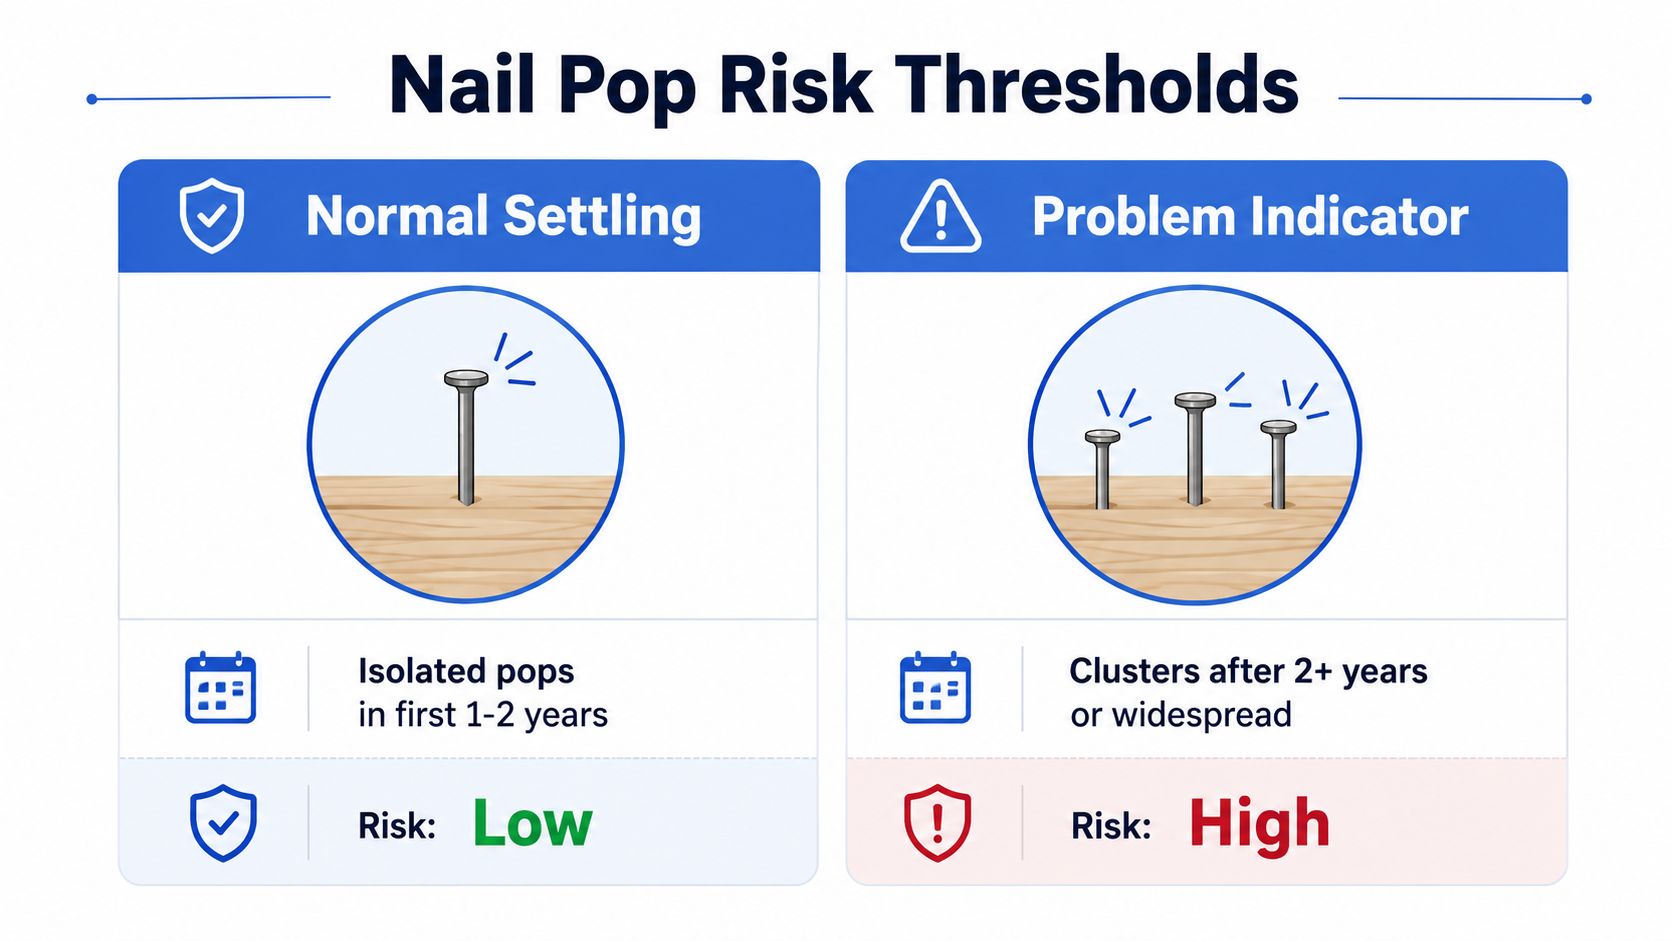
A useful way to think about it is this. Normal settling happens early and stays scattered. Problem patterns show up as clusters, repeat in the same area, or keep expanding after the roof has had time to settle.
How Much Risk Nail Pops Really Add to Your Roof
The risk is not the raised shingle by itself, it is the leak path it opens. A backed-out nail can break through the shingle mat and weaken the underlayment seal, which gives water a direct route into the roof assembly. That is why a small exterior defect can sit unnoticed for a while and still show up later as interior damage.
A residential roof may contain about 5,000 to 10,000 roofing nails, according to one roofing source cited in this nail pop guide. The same source says a few isolated pops in the first 1 to 2 years can be normal settling, while dozens of visible pops usually point to a systemic problem. It also states that roofs with more than 5 nail pops per 100 square feet have a 3.2x higher likelihood of developing leaks within 24 months, which is why clustered damage gets professional attention fast.
What that means in practice
The homeowner rule is straightforward. Count them. Compare their location. Watch the pattern. One or two scattered pops near a newer installation can be manageable. Multiple pops across one slope, or repeated pops in the same area, point to a different issue because the deck, fastening, or ventilation problem did not stay local.
A roof can also look fine right up until it does not. The nail head may be tiny, but once the shingle seal breaks and moisture reaches the deck, the damage starts before the ceiling stain appears. Inspectors treat a cluster as a maintenance signal, not just a patch job.
If you can trace several bumps to one slope, do not think cosmetic, think system-wide.
A quick professional inspection pays off. A roofer can tell whether the problem is isolated settlement, a fastening defect, or a sign the roof is headed toward broader repair work. That is a very different decision from guessing based on one raised shingle from the curb. The attic often gives the clearest clues, and a homeowner can compare what they see overhead with roof leak warning signs before deciding how urgent the problem really is.
A Homeowner's Step-by-Step Roof Inspection Routine
Start on the ground. A pair of binoculars and decent daylight tell you more than climbing a ladder in a hurry ever will. Look for raised bumps that stay aligned with a shingle course, shiny fastener heads, or a line of irregularities on one slope after a storm.
What to check without stepping on the roof
From the driveway, map where the bumps are. If they're scattered randomly, that leans toward normal movement or isolated failures. If they cluster in one section, repeat along one ridge line, or keep showing up in the same slope zone, that suggests a deeper fastening or ventilation problem.
Then move to the attic with a flashlight. Check for rusty nail tips, damp sheathing, daylight around protruding nails, or insulation that looks wet in a narrow spot. One roofing resource that homeowners often find useful for identifying related leak signs is this guide on roof leak warning signs, because the attic often tells you more than the shingles do.
- Look for moisture clues: Damp wood, rust around nail tips, or a small wet patch in insulation often means the defect is active, not just visible.
- Check nearby airflow: Blocked soffit vents or obviously overheated attic sections can point to a ventilation issue that's driving repeated movement.
- Document the pattern: Take photos from the driveway and attic, then note which slope and which general area each bump appears in.
Do not climb a wet, steep, or aging roof to “just take a look.” A ladder-free check is enough to decide whether you need a service call. If a recent storm passed through, save the photos and dates, because that's the kind of documentation a contractor or insurer may ask for later.
DIY Fixes Versus Professional Repair and Replacement Options
A single isolated nail pop can sometimes be handled with a careful temporary repair. That means lifting the shingle just enough to access the fastener, pulling the popped nail, driving a new nail into fresh wood nearby, and sealing the old hole and the new head. It's simple in theory, but it stops being simple on brittle shingles, steep slopes, or roofs that already have multiple pops.
| Repair Path Comparison for Columbus Homeowners | Typical Cost | Typical Timeline | Best Fit When |
|---|---|---|---|
| DIY temporary fix | Materials only, often a small afternoon project | Same day | One or two accessible pops on a low-risk slope |
| Targeted professional repair | Usually a few hundred dollars per area | Often one visit | Pops are clustered, leaks are active, or shingles need to be lifted carefully |
| Partial or full replacement | Planned project, not a quick patch | Scheduled work | Pops are widespread or paired with other end-of-life signs |
The biggest trade-off is durability. A repair that only seals the visible head without correcting the deck movement or fastening defect can fail again within a season. That's why a pro repair usually means removing the affected shingle, refastening correctly, and replacing the shingle with proper sealing rather than smearing cement over the top and hoping for the best.
For homeowners comparing contractors, this guide to choosing a roofing contractor is worth reading before you sign anything. I'd also put this plainly, HIBCO ROOF LLC provides roof inspections, leak diagnosis, and nail pop repairs as part of its residential roofing work in Columbus, which makes sense when the issue is still localized and not yet a replacement project. The right repair path depends on what the roof is telling you, not on what's easiest to sell.
Insurance, Storm Damage, and Deductible Realities
Most nail pops are not insurance claims. If the cause is installation error, aging materials, or ventilation problems, standard homeowners policies usually treat that as maintenance or workmanship, not a covered loss. That's the hard truth, and it saves a lot of wasted phone calls when homeowners get realistic early.
Storm damage is the exception, but it needs documentation. A legit claim should come with dated photos, slope-by-slope notes, and clear evidence of collateral damage to vents, gutters, or siding if those parts were also hit. If the roof work is below your wind or hail deductible, paying out of pocket is usually the cleaner move because you avoid a claim for a repair amount the policy won't really help with.
What to gather before you call your carrier
- Photos from multiple angles: Capture the raised shingle, the surrounding slope, and any storm-related collateral damage.
- Timing details: Note when you first saw the defect and whether a recent storm preceded it.
- Attic evidence: Save photos of moisture, rust, or daylight around nail tips if the interior shows it.
A helpful outside resource on the claims process is filing a homeowners insurance claim in Miami from PTL Insurance Associates, Inc., because the basics of documenting damage and organizing a claim file translate well even when the weather event is local. The point isn't to force every roof problem into a claim, it's to make sure the ones that belong in a claim are documented properly.
If the problem started as a few pops and the roof is otherwise sound, an out-of-pocket repair often makes more sense than opening a file that won't meet the deductible. If the storm hit multiple roof components, that's when a documented inspection earns its keep.
Prevention, Maintenance, and Your Next Step in Central Ohio
The best way to keep nail pops from coming back is to treat the roof like a system, not a surface. Start with a quick look from the ground twice a year, then make sure the attic has proper airflow and the roof edge stays clear of water backup. Gutter cleaning matters more than many homeowners expect, because standing water and ice put extra strain on the spots where the roof already works hardest.
Habits that truly help
- Check soffit and ridge airflow: Balanced intake and exhaust reduce attic heat buildup, which helps keep decking movement under control.
- Keep gutters clear: Clean gutters reduce overflow and ice backup at the edge of the roof.
- Trim branches early: Overhanging limbs can scuff shingles and add wear in the same spots year after year.
Columbus weather keeps roofs busy. Heavy summer storms, hard freezes, and humid shoulder seasons all stress the deck in different ways, which is why a problem that looks minor in July can behave differently by January. A homeowner can spot a bump, but a trained eye can tell whether that bump is part of a bigger pattern.
If you already care for wood furniture, the same habit applies here, clean before grime settles in and do not wait for damage to announce itself. That mindset fits roof maintenance well, and this practical guide on how to clean solid wood furniture is a useful reminder that steady upkeep beats rescue work later.

A free professional inspection takes the guesswork out of whether you are looking at a one-off fastener issue or a roof-wide problem. If you are in central Ohio and you have spotted a raised shingle, HIBCO ROOF LLC can inspect the roof, check the attic clues, and tell you whether a repair or a replacement makes more sense for the condition you have.