

You step onto the back porch after a wet spring afternoon and notice a green haze spreading across the north wall. The siding looked clean when winter ended, but pollen, damp air, and runoff have turned a small buildup into something you can't ignore. In central Ohio, that's a familiar starting point for vinyl siding care, and cleaning is only part of the job.
Vinyl siding is low maintenance, not maintenance-free. A sensible routine combines gentle washing, seasonal inspections, careful repairs, and fast attention to water that's getting where it shouldn't. The payoff is preservation. Independent industry guidance generally places vinyl siding's typical service life at 20 to 40 years, with favorable conditions, better products, and consistent maintenance extending that range toward 50 to 60 years. Mighty Dog Roofing's maintenance guidance connects that longevity to cleaning, inspections after severe weather, and keeping landscaping from rubbing against panels.
Table of Contents
- Why Vinyl Siding Needs Real Care in Central Ohio
- The Right Way to Wash Vinyl Siding
- A Seasonal Checklist for Columbus-Area Homes
- DIY Repairs You Can Safely Handle
- Removing Stains, Mold, and Mildew
- Preventing Problems Before They Start
- When to Call a Licensed Contractor
Why Vinyl Siding Needs Real Care in Central Ohio
After a wet spring, a Hilliard homeowner may find mildew spreading across the shaded side of the house. The trigger is rarely one rainy week. Central Ohio siding absorbs repeated freeze-thaw movement, humid summer air, spring pollen, and wind-driven rain from autumn storms. Those conditions pressure joints, trim, drainage paths, and installation clearances, not just the vinyl surface.
The home's age also affects what deserves attention. Houses built from the late 1990s through the mid-2010s may still have builder-grade siding, but their J-channels, corner posts, caulk joints, and fasteners can be reaching the stage where small failures matter. Panels may look sound from the street while openings let moisture behind the cladding.
Vinyl expands and contracts as temperatures change. Manufacturer installation instructions specify clearance at openings and stops, including at least 1/4 inch at those locations. They also call for 3/8 inch when installation occurs below 40°F. These gaps are part of the installation, not defects. They give the panels room to move without buckling as central Ohio temperatures shift.
The care cycle is year-round
Spring washing removes pollen before it bonds with grime. Summer inspections can reveal fading, distortion, or vegetation rubbing against the wall. In fall, check leaves, gutters, and areas exposed to storm-driven water. During winter, rely on visual checks and avoid aggressive washing in freezing conditions.
A clean surface makes defects easier to find. Dirt and mildew can conceal a loose panel, separated seal, or damaged corner. This exterior improvement guide places siding within the larger exterior system of gutters, roofing, windows, and other components that direct water around the house.
Practical rule: Treat vinyl siding as a drainage surface and a movable cladding system, not as a waterproof wall by itself.
Neglect gives dirt, mildew, and small damage time to spread. Annual cleaning is common in homeowner and manufacturer guidance, while some maintenance plans clean every couple of years based on exposure. The practical trade-off is clear: gentle, regular care places less stress on the siding and the house than an occasional aggressive restoration.
The Right Way to Wash Vinyl Siding
The safest wash is staged. You're trying to loosen grit, clean the surface, and rinse residue away without forcing water behind the laps or dulling the finish. Major siding guidance recommends mild soap, water, and soft tools, while cautioning against abrasive cleaners and organic solvents. Norandex's vinyl siding care guidance also explains why textured panels need soft bristles that won't drive soil deeper into the grooves.
Use a controlled wash sequence
Pre-rinse the lower section first. Use a garden hose and work in manageable sections, roughly the width you can wash before the surface dries. Starting low lifts grit without sending dirty runoff over a clean wall and helps reduce streaking.
Mix a mild cleaner. A bucket of warm water with a pH-neutral siding cleaner is the conservative choice. A household alternative is 1/3 cup of dish soap per gallon, but test any cleaner in an inconspicuous area first. Skip abrasive powders, harsh solvents, and stiff scrub pads.
Scrub while the siding is wet. Use a long-handled soft-bristle brush or soft cloth with horizontal strokes. Don't scrub dry vinyl, and don't bear down on the matte surface. Textured panels need especially light pressure.
Rinse from the top down. Once the soil is loose, rinse thoroughly with a hose. Work downward so dirty water doesn't run back across a cleaned section. Cover electrical fixtures, shut exterior outlets, and protect nearby plants. Rinse landscaping before and after cleaning.
A pressure washer can shorten the job, but it raises the risk. Manufacturer limits vary, and some manufacturers advise against pressure washing altogether. One industry guide recommends approximately 1,300 to 1,600 PSI, a 25 to 40 degree nozzle, and keeping the wand at least 12 inches away. Window World's pressure-washing guidance also warns against zero-degree nozzles and upward spray. For a cautious central Ohio approach, stay under 1,300 PSI, use a 25-degree nozzle, hold it about 18 inches from the surface, and keep the spray perpendicular.
| Method | Pressure / Strength | Safe Distance | Best For |
|---|---|---|---|
| Garden hose | Low pressure, mild rinse | Keep the nozzle controlled and away from openings | Routine pollen, dust, and loose dirt |
| Soft brush and mild soap | Low aggression, hand-applied | Brush stays wet and lightly loaded | Annual cleaning and textured panels |
| Pressure washer | Under 1,300 PSI, 25-degree nozzle | About 18 inches from the siding | Stubborn exterior soil when the manufacturer allows it |
Residue is another avoidable problem. If you use a concentrated cleaner on a greasy spot, follow a degreaser residue prevention guide so the product doesn't dry into a film that attracts fresh dirt. Never combine bleach with an ammonia-based cleaner in the same session.
A Seasonal Checklist for Columbus-Area Homes
Central Ohio maintenance works better as a calendar than as a single spring-cleaning project. Each season exposes a different weakness, from winter movement around trim to summer heat on dark elevations and fall debris near drainage paths.
Match the inspection to the weather
March and April: Walk the perimeter after winter. Look for cracked caulk around windows, popped nails, displaced J-channels, and panels that no longer sit evenly. A gentle spring wash clears pollen before it becomes a sticky film.
May and June: Check north-facing walls for green mildew as humidity rises. Inspect gutters before pop-up thunderstorms, especially where roof valleys or nearby trees send concentrated water into a section.
July and August: Rinse dust and spider webs regularly, and inspect south- and west-facing walls for fading, warping, or buckling. Dark colors deserve extra attention because they absorb more heat.
September and October: Clear leaf debris from buttlock joints and trim after storms. Confirm that downspouts discharge 4 to 6 feet from the foundation before the ground freezes. This gutter-cleaning guide covers safer ways to handle gutter maintenance without climbing unnecessarily.
November: Complete a final wash and handle spot caulking once daytime temperatures remain above 40 degrees F, allowing the sealant to cure properly.
December through February: Postpone washing below freezing. After major wind events, inspect from inside as well as outside for water marks, damp trim, or unusual drafts.
A storm with winds over 50 mph should trigger an inspection regardless of season. You don't need to find visible damage before checking. Wind can loosen a panel or trim piece without leaving a dramatic tear.
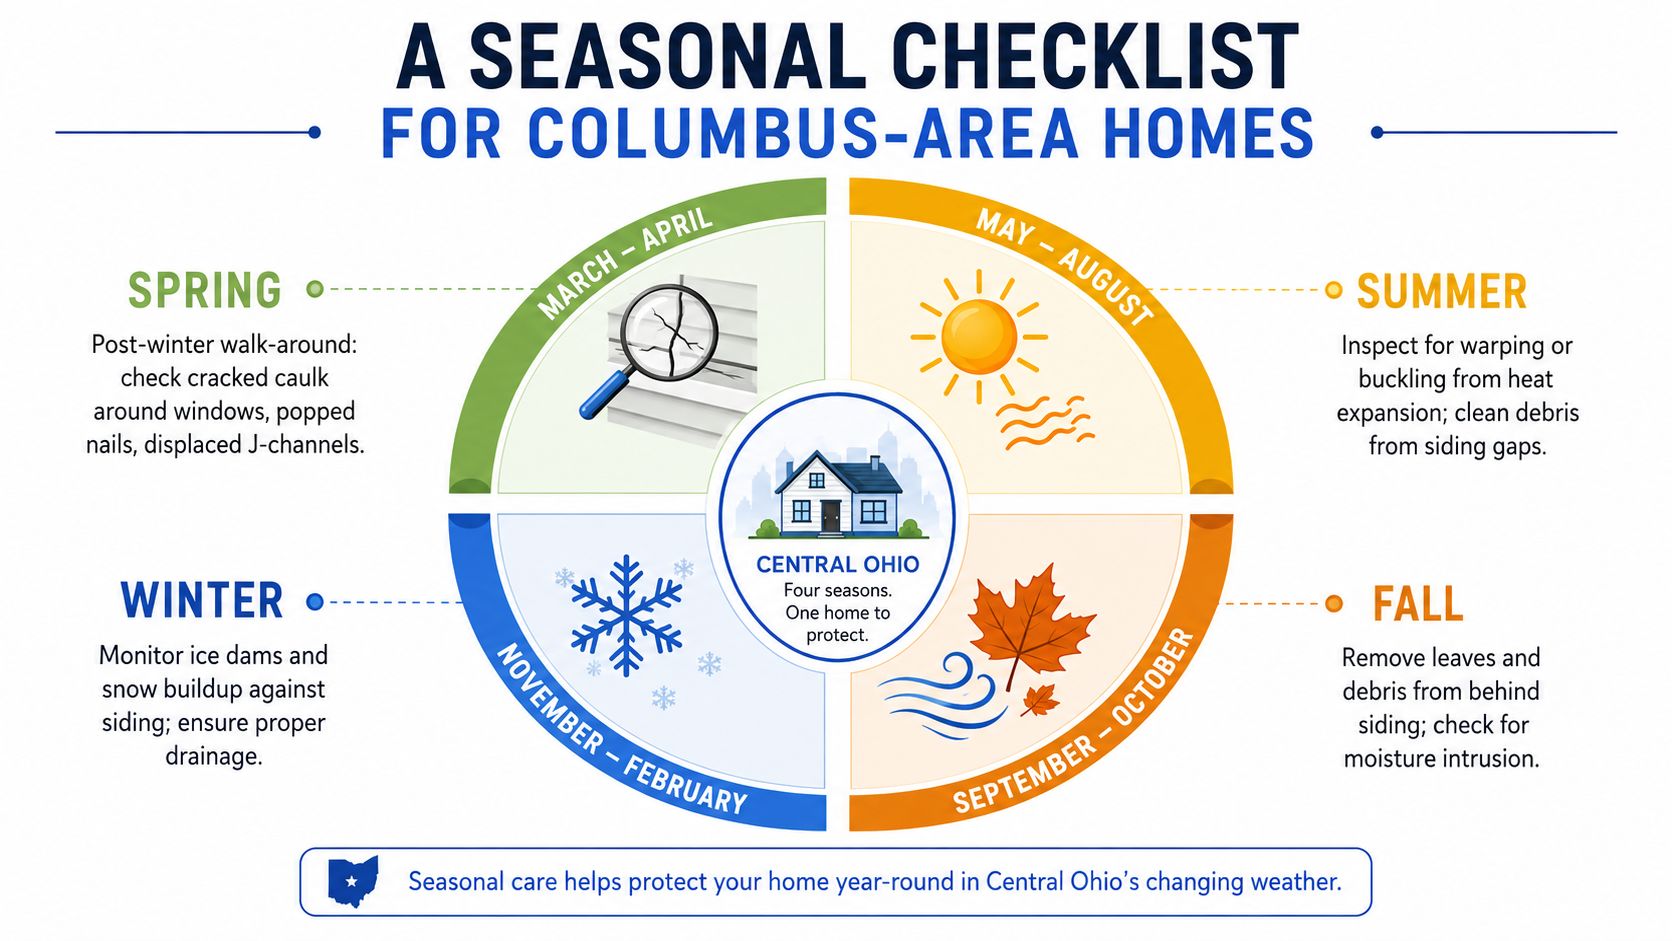
The most useful habit is to record what you see. A few phone photos from the same corners each spring and fall make gradual movement easier to spot, particularly on older siding where small joint changes can precede a larger repair.
DIY Repairs You Can Safely Handle
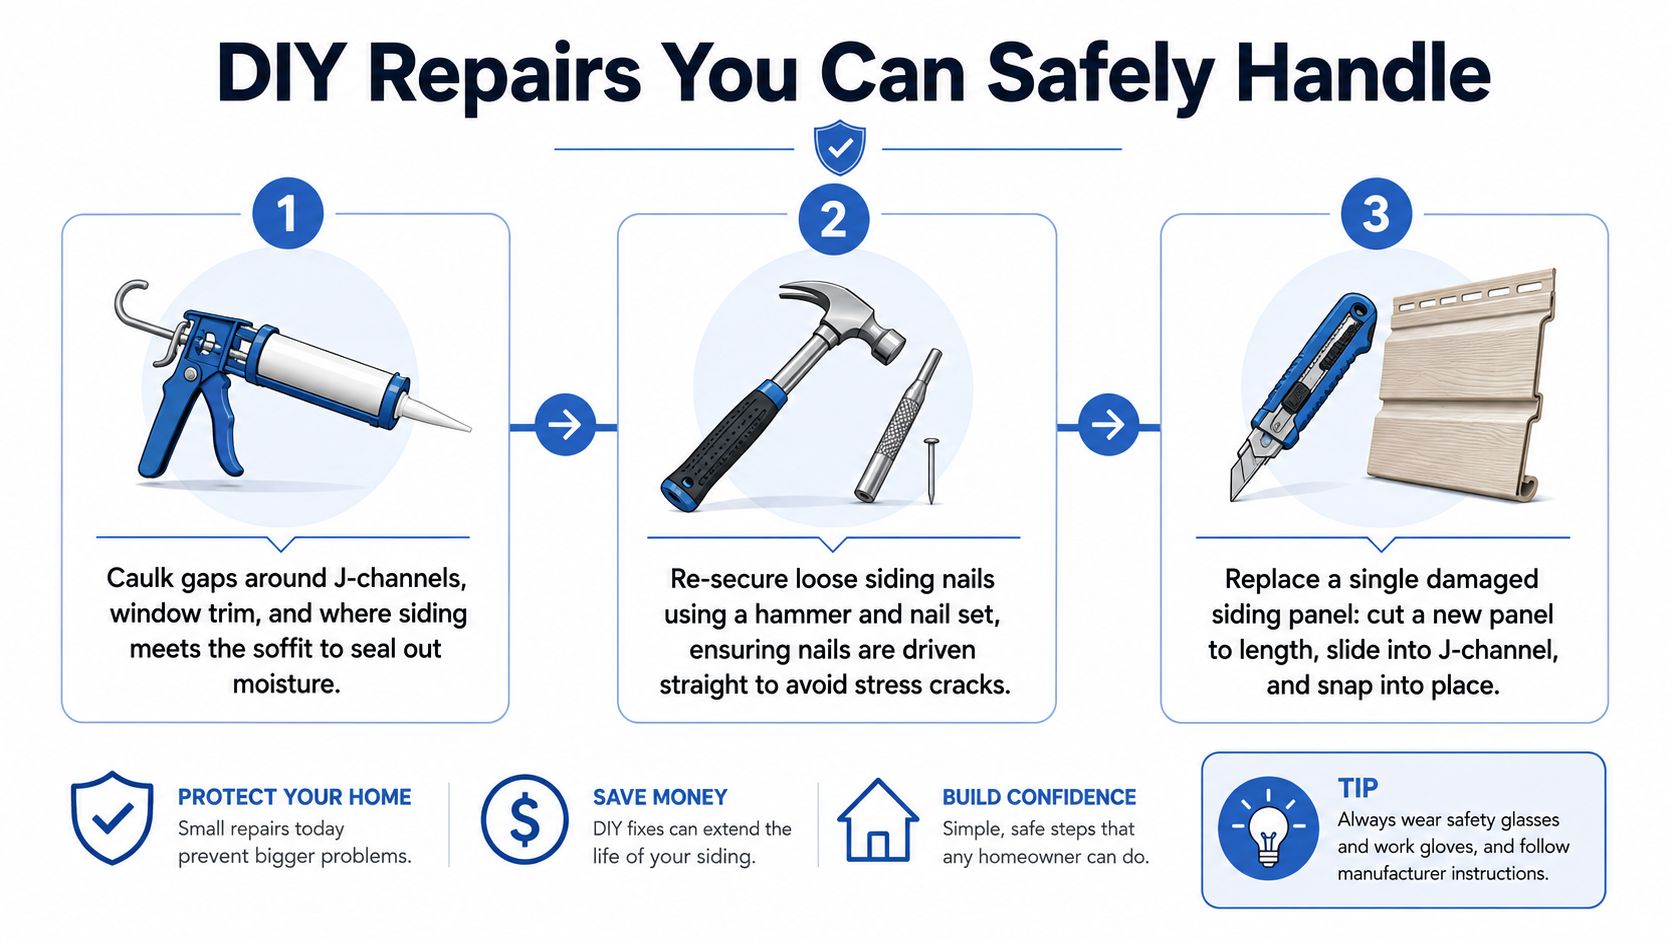
A cracked panel near a Columbus window or a loose corner after a windstorm is often manageable at ground level. Limit DIY work to isolated components, and stop if you uncover wet sheathing, soft trim, structural damage, or a problem spanning more than one course. Central Ohio's freeze-thaw cycles make a rushed patch more likely to fail behind the surface.
Seal small gaps without smearing the panel
For gaps around J-channels, window trim, or the joint where siding meets the soffit, use elastomeric or urethane caulk rated for exterior work. Clean the joint, let it dry, and apply a narrow bead. Tool it with a damp finishing tool or gloved finger, keeping excess off the visible siding.
Caulk cannot replace missing flashing. If storm-driven rain has been entering behind the trim, sealing the outside may trap moisture and hide the source. Check nearby wall areas for staining, softness, or recurring mildew before treating the opening as cosmetic.
Replace one damaged panel
A single cracked panel can usually be replaced with a zip tool, nail puller, and matching siding. Release the course above, remove the fasteners from the damaged panel, slide the replacement into its receiving channels, then reconnect the upper course.
Leave the manufacturer-specified movement space at the ends, typically 1/4 inch at openings and stops. If installation occurs below 40°F, allow 3/8 inch. The panel should hang from the center of each nailing slot. Do not pin it tightly, because vinyl must expand and contract as temperatures shift.
Reset loose trim carefully
A corner post or trim piece that has pulled loose may be reset if the surrounding material remains sound. Reposition it, then drive the fastener through the center of the nailing slot. The head should hold the trim without crushing it. Overdriving the fastener restricts movement and can contribute to stress cracks or buckling during temperature changes.
Do not attempt a large wall resection, soffit rewiring, or work above a single story alone. For the corner-post portion of this repair, follow this guide to replacing a vinyl siding corner. If the profile is discontinued or the sheathing feels soft, a patch will likely postpone the underlying repair rather than solve it.
Removing Stains, Mold, and Mildew
Not every stain should receive the same chemical treatment. Green mildew, black mold, rust runoff, and tree sap differ in both cause and removal risk. Start with the mildest compatible cleaner, test it in a hidden area, and rinse completely.
| Stain Type | Cleaner | Dilution / Ratio | Dwell Time | Key Caution |
|---|---|---|---|---|
| Green mildew | Oxygen bleach | 1 cup per gallon of warm water | Let it work briefly while the surface stays wet | Use soft bristles and protect plants |
| Black mold | Oxygen bleach first | Use the product label when it differs | Short, controlled dwell, never let it dry | Recurrence may indicate trapped moisture |
| Rust runoff | Rust remover rated for vinyl | Follow the product label | Keep contact limited | Test first, then rinse thoroughly |
| Tree sap | Mineral spirits, followed by soap and water | Use only enough to soften the sap | Work in small spots | Keep solvents off surrounding finishes |
Chlorine bleach may work on difficult organic staining, but it's a last resort. A siding maintenance guide allows a diluted mixture of 1 part bleach to 10 parts water for tougher stains, while warning against undiluted chlorine bleach and stressing a thorough rinse. Thompson Creek's siding maintenance guide provides that dilution guidance. Bleach can harm landscaping and may discolor the siding if it's too strong or left in place.
Keep the finish intact
Apply the cleaner from the bottom upward, then rinse from the top downward. That pattern limits streaks because the active cleaner doesn't run over dry, dirty areas and leave uneven trails. Use a soft-bristle brush with light pressure, especially on panels with a matte or textured finish.
Recurring mold deserves more attention than another wash. If the same area returns quickly, inspect nearby gutters, downspouts, vegetation, ventilation, and the wall behind the siding. Mold that keeps coming back can signal poor airflow or persistent moisture intrusion, and surface cleaning won't correct the source.
Preventing Problems Before They Start
The best vinyl siding care routine reduces the amount of water, heat, and debris the cladding has to manage. Central Ohio homes need particular attention at shaded walls, sun-exposed elevations, and transitions where gutters or trim direct water toward the siding.
Dark exterior colors deserve a realistic conversation. They absorb more heat, which increases expansion stress during hot summer weather. That doesn't automatically make a dark color unsuitable, but it makes correct fastening, movement clearance, and periodic inspection more important. If you're selecting new siding, lighter shades generally create a more forgiving maintenance profile.
Remove the moisture traps
Keep vegetation trimmed back from the siding line so leaves and branches don't rub the panels or hold dampness against them. North-facing walls often stay wet longer, especially where shrubs block air movement. Removing that contact gives the siding a better chance to dry after rain.
Gutters need the same attention. A clogged elbow or overflowing seam can send concentrated water behind a siding course, where it may reach housewrap, sheathing, or framing. Check that downspouts discharge away from the foundation and don't splash directly against the wall. The maintenance infographic specifies directing water at least 3 feet from the foundation, while the seasonal checklist above uses a broader 4 to 6 feet target before freeze-up.
West-facing walls deserve an annual light wash because sun and weather can bake pollutants into the surface. Cleaning won't reverse normal aging, but it removes the film that makes fading and surface dullness look worse.
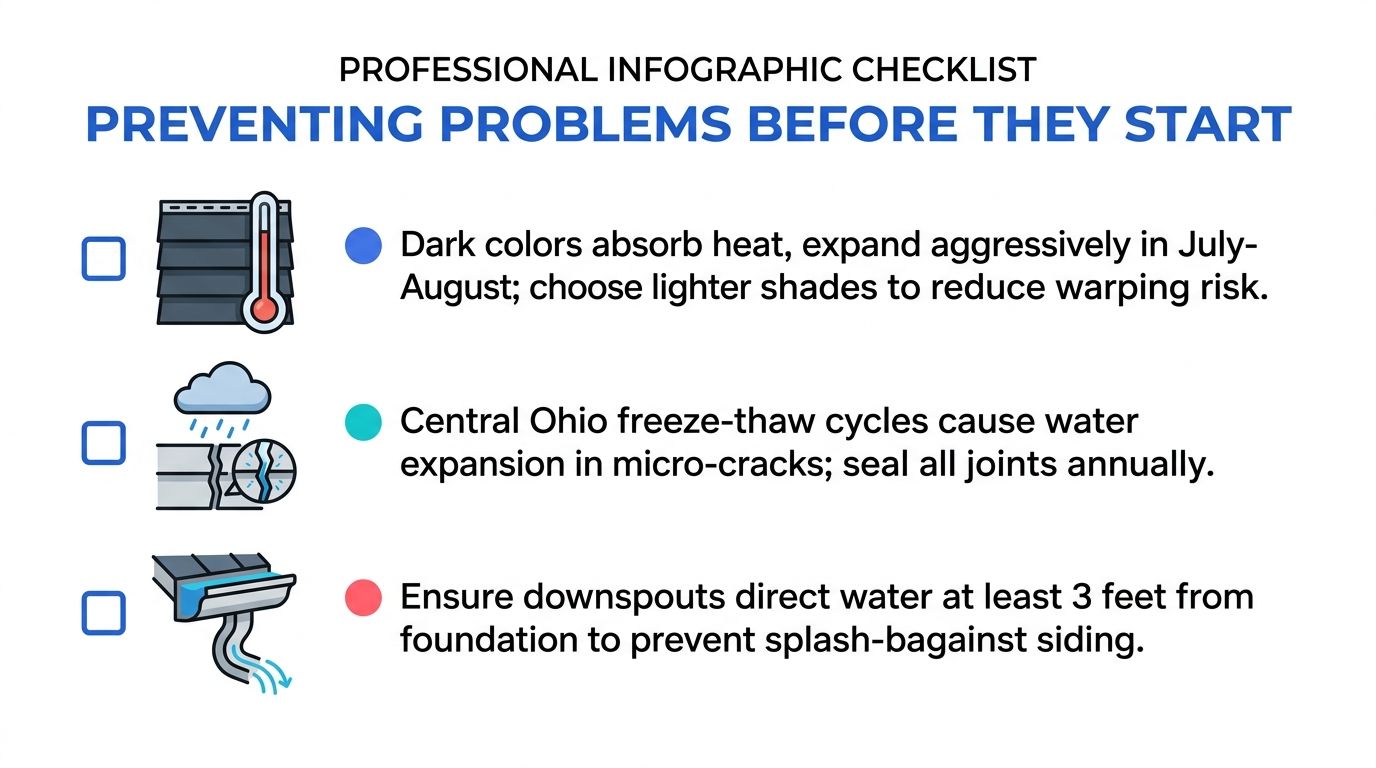
A simple perimeter habit prevents most surprises:
- Walk twice yearly: Check panels, trim, caulk, gutters, and vegetation in spring and fall.
- Scan after wind: Look for loose J-channel, lifted corners, and displaced laps after strong storms.
- Track sealant: Note caulk lines that have pulled away before freeze-thaw movement widens the gap.
- Maintain the tools: A practical tool maintenance checklist guide can help keep brushes, hoses, ladders, and hand tools ready before seasonal work begins.
The goal isn't to make the siding look new forever. It's to prevent small drainage and movement issues from becoming wall repairs.
When to Call a Licensed Contractor
Cleaning can remove a stain, but it can't correct a wall that's moving, wet, or structurally compromised. Homeowners sometimes keep patching because the visible damage seems limited to one panel. That approach stops making sense when the same defect appears across several courses or returns after every storm.
Stop treating the symptom when you see these signs
- Widespread warping or sagging: Multiple distorted panels can indicate heat stress, restricted movement, improper fastening, or moisture behind the cladding.
- Cracked courses across multiple stories: A single impact crack is different from a pattern that follows the wall.
- Interior water stains: Staining around windows, corners, or ceiling edges means the exterior needs a coordinated moisture investigation.
- Soft sheathing or recurring interior mold: These conditions require the wall assembly to be opened and evaluated, not just sprayed.
- Wind-torn sections or hail dents: Storm damage can affect siding, roofing, flashing, and gutters at the same time.
A licensed Columbus-area contractor should assess more than the panel face. That may include moisture mapping, fastener spacing and clearance, housewrap integrity, flashing transitions, drainage paths, and the availability of code-compliant replacement panels that match the existing profile. Full re-siding or structural repairs may require permits, depending on the scope and local requirements, so ask who handles that process before work starts.
Professional documentation also matters after hail or wind damage. Clear photographs, measurements, affected elevations, and a written scope can help separate storm-related repairs from ordinary wear during an insurance review. Don't accept a vague inspection that lists “siding damage” without identifying what needs repair and why.
Vet the contractor before authorizing work
Verify Ohio licensing where applicable, liability coverage, and workers' compensation coverage. Ask for local references, then request a written scope that separates diagnostic work, isolated repairs, and replacement. The proposal should identify materials, profile matching, trim work, disposal, and any permit responsibility.
HIBCO ROOF LLC provides inspections, repairs, siding replacement, gutter work, and storm or hail damage documentation for homeowners in Columbus and central Ohio. A sensible decision rule is this: if damage spans multiple courses, moisture appears inside, the wall feels soft, or the same repair fails repeatedly, stop patching and request an on-site evaluation.
If your Columbus-area home has recurring mildew, loose siding, storm damage, or aging exterior components, HIBCO ROOF LLC can inspect the siding, gutters, and related drainage points and provide a written scope for repair or replacement. Visit HIBCO ROOF LLC to request a free, no-pressure estimate and determine what your home needs before a small siding issue reaches the wall assembly.