Ask around about the damp stain beside a chimney and the answer comes back fast: buy the best tube of sealant for chimney flashing and run a fat bead along the joint. That advice is backwards. Sealant is the last line of defense in a stack of metal, membrane and masonry that sheds water by gravity, and no product on the shelf fixes a joint where the step flashing is short, missing, or glued to the brick instead of cut into it.
The product question still matters, but only after the geometry question is settled. A polyurethane rated for movement won't rescue a counterflashing that stops an inch above the shingles. A mid-grade bead, tooled properly over sound metal and clean masonry, can hold for years.
What follows is what sealant can and cannot do at a chimney, which products earn a place on the roof, the measurements that separate a repairable joint from a rebuild, and how to tell a failed bead from failed metal before you spend a dollar on caulk.
Table of Contents
- Sealants That Work on Chimney Flashing
- Why Sealant Alone Rarely Stops a Chimney Leak
- Flashing Layers Your Sealant Must Protect
- How to Apply Sealant to a Chimney Joint
- Telling a Failed Bead From Failed Flashing
- When Sealant Is the Wrong Repair
Sealants That Work on Chimney Flashing
For a joint between metal flashing and masonry, the short answer is a polyurethane flashing sealant that meets ASTM C920, Type S, Grade NS, Class 35. That rating means a field-applied, non-sag elastomeric product built to move with the joint. I stay away from oil-based sealant and roofing tar on flashing seams, and I do not treat either one as a permanent repair.
Product choice still comes after joint condition. If the counterflashing edge is loose, the reglet is shallow, or the step flashing leaves a vertical gap, a better tube only buys a cleaner-looking failure.
| Sealant type | Chimney flashing use | Verdict |
|---|---|---|
| Polyurethane flashing sealant (ASTM C920, Type S, Grade NS, Class 35) | Metal-to-masonry joints, including counterflashing edges and flashing terminations | Suitable when cured in dry weather |
| Polysulfide | Masonry chimney flashing | Suitable with proper priming and backer rod |
| Butyl | Masonry chimney flashing | Suitable with proper priming and backer rod |
| Silicone-rubber | Masonry chimney flashing | Suitable with proper priming and backer rod |
| Oil-based sealant | Advised against for masonry chimney flashing | Avoid |
| Tar or roofing cement | Not a flashing sealant | Avoid as a permanent repair |
Where Each Product Stops Working
Polyurethane is the only row here with a published movement rating worth checking before purchase. A typical polyurethane roof and flashing sealant carries a service range of -40°F to 180°F, roughly seven days to cure under the conditions in its data sheet, and movement capability around plus or minus 35 percent, according to the OSI polyurethane roof and flashing data sheet. The same sheet rules out permanent water immersion and warns against deep joints filled without backer rod, two limits that matter at a chimney where the joint is often deeper than it is wide.
Polysulfide, butyl and silicone-rubber remain the traditional masonry choices. Each needs a clean, primed surface and backer rod in a deep joint to perform as intended. Silicone-rubber handles sun exposure better than butyl, but it will not take paint, which matters on a visible chimney face.
Oil-based sealant and roofing tar skin over, dry brittle and pull away from brick. They can hide a wet path for a season while the metal joint underneath keeps taking water, and the residue makes the next proper repair harder because fresh sealant will not bond reliably to it.
Compatibility with what is already there is the last check. Silicone and polyurethane behave differently on masonry than on metal, and a sealant selection guide for UAE contractors is useful only for the chemistry comparison; the chimney still gets judged by the flashing metal, asphaltic membrane, mortar and underlayment in front of you. A product that looks compatible on paper can still release from a dusty brick face.
Why Sealant Alone Rarely Stops a Chimney Leak
A bead of sealant is the zipper on a raincoat. It closes a seam that's supposed to stay closed, and it does that job well. It is not the hood. The hood is the flashing: metal step flashing lapped under the shingles, counterflashing cut into the masonry, and the water-shedding layers under both. Water leaves a roof by gravity, handed outward layer by layer until it reaches the gutter. Sealant's real assignment is narrow. It closes the designed joints in that assembly, absorbs the small movements between brick and metal, and keeps wind-driven rain out of the seams.
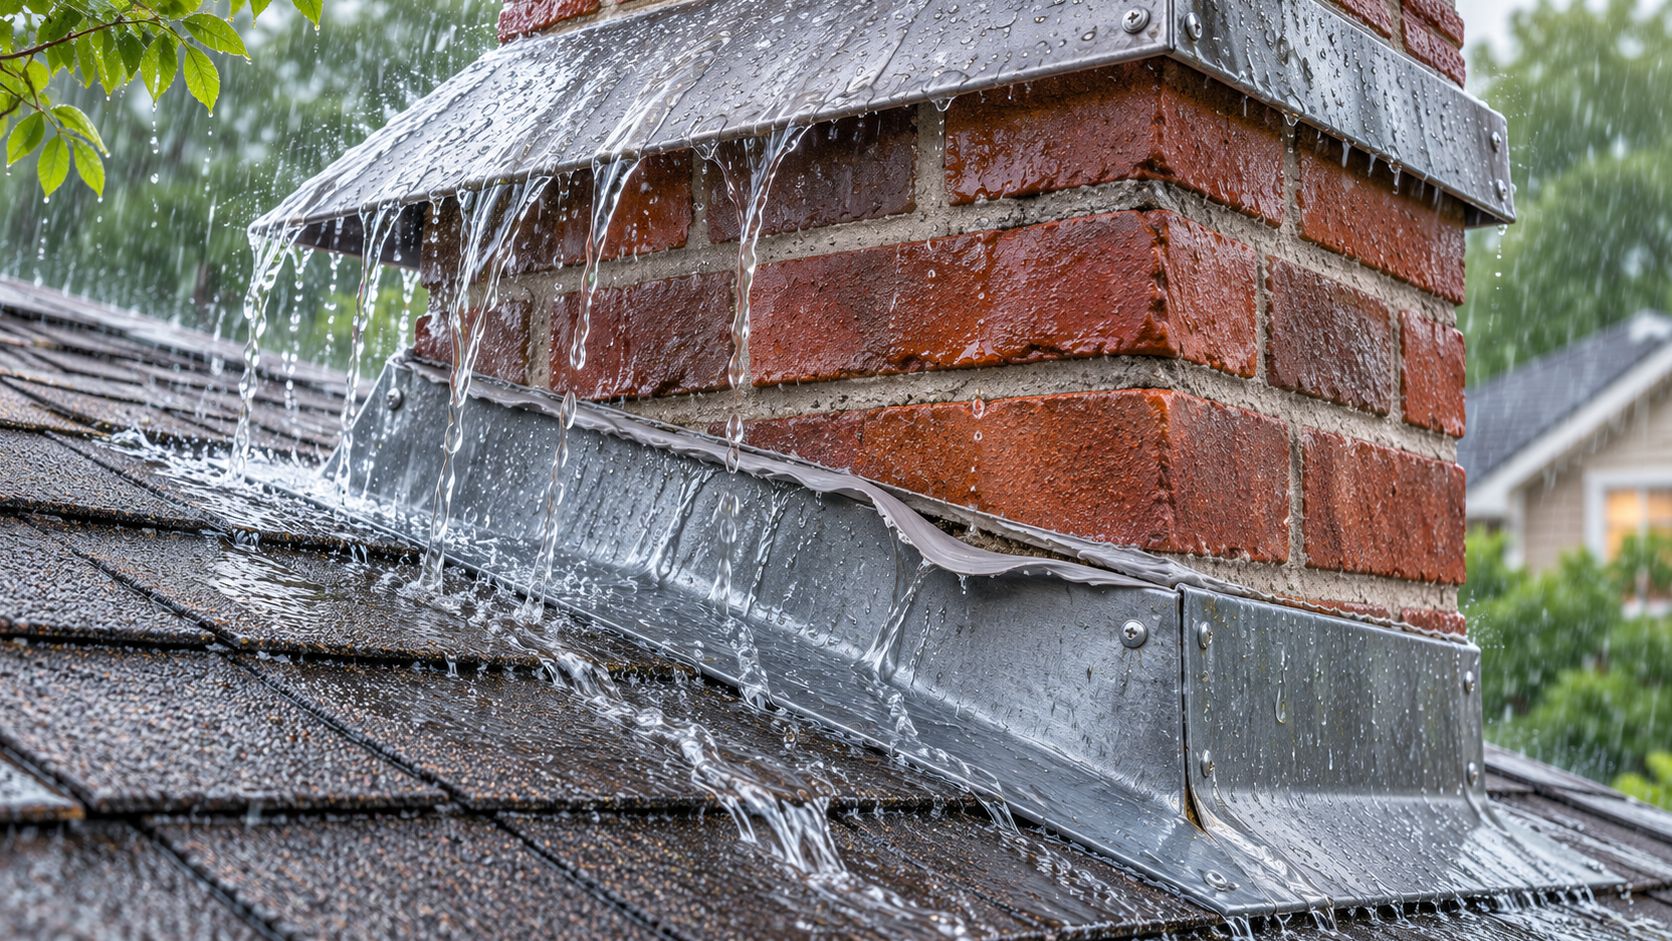
Even when product and technique are both right, sealant is a maintenance item with a clock on it. The ASTM Standard Guide C1193 treats a sealant joint as having both a design life and a service life, and ties performance to polymer type, formulation, compatibility with adjacent materials, installation quality, joint design, maintenance and environmental exposure. The guide works through a 50-year building design-life example, then cautions that sealant joints may need localized repairs, or complete replacement more than once, during that same period.
What that means on a roof: a bead applied over cracked, dirty, wet or badly detailed flashing is a stopgap, not a 50-year repair.
The practical test isn't whether the bead looks tidy. It's adhesion to both metal and masonry, how much the joint moves, ultraviolet exposure, freeze-thaw cycling, and whether water is getting in behind the flashing rather than through the seal you can see. Central Ohio's swing between wet springs and hard freezes makes sealant continuity worth an annual look, but the metal geometry underneath is still the primary defense against runoff. Pair compatible sealant with sound flashing details and a scheduled inspection, and skip the fantasy that caulk alone will do it.
Flashing Layers Your Sealant Must Protect
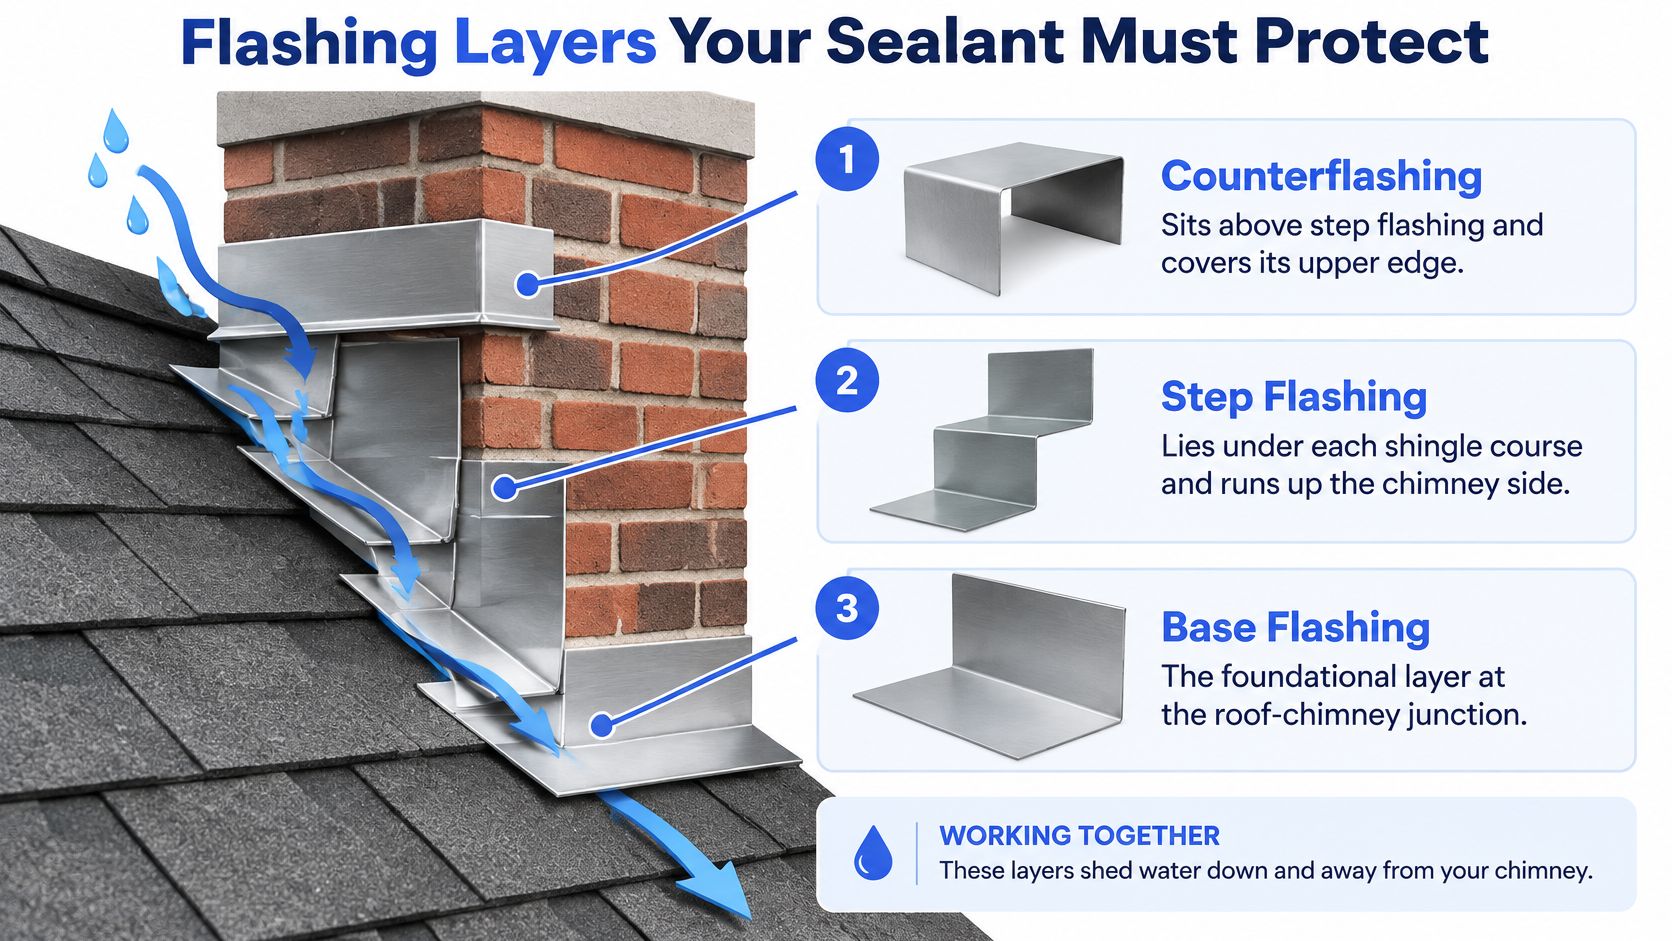
Water meets a chimney in a fixed order: roof deck, underlayment, base flashing, step flashing, counterflashing, then air. Every layer hands the water to the next one downhill. Sealant sits at the joints in that stack, which is why it can slow a leak and cannot replace a single layer beneath it.
Layer by Layer, With the Numbers
Counterflashing is the piece you can see. It covers and protects the upper edge of the base flashing, and on masonry it belongs in a reglet, a joint cut into the mortar. NRCA guidance puts the reglet at at least 1 inch deep, with 1.5 inches preferred, and calls for the counterflashing to project beyond the base or step flashing before it turns down, creating a capillary break that stops water from crawling back behind the assembly (NRCA roofing guidelines). A compression fit in that joint, with a compatible urethane bead tooled over the metal edge, is the detail that lasts.
Step flashing is the part you can't see from the ground. Each piece is an L bent to sit under a shingle course and against the chimney side, and each course laps the one below. Masonry-chimney guidance calls for the flashing to extend at least 4 inches up the chimney face, for the metal to be inserted into the mortar joint by about 3/4 to 1 inch, and for counterflashing to overlap the base flashing by at least 3 inches (masonry chimney flashing guidance). Every base and counterflashing joint in that system gets sealed.
If you want to understand what those metal edges are tying into, this walkthrough of what goes under roof shingles shows the underlayment and shingle courses that step flashing laps into.
| Measurement | Required value | If not met |
|---|---|---|
| Flashing extension up chimney face | At least 4 inches | Plan replacement if shorter |
| Counterflashing overlap on base flashing | At least 3 inches | Plan replacement if shorter |
| Counterflashing insertion into mortar joint | About 3/4 to 1 inch | Re-cut the joint if shallower |
| Reglet depth (NRCA) | At least 1 inch, 1.5 inches preferred | Re-cut the reglet |
| Sealant bond area | At least 1/4 inch | Clean the surfaces and reseal |
| Weatherseal joint width | At least 1/4 inch | Reseal to the designed width |
| Polyurethane cure time | About 7 days | Keep the joint dry through the cure |
| Polyurethane movement capability | Plus or minus 35 percent (ASTM C920 Type S, Grade NS, Class 35) | Check the data sheet before purchase |
| Service temperature range | -40°F to 180°F | Confirm against local conditions |
A missing layer announces itself in predictable ways. No step flashing at a back corner, laps that open up after a freeze, or counterflashing glued to the brick face instead of seated in a cut joint all look fine from the driveway and leak from October to April. A bead run along the exposed face cannot compensate for any of them. Go up on a ladder, or have someone go up, and check the mortar joint and sealant line for cracking, debonding or lost compression after the winter heave, before the spring rains find the gap.
How to Apply Sealant to a Chimney Joint
Most resealed chimneys that leak again failed at the surface, not in the tube. Prep does the work, and the sequence below is the one that holds.
Confirm the flashing is sound and the surfaces are dry. Run a putty knife along the flashing edge and push on the counterflashing. Look for rust-through, lifted laps, or metal that moves. Sealant over wet metal or damp brick won't bond, whatever the tube promises.
Strip the old material down to a clean substrate. Warm old mastic with a heat gun on low, keep the heat moving, and scrape with a stiff putty knife before wiping the residue with mineral spirits. Scrub mortar with a wire brush. Prime where the product calls for it, because a primed joint is a different joint.
Measure the bond area before you load the joint. Manufacturer guidance commonly specifies at least a 1/4-inch bond and a 1/4-inch-wide weatherseal joint (Loctite PL roof and flashing polyurethane data sheet). That same sheet lists 350 psi tensile strength, 800 percent elongation and nil shrinkage, which is the data telling you how far the cured bead can stretch before it tears. A joint narrower than a quarter inch starves the sealant and it fails at the bond line.
Set backer rod in any joint deeper than it's wide. Foam rod gives the bead a round back, controls the depth and stops three-sided adhesion, which is the condition that rips a sealant apart as the joint moves.
Match the sealant to every material it touches. The flashing metal, the asphaltic membrane, the mortar and the underlayment all have to be compatible. Chemical compatibility on a chart doesn't automatically mean adhesion on a weathering steel edge or a chalky mortar joint.
Apply only at designed joints and tool the bead. Push sealant into the joint, tool it for continuous contact on both faces, and keep it out of drainage paths. Sealant smeared over a weep or a drainage opening traps moisture behind the counterflashing, and that trapped water does more damage than the original drip.
Work inside the temperature and cure limits. Read the application range on the label and keep the joint dry through the cure window. A bead that takes rain at hour twelve is a bead you'll be replacing next season.
What a Finished Joint Looks Like
The result is easy to grade. Sealant should touch both surfaces continuously, with no voids, no bridges across a gap it can't reach, and nothing covering a drainage opening.
A proper bead looks slightly concave, sticks to clean metal and clean brick, and stops where the joint stops. If it's slathered six inches wide to hide cracked mortar, that's a patch, not a repair.
The same discipline governs skylight flashing installation: the metal and membrane do the shedding, and sealant works the terminations. Get that order right on a chimney and the bead lasts years instead of months.
Telling a Failed Bead From Failed Flashing
Sealant fails more often than homeowners expect. Field surveys of building joints have long found that a large share of installed sealants lose their seal well inside their expected service life, and durability research identifies loss of adhesion as the predominant failure mode in the field, with wind-driven rain entering cracks in both extended and non-extended joints (ASTM STP 1583 on sealant durability). The same body of research shows that well-formulated sealants on properly prepared joints can hold for years outdoors, which tells you the failure rate is a choice, not a fate. Preparation and joint design move that number a long way.
So inspect the bead first. Then inspect the metal anyway, because an intact bead with a live leak is a different problem with a different repair.
| Symptom | Likely source | Next action |
|---|---|---|
| Bead cracked, lifting or pulled from the metal | Failed sealant, adhesion lost | Remove old material and reseal on prepared surfaces |
| Bead intact but ceiling stain near the chimney | Water behind the flashing or failed step flashing | Repair or replace the flashing; sealant alone will not fix it |
| Gap where counterflashing meets mortar | Counterflashing not cut into a reglet | Re-cut the joint or rebuild the counterflashing |
| Cracked mortar joints or loose crown above the roof | Masonry movement or freeze-thaw damage | Repoint the masonry and seal joints with a compatible sealant |
| Water pooling beside a wide chimney | Chimney wider than the roof detail can drain | Ask for a cricket; a larger bead will not drain it |
| Leak that continues after sealing | Sealant placed over a defect, not the source | Stop sealing and inspect the flashing system |
Five Checks in the Order That Saves Money
- Trace the bead end to end. A cracked or peeled section, or a bead you can lift with a fingernail, is adhesion failure. That one is a reseal, done properly.
- Look at where counterflashing meets mortar. A metal edge sitting on the brick face is a patch. An edge driven into a cut joint is a repair.
- Read the masonry above the roofline. Hairline mortar cracks and a loose crown let water into the chimney body, and it shows up as a ceiling stain far from the flashing.
- Check the stain pattern inside. Staining that appears within hours of a hard rain points to a direct path at the flashing. A slow spread over days points to masonry saturation.
- Judge the chimney's width against the roof detail. A chimney broad enough to collect a real volume of water needs a cricket to divert it, not a thicker bead.
The rule of thumb: adhesion loss means strip it and reseal. A sound bead over a leak that won't quit means the problem lives somewhere sealant can't reach.
Re-sealing works when the deteriorated material comes off and the surfaces underneath are restored. Fresh sealant over old, dirty sealant just hides the failure for a season, and every season it hides it, water keeps working on the wood underneath.
When Sealant Is the Wrong Repair
A more expensive sealant won't extend the life of a flashing assembly that was built wrong. That's the part most product advice skips. Ohio's building code requires flashing at roof-to-chimney intersections and spells out through-flashing and the drainage details around it (Ohio Administrative Code 4101:1-21-01). Read that as a standard for what the assembly has to accomplish, not for which caulk goes on top. A visible bead proves somebody was on the roof. It doesn't prove the water has a way out.
Plan on replacement, not another tube, when you find any of these:
- Missing or misplaced metal. No step flashing at a corner, or flashing that never climbs the chimney face.
- Counterflashing that isn't mechanically held. Glued to brick rather than seated in a cut joint or covered by a reglet.
- Blocked drainage behind the chimney. Water has nowhere to go but inward, and sealing the visible seam makes it worse.
- The wrong metal geometry. Laps running the wrong direction, corners that were never closed, or a back pan with no slope.
- A chimney too wide for the roof detail. That calls for a cricket, and a cricket is carpentry and sheet metal, not sealant.
Where a repair does involve a membrane or a taped seam rather than a bead, a leak-proofing guide for Fort Worth roofers covers how flashing tape is lapped, pressed and detailed so it stays part of the water-shedding system instead of becoming another surface patch.
The Checklist Before You Buy Sealant or Book Work
- Photograph everything. Bead, flashing, mortar joints and crown, from the roof and from the ground. Photos settle arguments later.
- Log the leak. Note where water shows inside and how quickly it appears after rain, since timing points at the source.
- Ask for a full inspection. Step flashing, counterflashing, mortar joints, drainage and chimney crown, not just the sealant line.
- Reseal only if the metal is sound and the bead has failed. That's the narrow case where a bead is the right answer.
- Ask the direct question. Is repair or replacement the better long-term investment here, and why?
If a leak keeps returning after a reseal, the diagnosis usually starts above the stain rather than beside it, and this guide to chimney leak repair follows that order. We'd rather tell you the flashing needs rebuilding than sell another bead. If a repair will hold, we say so; if replacement is the better long-term investment, we explain why, without pressure or sales tactics. Missing shingles, damaged flashing, pipe boot failures and storm-related damage can often be repaired, and that's the first thing worth checking.
The decision at the end of all this is simple. Sound metal and a failed bead means reseal it correctly, once. Defective geometry means fix the flashing first and treat the caulk as a secondary detail that keeps a designed joint closed. Anything else is a patch on a problem that has already won.
HIBCO ROOF LLC inspects chimney flashing across Columbus and central Ohio, checking step flashing, counterflashing, mortar joints, drainage and the crown before anyone recommends a tube of sealant. If the metal is sound and the bead failed, we reseal it properly; if the flashing system is the problem, we explain what a repair or rebuild involves and what it will take to make the chimney dry, with free inspections and a written estimate. Visit HIBCO ROOF LLC to schedule an inspection and get a straight answer on whether sealant will hold.