You notice the problem after a hard Columbus rainstorm. The gutter is full, the fascia paint is peeling, or a dark mark has appeared along the roof edge. Nothing looks dramatic from the yard, yet water may be finding a narrow path behind the fascia and into the roof edge.
That small metal strip along the perimeter is the drip edge on a house, and it does more than give the roof a finished appearance. It helps move runoff away from vulnerable wood, connects the shingle edge to the gutter system, and works with underlayment to keep water on the intended drainage path.
A drip edge can't correct every roof problem, and gutters can't replace it. The result depends on the complete edge assembly, including the flashing, fascia, gutter alignment, underlayment, ice-and-water membrane where appropriate, and the way each layer overlaps the next.
This guide explains the detail in plain language. You'll learn what drip edge does, which materials and profiles you may encounter, how modern residential code treats it, why installation order matters, and which warning signs deserve attention. The information is intended to help Columbus-area homeowners ask better questions during an inspection, repair, storm assessment, or roof replacement.
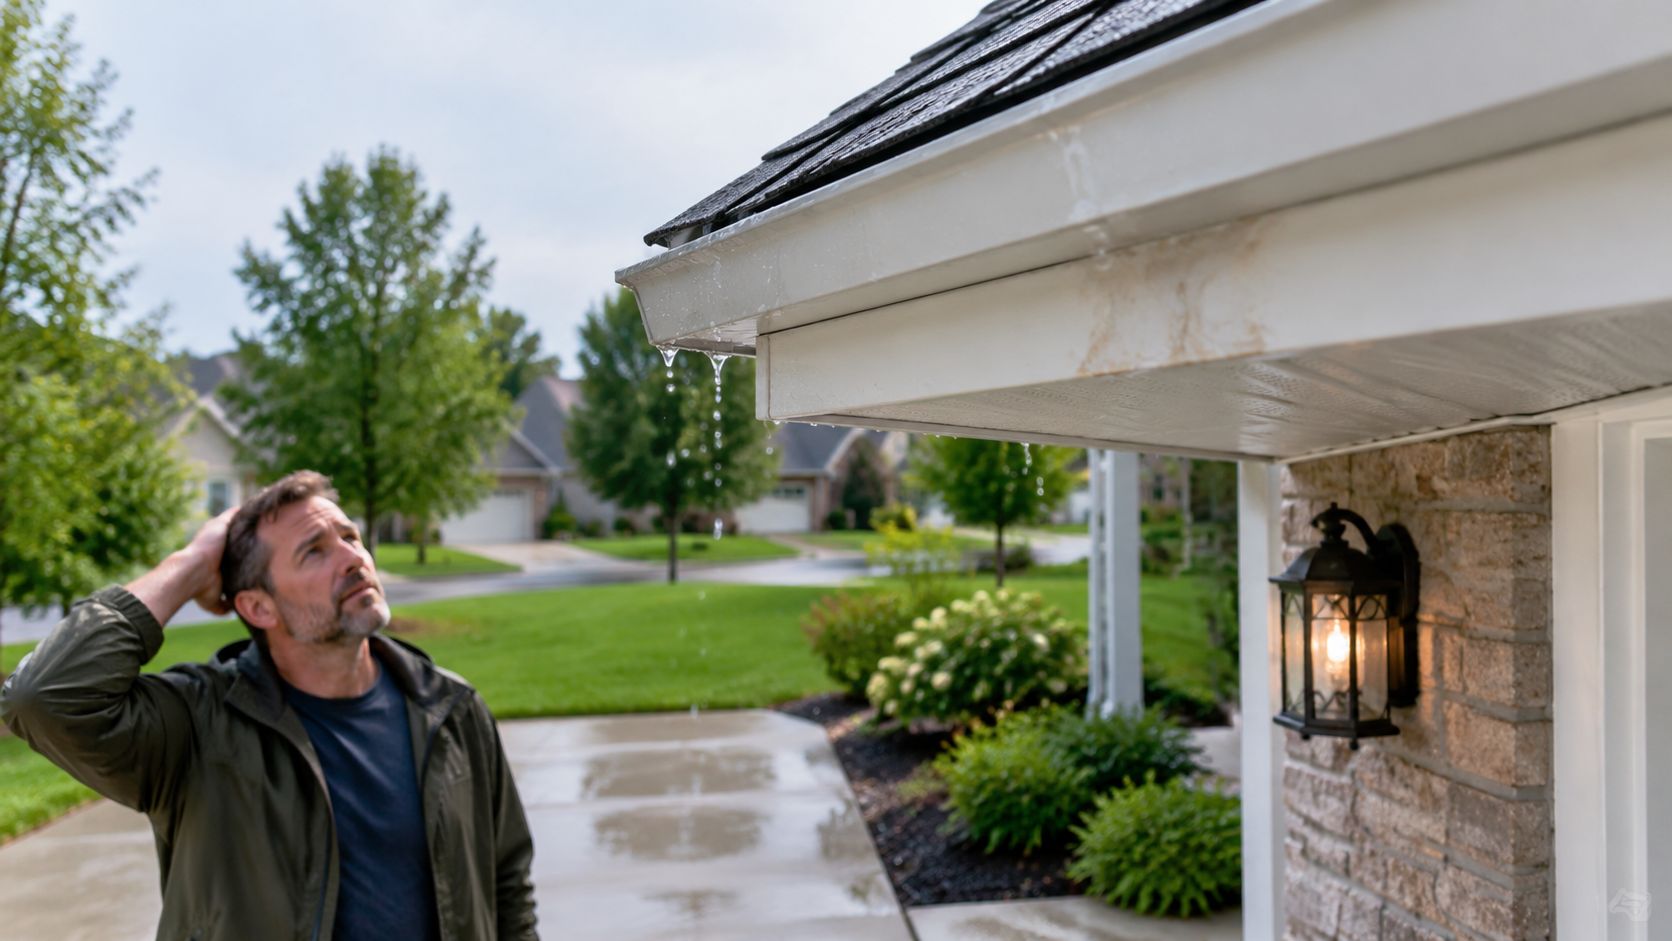
Table of Contents
- Introduction Why a Small Metal Edge Protects Your Whole Roof
- What a Drip Edge Is and How It Moves Water Away
- Common Drip Edge Types Materials and Profiles Explained
- Code Requirements and Correct Installation Sequencing
- How Drip Edge Works With Gutters Fascia and Underlayment
- Signs Your Drip Edge Is Missing Damaged or Failing
- Protecting Your Roof Edge and Next Steps for Homeowners
Introduction Why a Small Metal Edge Protects Your Whole Roof
A homeowner may first blame the gutter when water appears at the fascia. That's understandable. The gutter is the visible part of the drainage system, so a loose section, clogged outlet, or overflowing run seems like the obvious source. But the roof edge can still leak behind the gutter when the drip edge is missing, short, bent, poorly overlapped, or installed in the wrong relationship to the underlayment.
Consider a roof where the shingles look serviceable from the ground. During ordinary rain, runoff may enter the gutter without an obvious problem. During wind-driven rain, however, water can cling to the shingle edge and travel backward toward the fascia. Repeated wetting can affect paint, trim, and the wood at the sheathing edge before an interior ceiling stain ever appears.
The roof edge is a system
The drip edge is one part of a connected water-management assembly. The shingles shed water, the underlayment supports the drainage plane, the metal flashing guides runoff outward, the gutter captures it, and the fascia provides the finished structural edge. If one layer leaves a gap, the other components may not be able to compensate.
That's why a gutter guard, newer shingles, or a freshly painted fascia doesn't automatically solve an edge problem. Each product performs a different job. A guard helps manage debris, shingles cover the roof surface, and paint protects exposed trim, but none creates the same capillary break as properly positioned drip edge.
Practical rule: Judge the roof edge by how the layers work together, not by whether one visible component looks new.
For Columbus homeowners, this matters during routine maintenance and after storms. A ground-level inspection can identify clues, but a roof professional may need to examine the edge beneath the shingle courses to confirm whether the metal is present and correctly sequenced. HIBCO ROOF LLC provides roofing inspections, repairs, replacements, and related exterior work for Columbus and central Ohio homeowners, making system-based edge evaluation part of a broader roof assessment rather than an isolated cosmetic check.
By the end of this guide, you'll have a practical checklist. You'll know what drip edge is supposed to do, what installation details to ask about, which symptoms suggest hidden damage, and when a targeted repair may be appropriate instead of waiting for a larger roof-edge failure.
What a Drip Edge Is and How It Moves Water Away
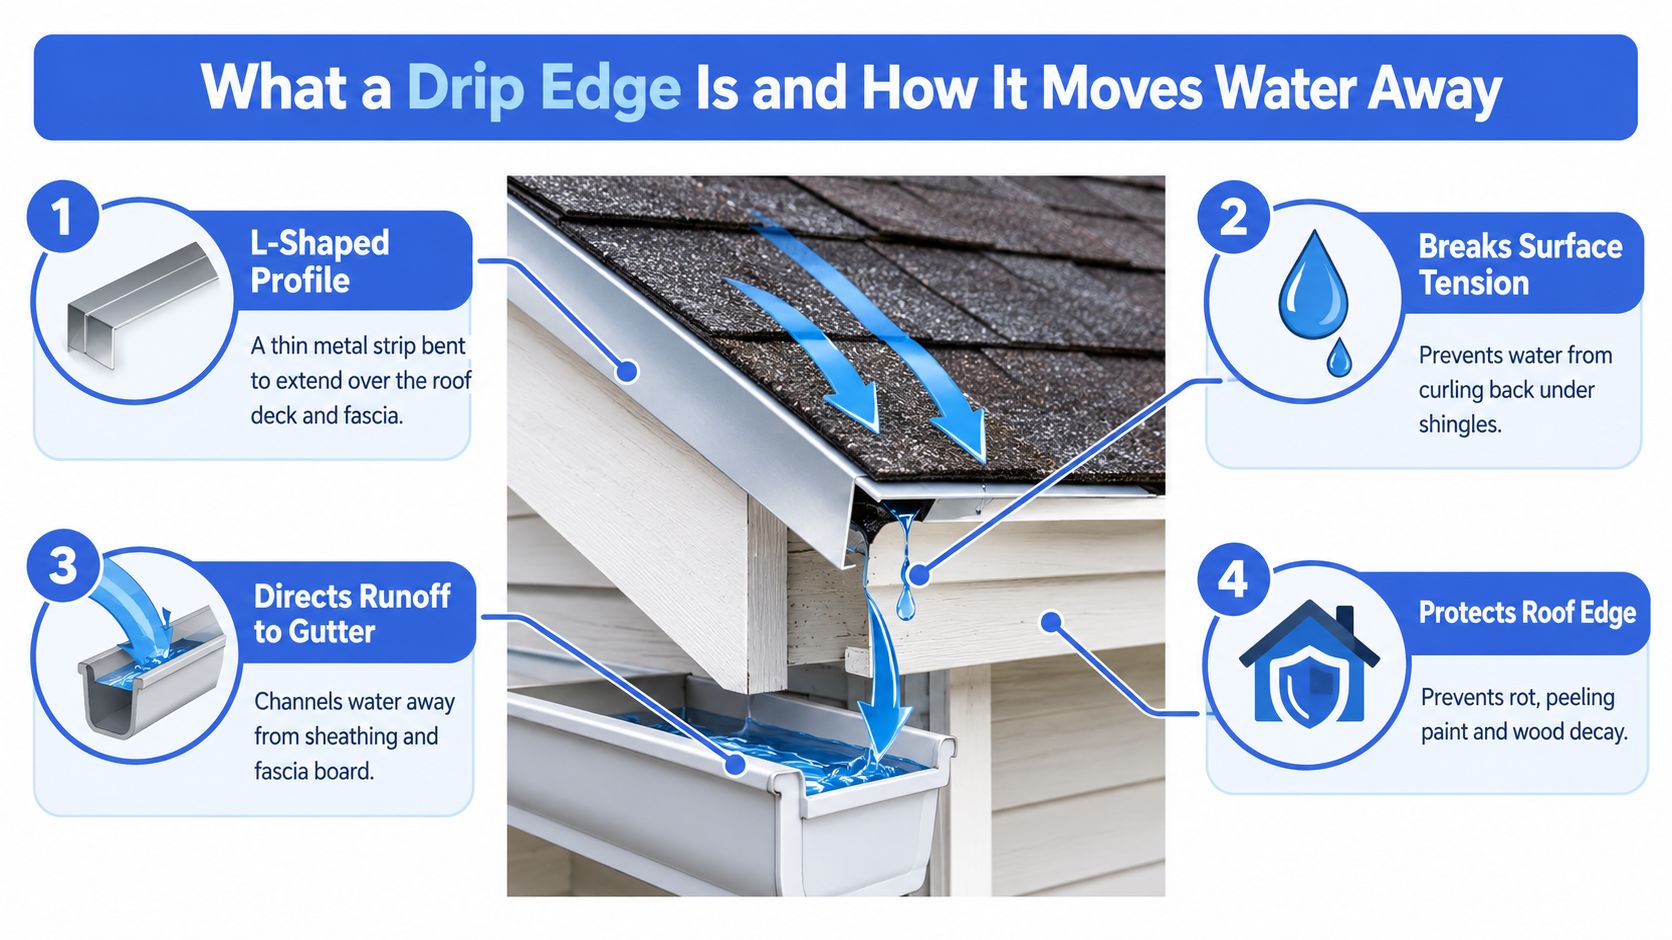
A drip edge is an angled metal flashing installed along the eaves, the lower horizontal roof edges, and the rakes, the sloped edges at the sides of a gable. Its shape creates a controlled transition from the roof deck and shingle field to the fascia and gutter.
The upper flange rests on or over the roof assembly, while the vertical leg extends down near the fascia. That bend gives water a surface to follow until gravity pulls it away from the wood. The metal doesn't merely block water. It changes the path water takes at the most exposed edge of the roof.
Think of the edge like a window lip
Water doesn't always fall straight down. Surface tension can make a thin film cling to a material and curl around an edge. You may have seen the same behavior on a window sill or the underside of a countertop. Without a projecting lip, water can track back toward the surface behind it.
The drip edge interrupts that movement. Its outward bend creates a capillary break, separating the wet roof edge from the fascia and directing runoff toward the gutter or away from the wall line.
Water should leave the shingle edge and continue outward, not turn the corner and soak the wood behind it.
Where it fits in the assembly
At the eave, the flashing sits at the lower edge of the roof deck and interacts with the underlayment, shingles, fascia, and gutter. At the rake, it protects the sloped perimeter where wind can push rain sideways beneath the shingle edge.
The result is a more continuous drainage plane. Instead of allowing water to find a rough, absorbent wood edge, the roof gives it a smooth metal route toward the exterior. The detail is especially important on asphalt shingle roofs because the shingle courses depend on the edge flashing and underlayment to manage runoff at the perimeter.
A properly installed piece also helps cover small transitions between the roof deck and fascia. It doesn't replace sound wood, correct gutter pitch, or properly installed shingles. It supports those components by making the final water-shedding path more predictable.
Common Drip Edge Types Materials and Profiles Explained
Homeowners usually encounter drip edge choices in two categories, material and profile. Material affects corrosion resistance, rigidity, appearance, and handling. Profile affects how far the flashing covers the roof edge, how it meets the fascia, and how it directs water toward the gutter.
There isn't one universal size for every roof. Common products are sold in profiles such as 2 x 2 inches, 2.5 x 2.5 inches, 2 x 3 inches, and 3 x 3 inches, as shown in standardized residential drip edge product profiles. The correct choice depends on the roof assembly, overhang, fascia condition, gutter position, and exposure.
Material differences
Aluminum is lightweight, corrosion-resistant, and easy to form around corners. It's widely used on residential work and is available in finishes that coordinate with gutters and fascia.
Galvanized steel is heavier and more rigid. That can help the flashing hold a straighter line, but damaged or exposed coating can allow corrosion to develop. Installers also need to consider how the metal interacts with nearby components.
Copper provides a distinctive appearance and develops a patina over time. It's a premium material choice and should be selected with the surrounding roof, gutter, and trim finishes in mind.
Profile selection matters just as much as the metal. A simple L-shaped piece may suit a straightforward edge, while a design with a wider flange or stronger outward projection may handle a wider gap or a more demanding gutter transition.
Drip Edge Materials and Profiles at a Glance
| Material/Profile | Best For | Key Trade Off |
|---|---|---|
| Aluminum | Common residential roofs and color-matched trim | Lightweight and corrosion-resistant, but easier to bend |
| Galvanized steel | Edges where added rigidity matters | Stronger and heavier, with corrosion concerns if the coating is damaged |
| Copper | Architectural work and premium exterior finishes | Long-lasting appearance, but higher material cost and finish impact |
| L or C-style profile | Straightforward standard eaves | Simple shape, with less coverage than extended profiles |
| T or D-style profile | Roof edges requiring more outward water direction | Better water throw, with a more pronounced shape |
| F or gutter-apron profile | Wider fascia gaps and gutter transitions | More coverage, but bulkier to form and install |
The best match isn't chosen by appearance alone. A roofer should compare the existing gutter position, shingle type, roof pitch, edge exposure, and the condition of the fascia before selecting a profile. The goal is to keep runoff moving outward without leaving a gap where water can wick behind the assembly.
Code Requirements and Correct Installation Sequencing
Modern code changed the status of drip edge on asphalt shingle roofs. The history of drip edge in the International Residential Code shows that the IRC didn't require metal drip edge along eaves and rake edges until the 2012 IRC edition. The 2018 IRC and 2021 IRC continued the requirement, treating the detail as a standard part of shingle-roof construction.
For homeowners, the practical point is simple. Code-compliant drip edge generally belongs at both the eaves and rakes, not only at the gutter edge. IRC Section R905.2.8.5 code summaries identify drip edge at both locations as a modern residential roofing requirement for asphalt shingles.
Dimensions inspectors and homeowners should understand
The code details provide a consistent baseline:
- Roof coverage: The flange extends back onto the roof deck at least 2 inches.
- Vertical protection: The vertical leg extends at least 1/4 inch below the sheathing.
- Piece-to-piece joints: Adjacent segments overlap at least 2 inches.
- Fastening: Mechanical fasteners are installed at intervals no greater than 12 inches on center.
- Edge locations: The flashing is provided at both eaves and rake edges of shingle roofs.
A Georgia residential code form provides a useful example of how these requirements are applied locally. Georgia made drip edge mandatory under its statewide minimum residential code effective January 1, 2014, with requirements covering eaves and gables, two-inch laps, the roof-deck extension, the vertical leg, and fastening intervals. Local enforcement can differ by jurisdiction, so a homeowner should confirm requirements with the authority having jurisdiction for the property.
Sequence changes at the eave and rake
The installation order is not the same on every edge. At the eave, the drip edge goes on the roof deck first, and the underlayment goes over the metal. At the rake, the underlayment is installed first, and the drip edge goes over it.
That sequence helps water stay on the intended drainage path. At the eave, water moving down through or across the underlayment can reach the metal and discharge outward. At the rake, placing the flashing over the underlayment helps protect the side edge from wind-driven rain entering beneath the membrane.
For a homeowner reviewing a replacement scope, what goes under roof shingles is a useful related question because shingle performance depends on the layers beneath and around it. Ask the contractor to identify the eave and rake sequence, not merely to state that drip edge is included.
How Drip Edge Works With Gutters Fascia and Underlayment
A gutter collects water. A drip edge controls how water reaches the gutter. Those jobs overlap, but they aren't interchangeable.
A gutter mounted beneath a bare shingle edge may catch much of the runoff during calm weather. It still can't stop water from curling backward against the fascia or entering the roof-edge joint. The metal flashing creates the outward break that keeps the water moving away from the wood before the gutter receives it.
Four parts, four jobs
The fascia forms the visible board along the roof edge. It can receive moisture when flashing is too short, pulled away, or incorrectly lapped.
The underlayment sits beneath the shingles and helps manage water that gets below the shingle surface. Its relationship to the drip edge determines whether water exits over the metal or finds a path behind it.
The ice-and-water membrane, where included in the roof assembly, adds a self-adhering layer in vulnerable areas such as eaves and valleys. It doesn't eliminate the need for correctly positioned metal.
The gutter captures directed runoff and carries it toward a downspout. It needs suitable alignment so water lands inside rather than behind or beyond the front edge.
A gutter is the collection channel. Drip edge is the transition that gets water into that channel without wetting the roof structure.
What failure can look like
A missing or mis-sequenced edge may leave dark staining on the fascia, swelling at the sheathing edge, or peeling paint below the shingles. The gutter may appear functional while the wood behind it continues to receive moisture.
Wind makes the problem harder to diagnose. Rain can move sideways beneath an exposed rake edge or push against a poorly overlapped joint. Heavy runoff can also reveal a profile mismatch, especially where the gutter sits too far below the shingle edge or the flashing doesn't project far enough.
The gap between drip edge and gutter deserves attention during any roof or gutter evaluation. A small visible gap doesn't automatically prove failure, but it tells you to examine water direction, fascia condition, and the relationship between the flashing and gutter rather than judging the gutter alone.
Signs Your Drip Edge Is Missing Damaged or Failing
You don't need to climb onto the roof to identify warning signs. Stand where you can see the eaves and rakes safely, use binoculars if necessary, and inspect after dry weather rather than reaching over a ladder or gutter.
Look for patterns, not one isolated mark. A single paint defect may have another cause, but several edge symptoms together justify a closer inspection.
Ground-level clues
- Rust streaks: Corrosion can indicate age, damaged finish, standing moisture, or separation at a joint.
- Bent or lifted metal: A storm, ladder, wind, or poor fastening may have pulled the flashing away from its intended line.
- Open seams: Gaps between segments can interrupt the outward drainage path.
- Fascia staining: Vertical dark marks beneath the shingle edge suggest repeated wetting.
- Peeling paint: Moisture may be reaching the fascia from behind rather than from rain striking the front surface.
- Gutter separation: A gutter pulling away can expose the edge assembly and change where runoff lands.
- Granules at the edge: Loose shingle granules may collect in the gutter or below the eave when the shingle edge is deteriorating.
Match the symptom to the likely detail
Water behind the fascia often points toward a problem with outward projection, a missing capillary break, or incorrect overlap. A visible gap at the corner may indicate that the eave and rake pieces weren't joined in a way that preserves the drainage path.
If staining continues after the gutter is cleaned, don't assume another cleaning will solve it. The gutter may be carrying water correctly while the flashing allows moisture to reach the fascia before it enters the channel.
Look first, climb only with the right equipment: Ground-level observation can identify a concern, but roof-edge diagnosis often requires safe access and careful shingle lifting.
Call for a professional inspection when you see soft-looking wood, widespread corrosion, lifted sections, active leakage, or damage after wind and hail. A qualified roofer can check the visible edge, the shingle courses, the underlayment transition, gutter alignment, and adjacent roof materials without turning a minor concern into a ladder accident.
Protecting Your Roof Edge and Next Steps for Homeowners
A sound roof edge accomplishes three tasks. It keeps water on the exterior drainage path, protects the fascia and sheathing transition, and gives the roof replacement a code-conscious finish. The detail is small, but the inspection decision should consider the entire edge system.
A practical repair decision
Targeted repair may fit when the damage is limited to a bent or displaced section, the surrounding metal remains sound, the fascia is firm, and the shingles and underlayment can be lifted without broader disturbance.
Broader replacement makes more sense when the roof has no drip edge, the metal is widely corroded, multiple joints are open, the fascia has rot, or a reroof already exposes the perimeter. Replacing isolated pieces while leaving a consistently short or mis-sequenced system can preserve the original leak path.
Questions to ask before work begins
- Is drip edge included at both eaves and rakes?
- Which material and profile will be used?
- How will the contractor handle corners, joints, and gutter alignment?
- Will the estimate identify drip edge and related fascia repairs separately?
- At eaves and rakes, where will the underlayment sit relative to the metal?
- Will storm-related conditions be photographed and documented before repair?
A written scope should explain the work clearly, especially when an insurance inspection or home sale is involved. For more context on the complete assembly, roof-edge protection should be considered alongside shingles, underlayment, gutters, fascia, and ice-and-water protection rather than as a separate trim upgrade.
For Columbus and central Ohio homeowners, HIBCO ROOF LLC offers free roof inspections, leak diagnosis, storm and hail documentation, roof replacement, and gutter services. The right next step depends on what the inspection finds, not on assuming that every visible drip edge issue requires a full roof replacement.
HIBCO ROOF LLC can inspect the roof edge, fascia, gutters, flashing, and underlayment transitions as part of a free Columbus-area roof assessment. Visit HIBCO ROOF LLC to request an inspection and receive a clear written recommendation for repair or replacement.