
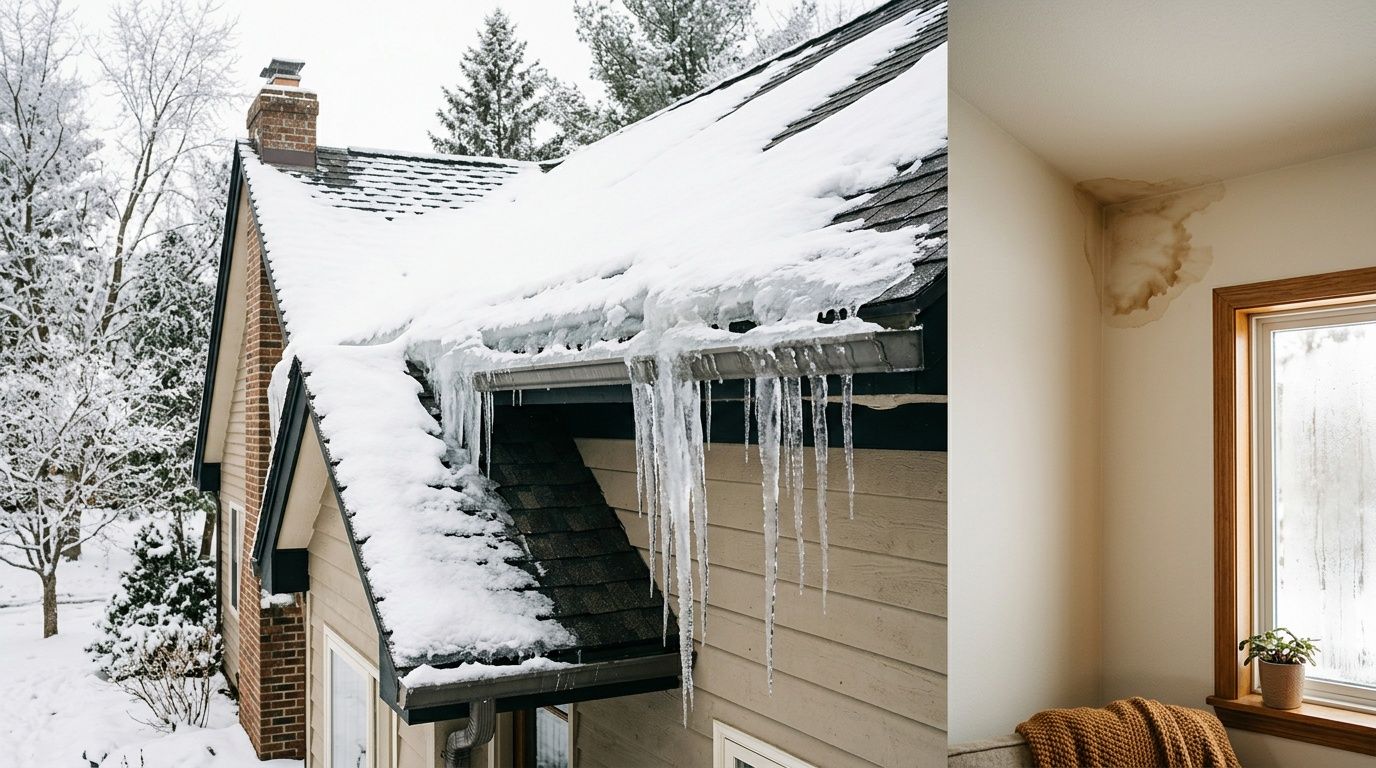
You've probably noticed the problem before you've found the cause. A ceiling stain appears near an exterior wall after a winter storm, while snow and ice remain packed along the roof edge. The shingles may look intact from the ground, but an ice dam can hold meltwater against the roofing system long enough for it to move beneath the shingles.
That's where ice and water shield installation earns its place. The membrane is only one part of the roof assembly, though. A good product installed in the wrong sequence, over a damp deck, or behind incorrectly layered flashing can still leave a direct path for water. The details at the eaves, valleys, rakes, chimneys, dormers, and wall transitions determine whether water sheds away or works into the structure.
Table of Contents
- Why Ice and Water Shield Matters for Your Roof
- Code Requirements and Material Specifications
- Preparing the Roof Deck and Laying the Membrane
- Integrating Flashing and Drip Edge Correctly
- Common Installation Mistakes That Cause Leaks
- DIY Installation Versus Hiring a Professional Roofer
Why Ice and Water Shield Matters for Your Roof
After a winter storm, an ice dam can sit above a cold overhang while meltwater continues moving down the roof. The ridge holds that water against the shingles instead of letting it drain. Shingles shed water downslope, but they are not designed to hold a reservoir, so backed-up water can reach seams, fasteners, and edge details that ordinary rainfall may not test in the same way.
Ice and water shield is a self-adhering, polymer-modified bituminous membrane applied directly to the roof deck. It forms a continuous waterproof layer and seals around many fastener penetrations. ASTM-based guidance includes a nail-sealing performance requirement involving 2 inches of standing water for 24 hours at 40°F without leakage. That protection matters because shingles, flashings, and other roof components still need mechanical attachment. Nails will pass through the membrane, and the membrane must limit leakage at those penetrations.
Place the membrane where water concentrates or backs up, including eaves, valleys, wall intersections, chimneys, dormers, skylights, and other penetrations. Valleys need careful planning because two roof planes send runoff into one channel. A short patch that stops before the main flow zone may save material, but it leaves the area under the greatest water load exposed.
The product cannot compensate for poor sequencing. The installer must coordinate coverage, laps, adhesion, drip edge, and flashing so each layer directs water outward rather than behind the next one.
Homeowners facing active winter buildup may need safe emergency work before permanent repairs. Review how to remove an ice dam from a roof before anyone climbs onto the roof with improvised tools. Removal can reduce immediate water entry, but it does not correct a missing membrane or flashing installed in the wrong order.
Code Requirements and Material Specifications
A membrane can meet the code and still leak if its coverage and adjoining materials are planned in the wrong order. Start by checking the adopted building code, the roof covering, and the membrane's product data. In colder regions where the average January daily temperature is 25°F or less, the International Residential Code requires an ice barrier from the eave edge to at least 24 inches inside the exterior wall line. Measure from the wall line, not only from the gutter, because that point identifies where the heated interior and colder overhang meet. (IRC roof underlayment requirements)
The IRC recognizes a self-adhering polymer-modified bitumen sheet that meets ASTM D1970. Another accepted method uses two layers of underlayment cemented together, with a 19-inch starter course and a 36-inch full course above it. These systems cannot be judged by appearance alone. Check the roll markings, product data sheet, roof-covering approval, and local code provisions before material is installed. (Ice barrier provisions and accepted methods)
Many self-adhering membranes are specified at about 35 to 45 mils and are designed to meet ASTM D1970 criteria. Thickness alone does not determine performance. Verify the membrane's temperature limits, surface compatibility, approved roof coverings, and nail-sealing performance before choosing it. (Membrane thickness and performance criteria)
How the specifications compare
| Specification | Standard Requirement | Premium Grade | Application Notes |
|---|---|---|---|
| Code recognition | Self-adhering polymer-modified bitumen meeting ASTM D1970 | ASTM D1970 compliance documented for the selected product | Confirm approval for the roof covering and local code |
| Placement | From the lowest roof edge to at least 24 inches inside the exterior wall line | Additional coverage only where the manufacturer and code allow it | Coordinate eaves, valleys, walls, and penetrations before cutting |
| Nail sealing | Must meet the applicable ASTM performance criteria | Product data must identify the documented nail-sealing performance | Fasteners still need correct placement and flashing integration |
| Surface preparation | Smooth, firm, clean, and dry deck | Primer or specialized bonding features only when listed in the product instructions | A higher-grade membrane will not bond to contaminated decking |
| Thickness | Common products are about 35 to 45 mils | Use the documented thickness in the product specification, such as a 45-mil sheet where specified | Follow the manufacturer's installation sheet |
| Temperature | Follow the product's minimum application temperature | High-temperature versions may suit specific roof assemblies | Do not install a cold-sensitive adhesive on a cold, damp deck |
Code compliance sets the floor. It does not decide how the membrane meets the drip edge, step flashing, wall flashing, or valley metal. Those transitions must be sequenced so water remains on top of the lower layer and cannot run behind an edge or flashing flange.
Roof work also exposes installers to falls before the membrane reaches the deck. Review practical HSE fall arrest system tips and follow the manufacturer's safety requirements before starting.
Preparing the Roof Deck and Laying the Membrane
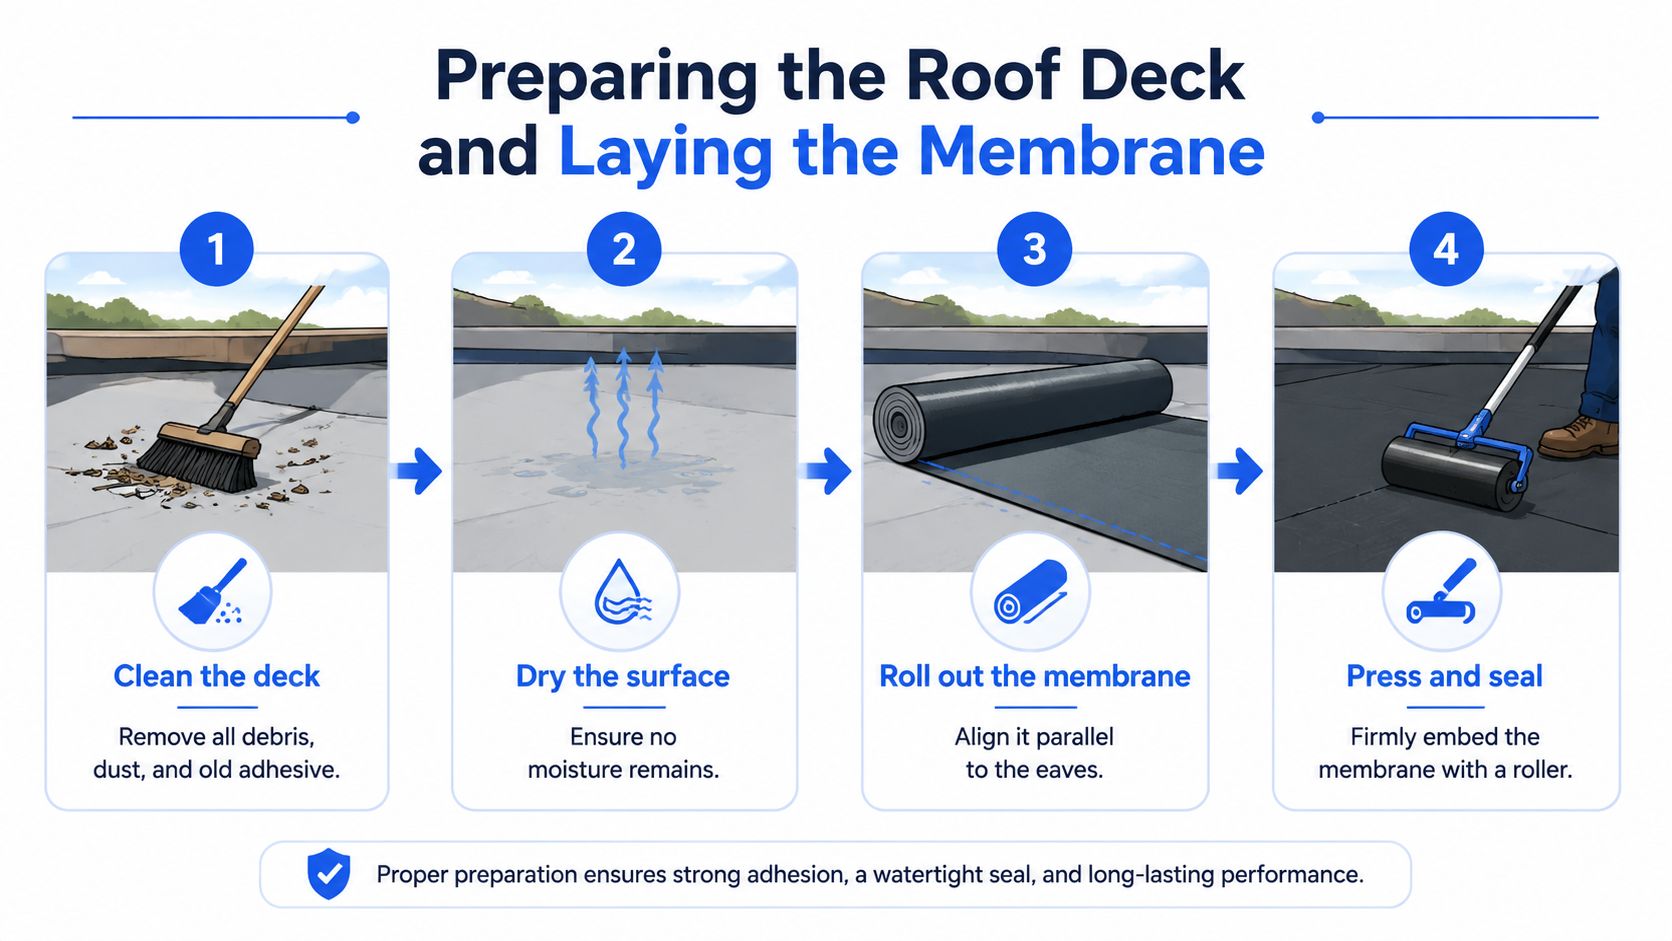
A peel-and-stick membrane can fail before the first shingle is installed if the deck is damp, dirty, or uneven. Inspect the sheathing for soft spots, delamination, broken edges, protruding nails, and raised joints. Replace damaged decking, then drive or remove fasteners that could telegraph through the membrane and prevent full contact.
Sweep the surface and remove fine debris. Let the deck dry completely before opening the roll. Manufacturer instructions commonly require fair-weather installation and surface temperatures above 40°F to 45°F, or approximately 5°C to 7°C, depending on the product. A cold, wet morning is a poor time to rush this work because the adhesive may not wet out against the deck. (Installation conditions and substrate requirements)
Lay out the first course carefully
At the eave, mark a straight line parallel to the roof edge. Cut manageable lengths, generally 10 to 15 feet, instead of fighting a full roll in the wind. Dry-fit each piece with its release liner intact, then peel the liner gradually while pressing the membrane firmly onto the deck.
Keep the sheet relaxed. Stretching it into alignment creates tension that can pull it away from valleys, corners, or fastener lines as temperatures change. Press from the center toward the edges, working wrinkles out before the adhesive sets.
Control laps and transitions
Lap dimensions and the order of membrane, flashing, and edge metal must match the roof detail. See Integrating Flashing and Drip Edge Correctly for lap and transition details. At valleys, provide continuous coverage when the roof design and manufacturer instructions require it. Press the membrane into the valley without bridging the center or leaving channels that can carry water beneath the sheet.
A weighted roller improves contact along seams, edges, and corners after the deck has been cleaned and dried. It cannot correct contamination, moisture, or poor alignment. Check each completed run before shingles cover the membrane, especially where the sheet meets valleys, walls, and roof edges.
For a broader explanation of how sheathing, underlayment, and surface protection work together, review this guide to roof deck protection.
Integrating Flashing and Drip Edge Correctly
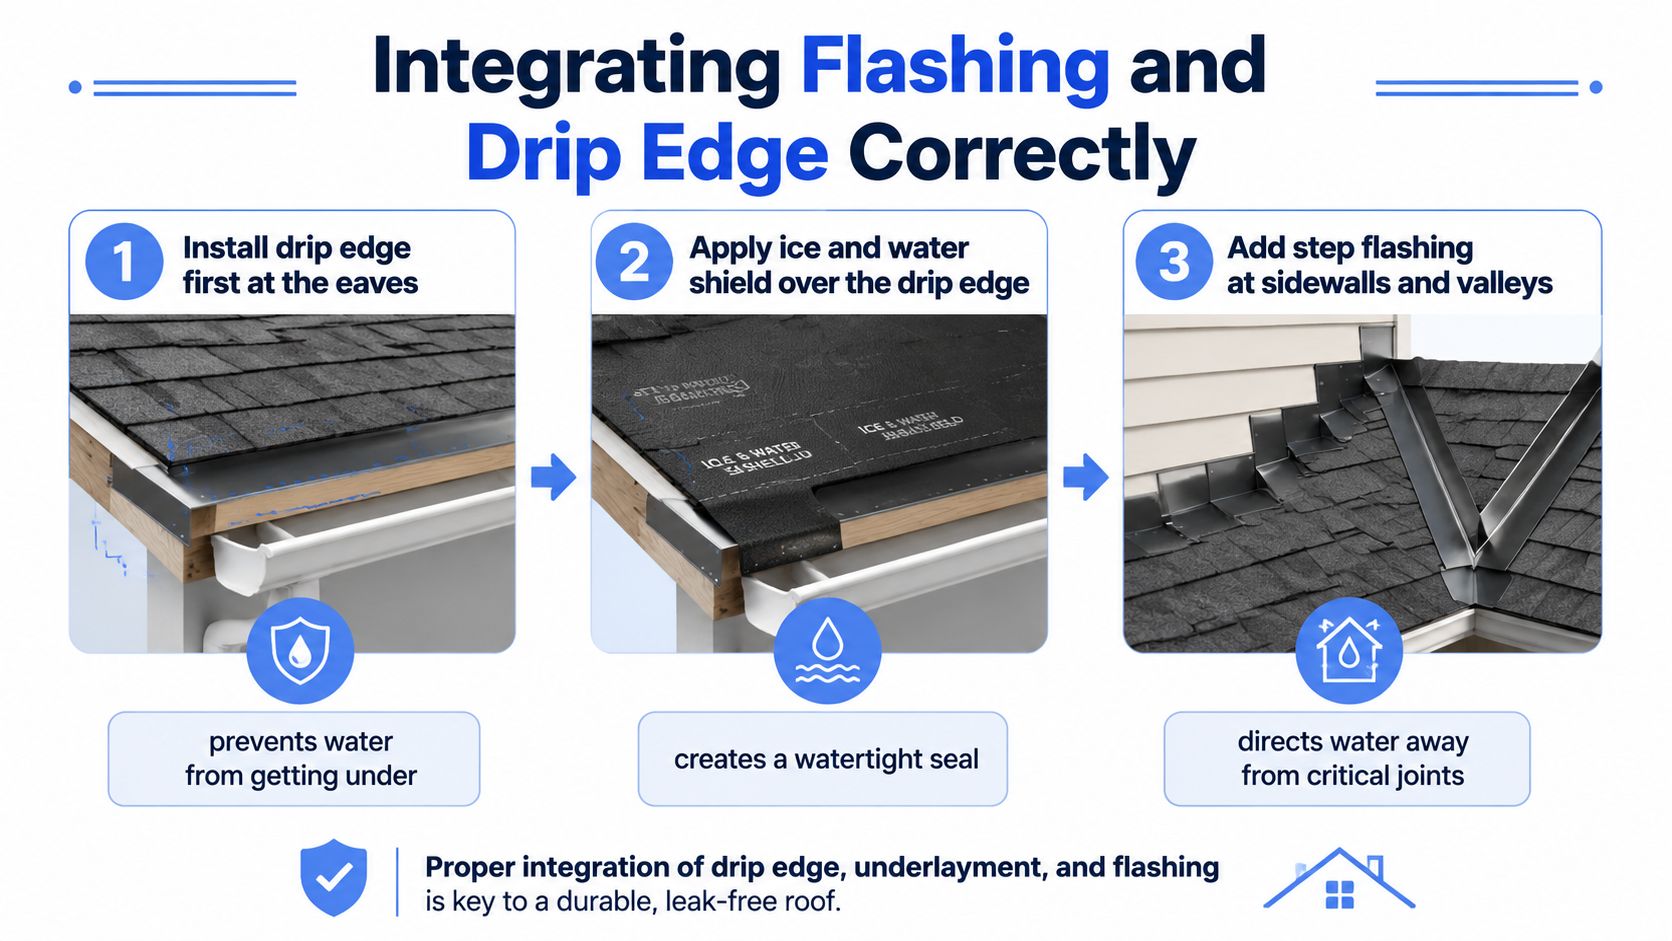
The most expensive sequencing mistake is often invisible from the yard. At an eave, water needs a clear path from the roof surface into the gutter. If the drip edge, membrane, and underlayment are reversed, water can be directed behind the edge metal and into the fascia or roof deck instead.
At the eave, the membrane goes directly on the deck, and the drip edge should cover the membrane so water sheds over the metal and toward the gutter. At rakes, the installation relationship can differ, so follow the manufacturer's detail and local code. Code-oriented guidance commonly calls for the membrane or eave flashing to overhang the drip edge by 1/4 to 3/8 inch, use galvanized roofing nails instead of staples, and overlap additional flashing layers by at least 2 inches. (Roofing waterproofing and flashing code guidance)
Treat wall and penetration details as drainage systems
At chimneys, dormers, and sidewalls, the membrane belongs below the flashing where the assembly allows water to drain across the surface. It shouldn't be folded in a way that creates a pocket behind the metal. The membrane must turn into vulnerable corners and remain continuous around transitions, while step flashing directs water around each course of shingles and away from the wall.
Valleys need the same discipline. Cutting the membrane short near the upper end, leaving gaps at inside corners, or relying on a small patch at the lower end creates a concentrated leak path. If another course is needed because one sheet isn't wide enough, the added course should overlap the first by 2 inches where the technical guidance specifies that arrangement. (Self-adhered underlayment installation guidance)
Drainage test: For every piece of metal, ask where water goes next. If the answer is behind the metal, the sequence needs to change.
Edge details also affect gutter performance. A small gap between the drip edge and gutter can let water miss the trough or wet the fascia. Review the practical guide to the gap between drip edge and gutter when evaluating an existing installation.
Common Installation Mistakes That Cause Leaks
The right membrane cannot compensate for poor sequencing. Leaks often begin where the membrane, drip edge, flashing, and shingles meet, because water follows the wrong layer when those parts are installed out of order.
Five problems deserve immediate scrutiny
Installing the drip edge in the wrong sequence: At the eaves, the membrane and metal must work together so runoff reaches the gutter instead of the roof edge or fascia. At rakes, the edge detail must also shed water outward. A drip edge placed without considering the membrane can trap water behind the metal or leave an open path beneath the shingles.
Breaking continuity at valleys: Do not stop the membrane short at the upper valley, leave an inside-corner gap, or depend on a small lower patch. Lay it relaxed into the valley shape, keep the protection continuous, and follow the product's required overlap when another course is needed.
Miscalculating laps at transitions: Side and end laps must follow the product data sheet and applicable installation requirements. Short laps, aligned end joints, and poorly rolled seams give backed-up water a direct route beneath the membrane. (Overlap and installation requirements)
Treating wall and penetration flashing as a surface patch: At chimneys, dormers, sidewalls, and roof penetrations, the membrane must turn into vulnerable corners and remain continuous beneath the flashing where the assembly permits drainage. Step flashing should direct water around each shingle course. Folding the membrane behind metal can create a pocket that holds water against the wall.
Treating every nail as harmless: Fasteners are part of the roofing system, but unnecessary punctures, exposed nails, and poorly integrated counterflashing can create leak paths. Keep the membrane covered and use the specified attachment and sealing details.
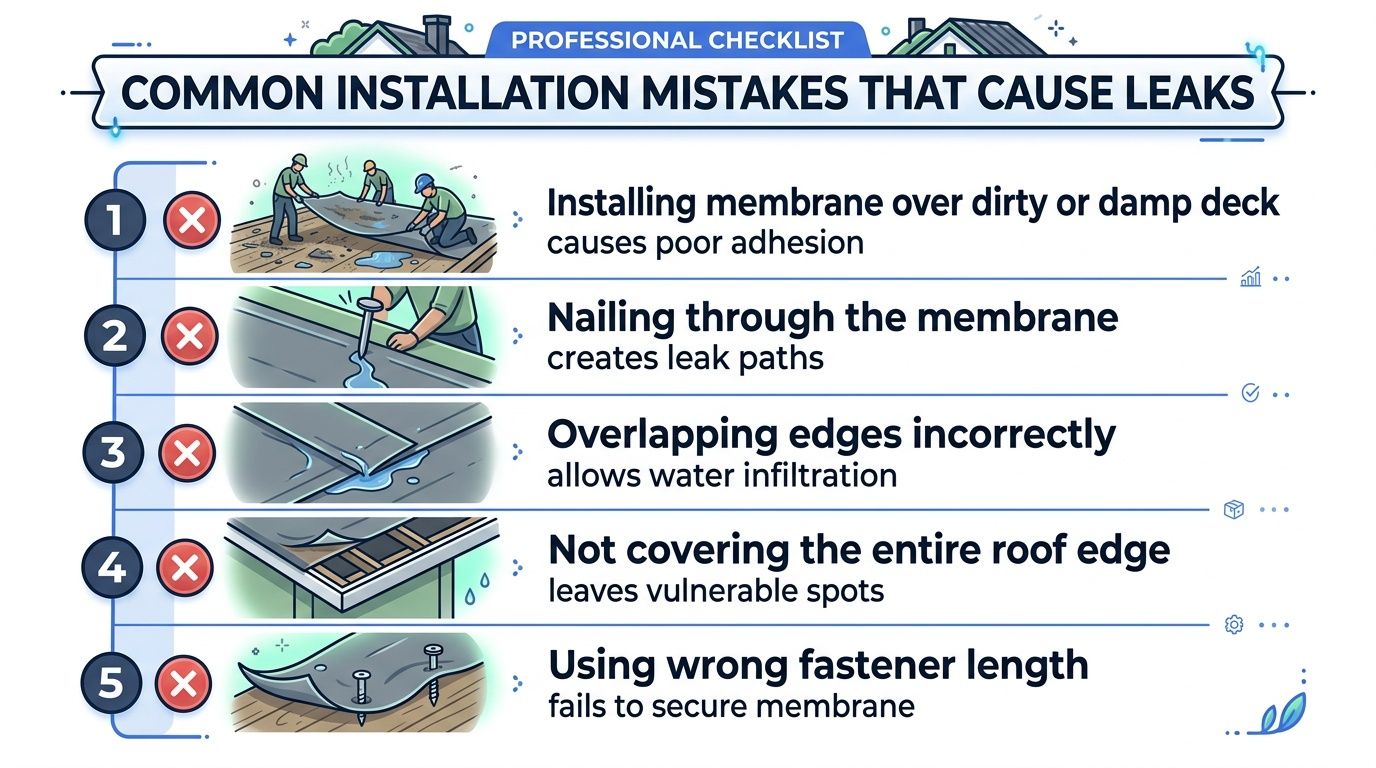
Rake edges, dormer transitions, and concentrated runoff areas need the same attention. The barrier should follow the roof's vulnerable geometry, especially where one roof plane meets a wall or another plane, rather than stopping at the easiest reachable strip.
What doesn't work: Applying a premium membrane as a narrow visual patch and assuming the roof is protected. Water follows the unprotected transition, regardless of the material used elsewhere.
Inspect for fishmouths, wrinkles, lifted corners, open laps, exposed adhesive, and gaps around penetrations before shingles, counterflashing, or trim conceal the work. Correcting those defects at this stage is far easier than tracing a leak after the roof is closed.
DIY Installation Versus Hiring a Professional Roofer
The material looks simple on a product shelf. On a roof, it can be awkward, adhesive-backed, heavy, and difficult to reposition once it contacts the deck. Wind can fold a sheet onto itself, a steep pitch can make alignment unsafe, and flashing integration requires more than knowing which side is sticky.
DIY work may be reasonable for a homeowner with roofing experience, safe roof access, suitable weather, and a straightforward low-complexity repair. It becomes a poor choice when the job involves steep slopes, multiple valleys, chimneys, dormers, skylights, fragile decking, or active water intrusion. A professional crew also brings the equipment and workflow needed to inspect the deck, stage materials, roll seams, coordinate flashing, and protect the site.
Compare the practical trade-offs
| Factor | DIY Installation | Professional Installation |
|---|---|---|
| Roof access | Homeowner must manage ladder and fall exposure | Crew plans access, staging, and fall protection |
| Material handling | Difficult to control long or heavy rolls in wind | Workers coordinate cutting, alignment, and placement |
| Deck preparation | Depends on the homeowner's inspection and repair judgment | Crew can identify damaged sheathing and unsuitable surfaces |
| Flashing sequence | Requires detailed knowledge at eaves, rakes, walls, and penetrations | Roofing specialists integrate membrane with the full roof system |
| Tools | May require a membrane roller, utility knives, chalk lines, and compatible sealants | Contractor arrives with the equipment and installation process |
| Warranty records | Documentation may be incomplete | Professional installation can provide product and project records |
| Leak liability | Homeowner may face the consequences of an installation error | Contract terms identify responsibility and repair procedures |
| Best fit | Limited, accessible work for an experienced DIYer | Full replacement, complex geometry, steep roofs, and uncertain damage |
A manufacturer's warranty may require certified installer documentation or specific installation practices. Read those terms before choosing a do-it-yourself approach, particularly if the membrane is part of a larger shingle warranty system. Home insurance coverage also depends on the policy and circumstances, so don't assume a claim will cover damage connected to improper roofing work.
Homeowners comparing contractors can use a practical SkipCalls roofing guide to organize questions about licensing, insurance, written scope, installation documentation, and cleanup. Ask each roofer where the membrane will go, how the drip edge will be sequenced, how laps will be handled, and what happens if damaged decking appears after tear-off.
For Columbus and central Ohio homeowners, HIBCO ROOF LLC provides inspections, leak diagnosis, repairs, and full roof replacements that include system-based underlayment and ice-and-water shield work at vulnerable roof areas.
HIBCO ROOF LLC can inspect your eaves, valleys, penetrations, drip edge, and flashing to identify sequencing problems before they become interior damage. Visit HIBCO ROOF LLC to request a free, no-pressure estimate for roof repair or replacement in Columbus and central Ohio.