
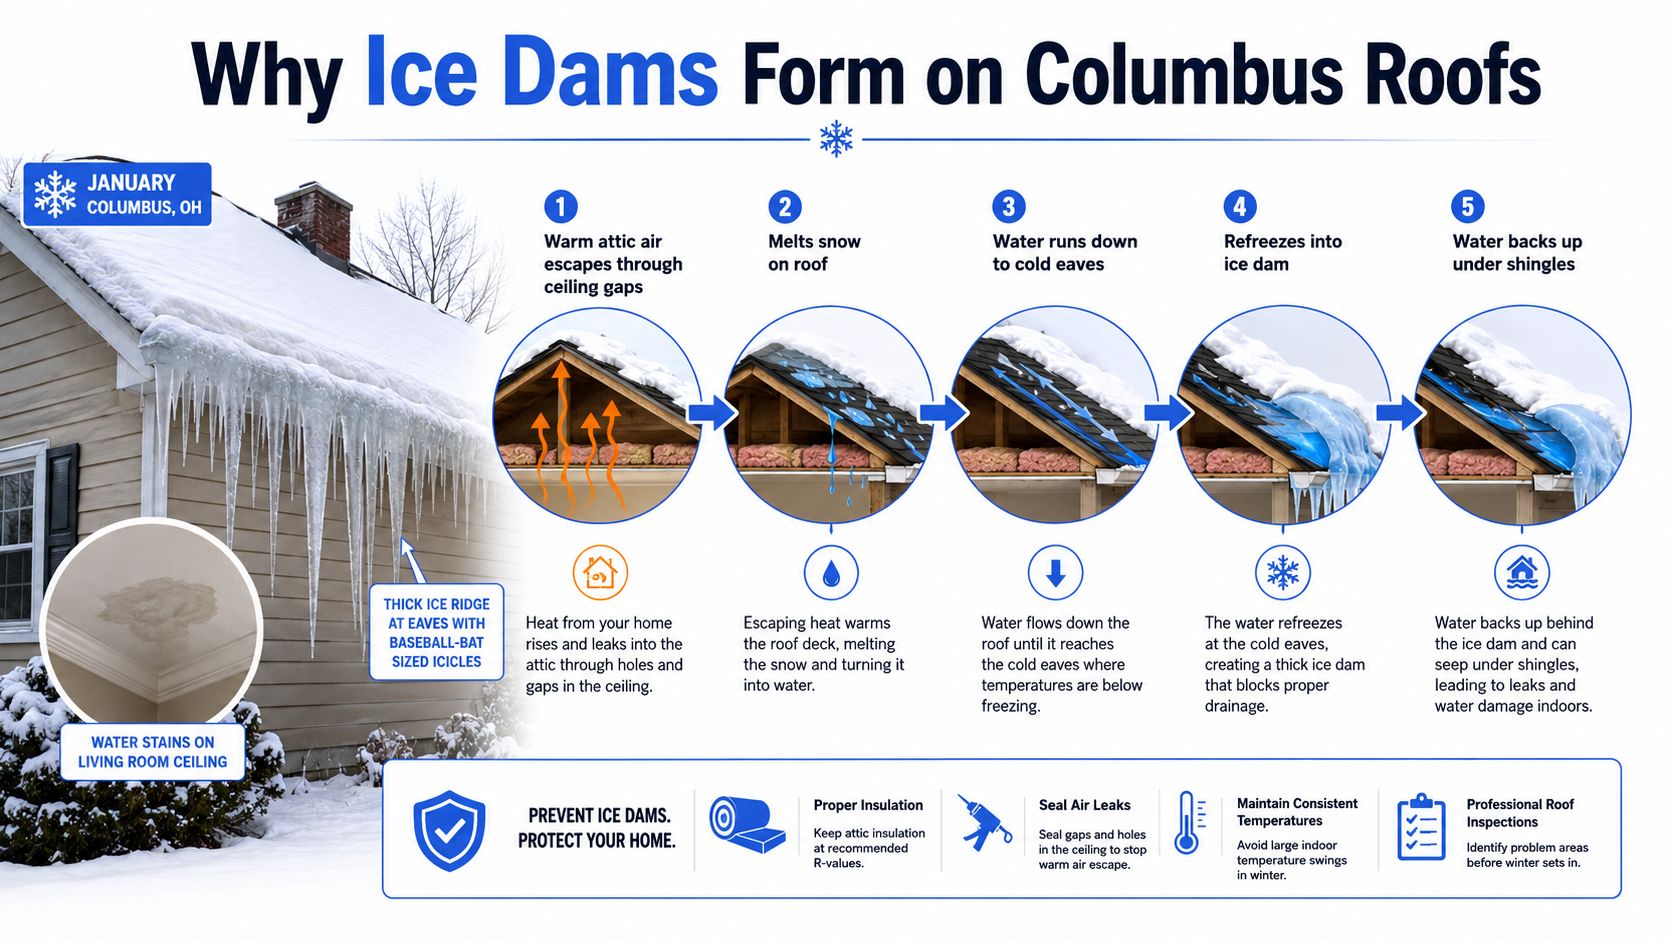
You notice the ice before you notice the leak. In January, a thick ridge forms along the eaves, baseball-bat-sized icicles hang from the gutters, and a water stain begins spreading across the living room ceiling. By the time water appears indoors, the roof is usually showing the symptom of a problem that began in the attic.
Effective ice dam prevention isn't a single product or a quick winter repair. It depends on how the entire roof system handles heat, air, insulation, ventilation, and drainage. After inspecting central Ohio attics and rooflines, the practical lesson is consistent: sealing air leaks and correcting insulation and airflow usually matter more than attaching a cable to the gutter or repeatedly knocking ice off the roof.
Table of Contents
- Why Ice Dams Form on Columbus Roofs
- Inspecting Your Attic and Roof for Ice Dam Risk
- Prioritized Prevention Measures That Actually Work
- When Standard Advice Fails on Complex Rooflines
- Cost and Benefit Breakdown of Prevention Options
- Seasonal Maintenance and When to Call a Professional
Why Ice Dams Form on Columbus Roofs
An ice dam develops when snow melts on a warmer portion of the roof, flows toward a colder eave, and freezes into a ridge. The frozen ridge blocks drainage, so later meltwater can back up beneath shingles and enter the roof assembly.
The process often starts with conditioned indoor air escaping through gaps in the ceiling plane. Recessed lights, plumbing penetrations, chimney chases, attic hatches, wiring holes, and poorly sealed top plates can all send warm air into the attic. That heat raises the temperature of portions of the roof deck while the overhang remains cold.
Practical rule: If the upper roof is warm and the eaves are cold, snowmelt has a place to refreeze.
Central Ohio winter weather makes that uneven temperature pattern especially troublesome. Columbus can move between freezing and thawing conditions, so snow may melt during a warmer afternoon and freeze again overnight. Moisture from regional winter storms, shifting temperatures, and substantial snow accumulation can all increase the amount of water moving across the roof. The exact weather pattern matters less than the repeated cycle of melting and refreezing.
Why gutters aren't the root cause
A blocked gutter can worsen an existing ice dam, but the gutter usually isn't where the problem begins. Heat loss from the home, insufficient insulation, blocked soffit airflow, and roof geometry create the conditions for meltwater to refreeze. Keeping gutters clear preserves the drainage path, but it won't cool a roof deck warmed by air leakage.
The Insurance Institute for Business & Home Safety describes ice barriers as a code-driven roof assembly requirement in areas with a history of ice formation along the eaves. Its guidance specifies that the barrier should extend from the lowest roof edge to at least 24 inches inside the exterior wall line, or 36 inches for roofs steeper than 8:12 in some code versions and interpretations. The same guidance connects prevention with a cold attic, eave baffles, suitable gutter positioning, and clear downspouts. The IBHS ice dam and building codes report explains why this is more than seasonal maintenance.
Your attic's moisture behavior also deserves attention. Warm air carries moisture into cold spaces, where condensation can wet insulation and roof materials. Homeowners comparing indoor moisture strategies can review this guide to control moisture in Phoenix homes, while Columbus homeowners should also inspect the roof and attic assembly itself. A related resource on attic moisture control can help organize that diagnosis.
Inspecting Your Attic and Roof for Ice Dam Risk
Start inside, before buying materials. An attic inspection should answer two questions: where is warm air entering, and whether insulation and ventilation can keep the roof deck cold.
Choose a dry day, wear protective clothing, and use a flashlight. Don't step between ceiling joists unless you have stable boards designed for attic access. Look and feel around common bypasses:
- Recessed lights: Check for gaps around fixtures and their housings, but don't apply foam or insulation unless the fixture is approved for that treatment.
- Plumbing stacks: Inspect the ceiling penetration for visible openings, staining, or drafts.
- Chimney chases: Look for unsealed framing gaps and darkened insulation near masonry.
- Attic hatches: Check whether the hatch closes tightly and whether insulation remains continuous around it.
- HVAC and wiring runs: Look for openings where ducts, cables, and pipes pass through the ceiling plane.
Use your hand to feel for moving air, but don't touch exposed electrical components. A smoke pencil can help a qualified person locate bypasses, while a homeowner can often identify obvious openings with a flashlight and careful visual inspection.
Read the insulation pattern
Measure insulation depth in several locations rather than checking only near the attic entrance. Missing, compressed, displaced, or wet insulation creates uneven roof temperatures. Pay particular attention to the eaves, where insulation often blocks soffit vents or gets pushed aside by previous work.
Ventilation requires a clear route, not just a vent visible from outside. Look for continuous channels from soffit intake areas toward ridge or gable exhaust points. Baffles should hold insulation away from the underside of the roof sheathing so air can move through the eaves. The PNNL guidance emphasizes an airtight ceiling plane, careful sealing of penetrations, and a 2-inch airspace under roof sheathing where ground snow loads are greater than 30 lb/ft². PNNL's ice dam performance brief ties those details to cold-climate roof performance.
Inspect the exterior without climbing
From the ground, look for isolated snow-free patches, dark moisture streaks, sagging gutters, and recurring ice patterns. A warm patch surrounded by snow often points to heat escaping below that roof area. Valleys, dormers, and roof-to-wall intersections deserve extra attention because water and snow collect there.
Cathedral ceilings require more caution because you may not have an accessible attic cavity. In those areas, a thermal camera, moisture meter, or targeted inspection by a roofing professional can reveal conditions that a flashlight cannot. Keep a record of where ice forms after each storm. That map can show whether the problem follows a bathroom, dormer, valley, or poorly ventilated roof section. For related gutter preparation, see this guide to winter gutter maintenance.
Prioritized Prevention Measures That Actually Work
Not every ice dam product deserves equal priority. Spend first on the measures that control heat flow, then address airflow and drainage, and use exterior products as backup or temporary protection.
Start with air sealing
Air sealing usually delivers the highest practical impact because insulation alone doesn't stop air moving through gaps. Seal ceiling-plane penetrations at top plates, plumbing openings, wiring runs, duct chases, and attic hatches. Use compatible caulk for small cracks and appropriate foam for larger openings, following the product's installation and fire-safety requirements.
An airtight hatch cover matters. A loose panel can leak a surprising amount of warm air into the attic, especially when the home is under pressure from exhaust fans. Don't spray foam over recessed lights, chimneys, or electrical equipment without confirming the correct clearance and material requirements.
The PNNL prevention guidance recommends sealing the ceiling plane, improving insulation continuity, and protecting soffit airflow with baffles. Its attic air-sealing and insulation guidance also makes the sequence clear: stop air leakage, reduce heat flow with insulation, and use ventilation to remove residual heat.
Build consistent insulation coverage
Once bypasses are sealed, add insulation where coverage is thin or inconsistent. Blown-in cellulose or fiberglass can work well in an accessible attic, but the material must remain evenly distributed and must not bury soffit intake paths. Central Ohio projects often target insulation levels in the R-49 to R-60 range, but the correct design depends on the home's construction and applicable code requirements.
This is a professional-grade task when existing insulation is wet, contaminated, or difficult to work around. A contractor should also check whether raised-heel trusses or another eave detail is needed to maintain insulation depth at the roof edge.
Correct ventilation without creating a trap
Clear or install soffit intake vents, confirm that ridge vents are open, and verify that gable vents aren't being used in a way that disrupts the intended airflow pattern. Maintain at least a 1-inch air channel above insulation at the eaves where the assembly requires it. Ventilation can't compensate for major air leakage, and adding an exhaust vent without adequate intake can produce poor airflow rather than solve it.
What doesn't work: Adding ridge vents while leaving blocked soffits and unsealed ceiling penetrations. That spends money on exhaust capacity while warm air still reaches the roof deck.
Use exterior measures as support
A roof rake can remove snow from vulnerable eaves after a heavy storm, but use it from the ground and keep clear of overhead utility lines. Heated cables can create drainage channels in recurring problem areas, particularly valleys, but they don't correct the thermal cause and shouldn't become the only defense.
Gutter guards can reduce debris blockage, but they aren't a substitute for correct roof temperature control. Drip edge placement and eave detailing also affect how water leaves the roof. For a practical overview of drip edge installation, review the HomeProBadge guide. Leak-resistant membrane detailing at eaves, valleys, dormers, and penetrations can provide backup protection, as discussed in ice and water shield installation.
When Standard Advice Fails on Complex Rooflines
“Add insulation and ventilation” is sound advice for a simple, accessible attic. It becomes incomplete on a Columbus home with multiple roof levels, intersecting valleys, dormers, or cathedral ceilings. Those shapes create different thermal zones and drainage paths, so one correction may move the meltwater problem instead of eliminating it.
Valleys concentrate the failure
A valley receives runoff from two roof planes. Snowmelt and ice can collect at the intersection, while the valley itself may have limited ability to receive ventilation. If a valley terminates near a lower roof, wall, or gutter, the downstream area may carry more water than the surrounding roof sections.
Heat cable placed along the visible ice might open a narrow channel, but it doesn't correct the cold valley geometry or the warm-air source below. A professional may need to evaluate membrane coverage, flashing, roof slope transitions, and the route water takes after leaving the valley.
Dormers create hidden cold spots
Dormers often include short sidewalls, knee walls, and small roof sections that are difficult to insulate continuously. Warm air from the living space can reach a cold dormer roof or sidewall, while snow gathers around the intersection. Insulating only the main attic floor can leave that smaller assembly unchanged.
Look for recurring ice around dormer cheeks, roof-to-wall flashing, and the lower edge of the dormer roof. The correct remedy may involve opening finished areas, improving structural insulation, or rebuilding flashing, not just adding loose-fill material nearby.
Cathedral ceilings remove the easy attic fix
A cathedral ceiling leaves little or no attic cavity for traditional soffit-to-ridge ventilation. Baffles, insulation depth, and air sealing must be designed within the rafter assembly, and an improper retrofit can trap moisture against the roof sheathing. The National Weather Service explains the basic risk of roof ice dams and the importance of maintaining clear drainage, but complex assemblies require a closer building-science assessment. Its roof ice dam guidance is a useful starting point.
When the roof deck can't be made consistently cold with accessible attic work, design-level options may include a properly detailed cold roof assembly, structural insulation upgrades, custom flashing, or leak-resistant membrane installation. That's the point to stop experimenting with products and bring in a qualified professional.
Cost and Benefit Breakdown of Prevention Options
After inspecting hundreds of Columbus attics, the costliest mistake is usually treating the visible symptom first. Match the investment to the failure you found. Air sealing and insulation address heat entering the roof assembly. Ventilation helps maintain a colder roof deck when intake and exhaust paths are properly connected. Drainage controls reduce immediate exposure when the underlying assembly cannot be changed quickly.
Exact Columbus pricing depends on access, roof geometry, contamination, material condition, and whether finished ceilings must be opened. Since the available verified data does not establish local price ranges, the comparison below uses qualitative cost categories rather than invented dollar amounts.
| Prevention Method | Typical Cost Range | Protection Level | Expected ROI Timeline |
|---|---|---|---|
| Air sealing | Lower to moderate, depending on access | High when leakage drives the problem | Long-term, reduces heat loss and lowers future leak risk |
| Attic insulation upgrades | Moderate | High when coverage is missing or uneven | Builds over multiple heating seasons through energy savings and damage avoidance |
| Soffit and ridge ventilation corrections | Moderate | Moderate to high when intake and exhaust are balanced | Long-term, after air leakage is corrected |
| Gutter cleaning and downspout clearing | Low | Necessary drainage support | Recurs with seasonal maintenance |
| Roof raking | Low equipment cost, ongoing labor | Short-term snow-load and meltwater control | Immediate, but temporary |
| Heated cables | Moderate installation and operating commitment | Targeted protection for recurring areas | Supplemental control, not a root-cause correction |
| Ice and water shield during reroofing | Moderate within a roof project | Strong backup protection at vulnerable details | Long-term, subject to proper installation and roof life |
| Full roof replacement with assembly upgrades | Highest | Most extensive when design and installation are corrected together | Long-term, based on roof condition and system quality |
Spend in the right order
Start with diagnosis. If the shingles are serviceable and an unsealed attic hatch is the heat path, roof replacement is the wrong first expense. If a failing roof, damaged flashing, or inaccessible cathedral-ceiling assembly continues to create leaks, repeated emergency winter work only postpones the permanent correction.
A sensible sequence is air sealing and insulation, followed by ventilation and drainage corrections. Use roof raking or heated cables when active weather exposure requires short-term control. During reroofing, install properly detailed leak-resistant membrane at eaves, valleys, dormers, chimneys, skylights, and wall intersections.
Roof geometry changes the value of each measure. A cable along a valley may protect one recurring trouble spot, while unsealed bypasses under a dormer still warm the roof deck. Likewise, adding insulation near a cathedral ceiling without preserving a designed ventilation path can trap moisture. Correct the whole roof system first, then use targeted products where the remaining exposure justifies their cost.
Seasonal Maintenance and When to Call a Professional
Ice dam prevention starts before snow reaches the roof. In early fall, clear gutters and downspouts, inspect the roof from the ground, and note any loose shingles, damaged flashing, or sagging drainage components. Check the attic for wet insulation, visible air gaps, and blocked soffit channels before cold weather makes access more difficult.
As winter approaches, confirm that bathroom and kitchen exhaust systems discharge properly and that attic hatches close tightly. During snow events, monitor for isolated roof melting, growing icicles, and ice ridges. A roof rake can remove snow from accessible eaves when used from the ground, but don't climb onto an icy roof or attack an ice dam with an axe, chisel, or pressure washer.
A practical seasonal rhythm
- Fall: Clean gutters, inspect flashing, check attic insulation, and photograph vulnerable valleys and dormers.
- Early winter: Confirm ventilation paths and watch for warm roof patches after the first snow.
- Mid-winter: Keep drainage outlets clear and arrange professional help if water appears indoors.
- Spring: Inspect ceilings, soffits, gutters, fascia, and attic insulation for staining or moisture.
- Warm-weather repairs: Seal bypasses, restore insulation continuity, correct ventilation, and repair roof or flashing defects.
Homeowners can handle ground-level gutter cleaning, visual monitoring, and some accessible air-sealing work when they understand the materials and safety limits. A licensed professional should assess persistent dams, interior stains near exterior walls, sagging gutters, deteriorated roof decking, complex valleys, dormers, and cathedral ceilings.
For broader roof leak planning, this resource on how to prevent roof leaks provides useful context, but an active Columbus ice dam still requires a site-specific roof and attic diagnosis. Call a contractor when the same area dams repeatedly despite basic corrections, when water is entering the home, or when the proposed repair involves structural insulation, roof removal, flashing reconstruction, or warranty-protected installation.
HIBCO ROOF LLC provides Columbus-area roof inspections, leak diagnosis, repairs, replacements, gutter work, and related exterior improvements. Its team can evaluate whether your ice dam risk comes from air leakage, insulation gaps, ventilation restrictions, drainage defects, or a complex roofline that needs a more involved solution.
HIBCO ROOF LLC can inspect your attic and roof system, identify the cause of recurring ice dams, and recommend targeted repairs or a complete roof solution when necessary. Visit HIBCO ROOF LLC to request a Columbus-area inspection and free written estimate before the next winter storm.