
A February morning in a Columbus suburb can expose a roof's weak points quickly. Ice chokes the gutters, meltwater pools at the soffit, and water begins creeping beneath the lower shingle edge. By the time a ceiling stain appears inside, the damage may already involve the decking and insulation.
That's why homeowners ask about ice and water roofing shield during repairs and replacement projects. It's a rubberized, asphalt-based membrane with a sticky backing that bonds directly to the roof deck. Unlike ordinary felt, it seals around nail penetrations and helps block wind-driven rain and meltwater forced uphill by an ice dam.
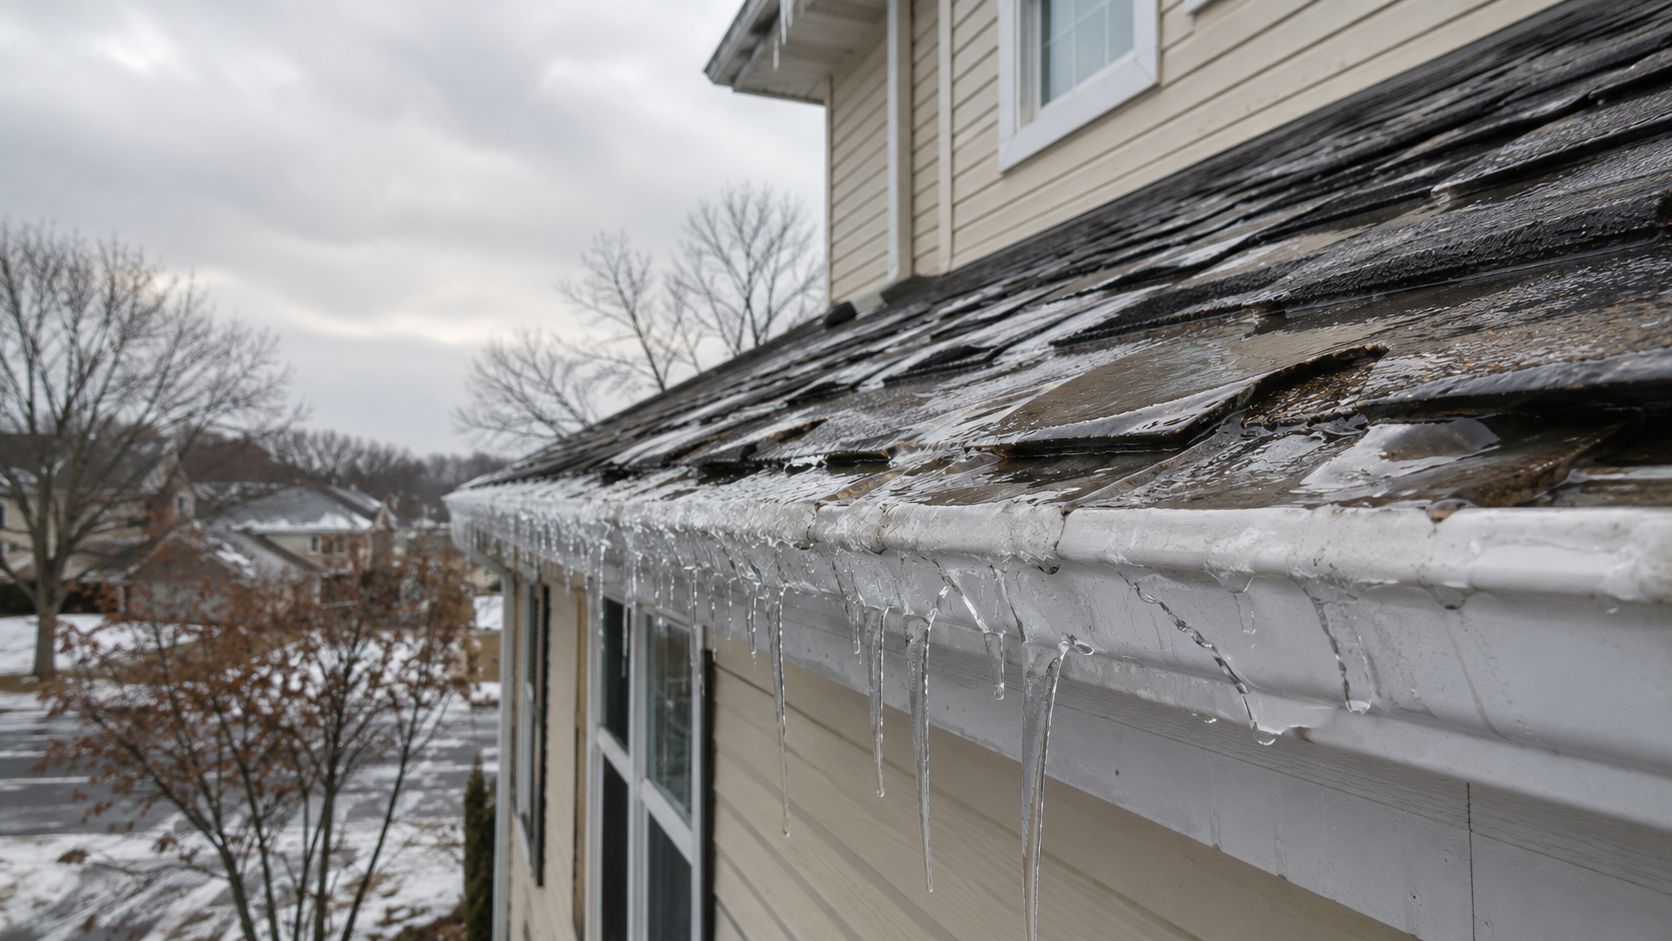
Table of Contents
- Why Columbus Homeowners Are Asking About Ice and Water Roofing Shield
- How a Self-Adhered Membrane Actually Stops Water
- Where the Code Says You Need It and Where You Really Need It
- Full-Deck Coverage Versus Targeted Eave and Valley Installation
- Comparing Ice and Water Shield With Other Roof Underlayments
- What Ice and Water Shield Costs on a Columbus Roof
- Warning Signs Your Home Needs Better Eave Protection
- Why Contractor Choice Matters More Than the Product Label
Why Columbus Homeowners Are Asking About Ice and Water Roofing Shield
Ice and water shield isn't a second shingle system. It's an underlayment upgrade installed directly over the roof deck, beneath the shingles and other field underlayment. The membrane creates a waterproof protection zone where ordinary roofing layers are most vulnerable, especially along eaves, valleys, and penetrations.
A typical central Ohio failure starts with temperature movement. Snow or frost melts higher on the roof, runs toward a colder overhang, and refreezes near the eave. The resulting ice buildup slows drainage, so water can move sideways and uphill beneath the shingle edge. Felt may resist that water for a time, but it doesn't bond tightly to the deck or seal every fastener opening.
The layer homeowners usually don't see
A self-adhering membrane sits flat against plywood or OSB. Its adhesive backing grips the deck, while its rubberized bitumen composition remains flexible as the roof experiences winter cold, spring warming, and summer expansion. Technical sheets for these products commonly show membranes around 40 to 60 mil thick, with ASTM D1970 compliance tied to sealing around fasteners and resisting water migration at penetrations. ASTM's standard for self-adhering polymer-modified bituminous sheets specifically addresses roof eaves and valleys where ice-dam backup can cause leakage.
Central Ohio homeowners are also dealing with older roofing assemblies, shaded roof planes, and freeze-thaw exposure along the I-70 corridor. A roof that has never leaked in ordinary rain may still be poorly prepared for backed-up water at the eave.
My practical view: Code tells you the minimum protection a roof must have. The roof's geometry and history tell you where a contractor should install more.
The right question isn't just, “Do I need ice and water shield?” Ask where it belongs, how far it should extend, and whether the crew is protecting the vulnerable transitions that cause real leaks.
How a Self-Adhered Membrane Actually Stops Water
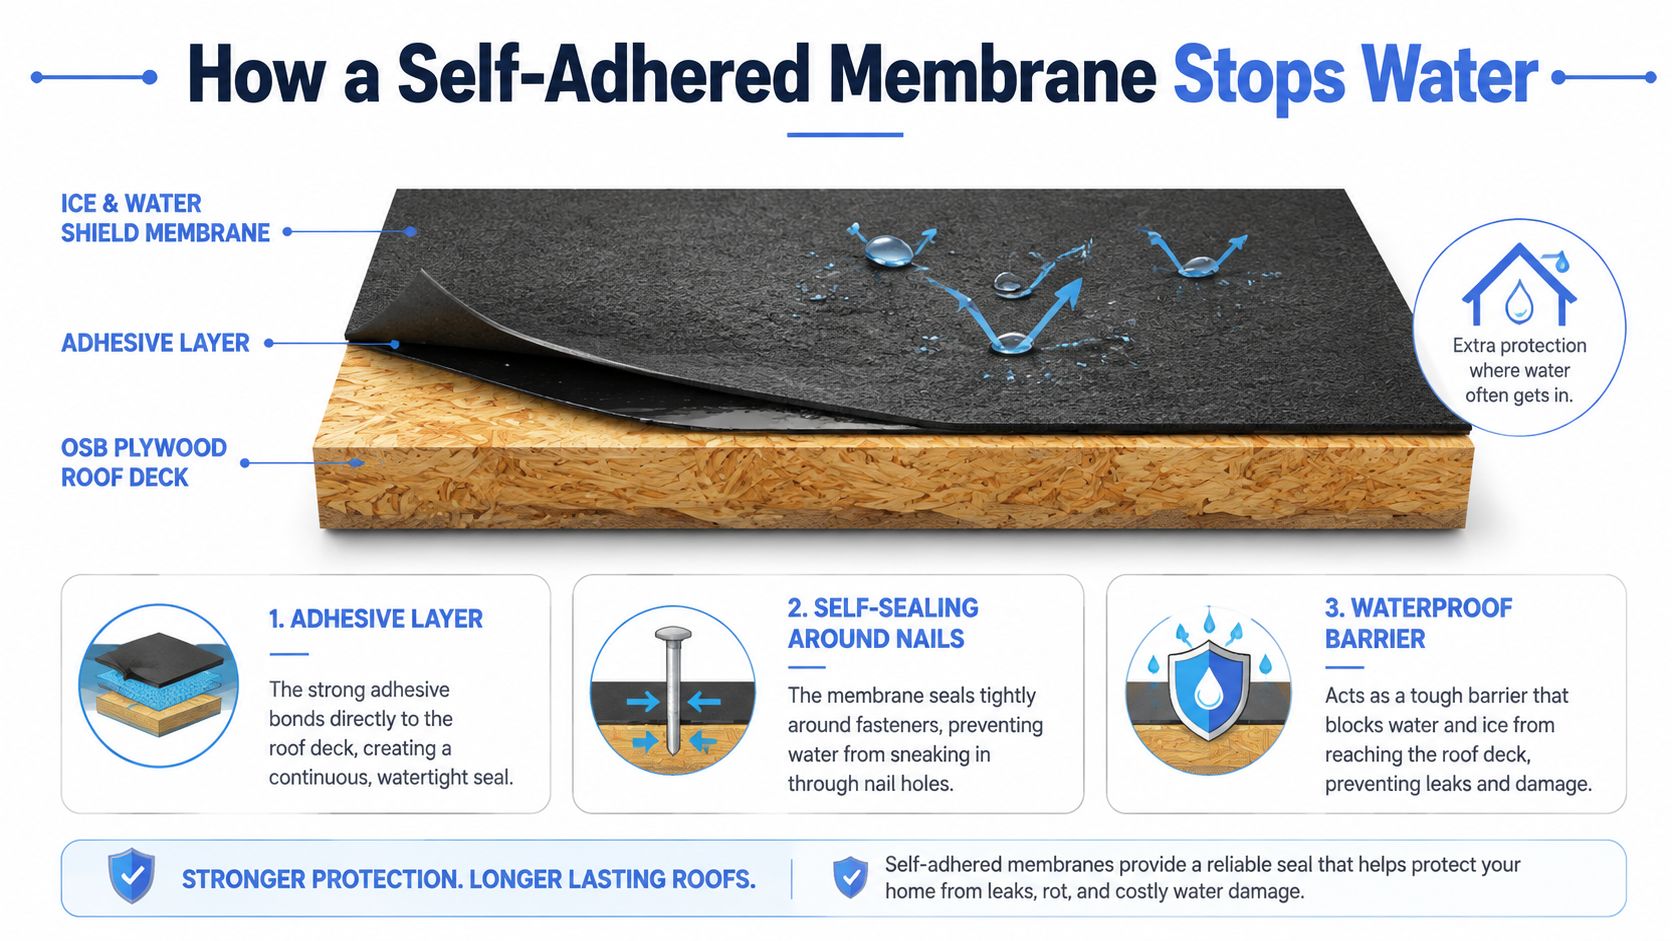
Think of a roof as a cross-section. At the bottom is the plywood or OSB deck. The self-adhered membrane is pressed onto that surface. Shingles are installed above it, and roofing nails pass through the shingles and membrane into the deck.
That penetration is where the product earns its place. The rubberized asphalt grips the nail shank and closes around the fastener, creating a gasket-like seal. Water that reaches the membrane has a much harder time following the nail into the wood.
Why ordinary underlayment behaves differently
Traditional felt and synthetic underlayment are loose sheets secured with staples or cap fasteners. They provide a secondary water-shedding layer across the roof field, but a fastener still creates an opening. Seams, wrinkles, and poorly seated staples can also create routes for moisture.
The self-adhered sheet changes the failure pattern. Instead of relying only on overlapping material to shed water, it bonds to the deck and seals around the holes made by shingle installation. That matters most where water can sit, reverse direction, or concentrate.
A quality membrane also needs to remain workable through changing weather. Polymer-modified bitumen gives it flexibility, while a textured or film-faced surface helps installers maintain footing and handle the sheet during placement. Independent technical material describes constructions using glass-fiber or polyolefin-facing layers, which can improve handling and surface traction. This guide to what goes under roof shingles places the membrane in the larger roof assembly rather than treating it as a substitute for every other underlayment.
The homeowner benefit is straightforward:
- Adhesive contact: The sheet bonds to the deck instead of floating over it.
- Fastener sealing: Rubberized asphalt closes around nail penetrations.
- Water resistance at transitions: Eaves, valleys, and penetrations receive a barrier designed for concentrated moisture.
- Better installation control: A surfaced membrane gives the crew a stable, workable layer beneath the shingles.
That engineering doesn't make a badly installed roof safe. It gives a disciplined crew a stronger waterproofing component to work with.
Where the Code Says You Need It and Where You Really Need It
A Columbus roof can meet the code and still leave high-risk areas underprotected. Start with IRC 2018 Section R905.1.2. Where the January average daily mean temperature is 25°F or less, the rule calls for an ice barrier from the eave edge to at least 24 inches inside the exterior wall line. The IRC ice-barrier summary for Section R905.1.2 explains that placement requirement.
Measure from the roof edge, overhang included. The membrane must run far enough uphill to reach the required point inside the wall line, so the installed length can exceed the visible shingle distance.
Steep sections require closer review. The 2015 IRC calls for the barrier to extend 36 inches up the slope on roofs with an 8:12 pitch or greater. Industry code guidance on ice-dam protection also identifies a self-adhering polymer-modified bitumen sheet as an alternative to two cemented underlayment layers.
Code minimum versus a contractor's scope
For a Columbus gable or hip roof, protection usually begins at the eave. Valleys, chimneys, plumbing vents, skylights, and wall intersections need a deliberate plan because runoff and flashing transitions concentrate exposure.
| Roof Zone | IRC Code Requirement | Recommended for Central Ohio |
|---|---|---|
| Eaves | Extend from the lowest roof edge to at least 24 inches inside the exterior wall line where the temperature or ice-history condition applies. IRC code reference | Confirm the measurement from the edge, overhang, and wall line. Add coverage where shading, roof geometry, or past backup raises risk. |
| Steep eaves | Roofs with an 8:12 pitch or greater may require coverage extending 36 inches up the slope. Steep-roof code analysis | Require the installer to identify steep sections and show the added course on the written scope. |
| Valleys | Code and manufacturer requirements govern the assembly and detailing. | Use a continuous, properly lapped membrane treatment through each valley. |
| Penetrations | Flashing and underlayment rules apply around vents, chimneys, skylights, and similar openings. | Require membrane integration with flashing, not a patch placed after shingles are installed. |
Code establishes the floor, not the complete risk assessment. North-facing eaves under trees, low-slope porch sections, and older homes with weak attic insulation deserve added attention. Ask for a roof plan that marks every protected zone before signing a replacement contract. A roof-deck-protection guide explains how this membrane fits with the rest of the roof assembly.
Full-Deck Coverage Versus Targeted Eave and Valley Installation
Full-deck coverage sounds safer because it puts a membrane across the entire roof. Sometimes that's the right decision. It isn't automatically the right decision for every Columbus home.
Targeted installation protects the locations where water backs up or concentrates: the eave area, valleys, wall intersections, and penetrations. On a conventional steep-slope roof with sound decking and functioning attic ventilation, that approach usually addresses the main exposure without covering every square foot in a low-permeability membrane.
When targeted protection makes sense
Use targeted coverage when the roof has a standard steep slope, a vented attic, and no unusual history of widespread moisture intrusion. The contractor should still map the eaves, valleys, overhangs, and penetrations instead of throwing down a narrow strip and calling the job complete.
Targeted work also lets the crew combine the shield with synthetic or felt underlayment across the field. That preserves a layered assembly, with the self-adhered membrane protecting high-risk areas and the field underlayment handling ordinary runoff.
When full coverage earns consideration
Full-deck coverage becomes more defensible on low-slope sections below 4:12, cathedral ceilings without adequate ventilation, and older homes where attic insulation or airflow remains marginal. It can also suit homeowners who want a more extensive waterproofing layer and accept the added material and labor.
The tradeoff is cost and assembly design. Full coverage uses more membrane, requires more careful alignment and seam work, and may create a moisture-management concern if the roof and attic aren't evaluated together. This installation guide reinforces the need to match placement to eaves, valleys, wall intersections, chimneys, dormers, skylights, and other vulnerable details.
My recommendation: On a normal, vented Columbus roof, pay for precise targeted protection before paying for blanket coverage. On low-slope or poorly ventilated sections, spend the money on a roof-specific evaluation first.
The membrane's location matters more than the dramatic wording on a proposal. A carefully installed eave and valley system can outperform a full-deck installation with poor seams, wrinkles, or trapped moisture.
Comparing Ice and Water Shield With Other Roof Underlayments
Central Ohio roof proposals usually include one of three underlayment categories: asphalt-saturated felt, synthetic underlayment, or self-adhered ice and water shield. They aren't interchangeable, and the cheapest roll isn't necessarily a bargain if it's specified in the wrong roof zone.
Traditional 15-pound or 30-pound asphalt felt is familiar and economical. It works as a secondary field layer, but it can tear under foot traffic, absorb moisture during prolonged exposure, and leave fastener holes unsealed. It has a place in some assemblies, yet it shouldn't be treated as equivalent to a self-adhered membrane at an ice-dam-prone eave.
Synthetic underlayment is stronger and easier to handle across broad roof fields. It generally tolerates installation traffic and weather exposure better than felt, but it still depends on laps and fasteners to shed water. It doesn't create the same bonded, self-sealing barrier around shingle nails.
The self-adhered product belongs at the transitions where water pressure and concentration create trouble. Its polymer-modified bitumen construction, reinforcing carrier, and ASTM D1970 labeling indicate a product designed for steep-roof ice-dam protection at eaves and valleys. The technical data for a representative membrane describes the construction and performance characteristics contractors should review.
| Property | Asphalt Felt, 15/30 lb | Synthetic Underlayment | Ice and Water Shield |
|---|---|---|---|
| Primary role | Secondary field water shedding | Secondary field protection | Waterproofing at high-risk transitions |
| Attachment | Staples or roofing fasteners | Staples, cap nails, or approved fasteners | Self-adhered bond to the deck |
| Fastener sealing | No self-sealing membrane around holes | No self-sealing membrane around holes | Designed to seal around fasteners |
| Handling | Familiar, but can tear and wrinkle | Lightweight and generally easier to handle | Heavier, adhesive, and more detail-sensitive |
| Best location | Broad roof field where specified | Broad roof field | Eaves, valleys, penetrations, and vulnerable low-slope areas |
Pick by roof location, not brand loyalty. A sound roof uses the right underlayment for each zone, with the self-adhered shield doing the work that felt and synthetic sheets cannot.
What Ice and Water Shield Costs on a Columbus Roof
Pricing depends on how much membrane the roof needs and how difficult the installation is. Material pricing commonly falls between $0.85 and $1.75 per square foot, depending on the product, thickness, and surface type. Industry cost guidance for ice and water shield discusses the way coverage strategy, roof geometry, and product selection affect the overall value.
For installed work, targeted eave, valley, and penetration coverage generally runs about $2.00 to $4.50 per square foot. Full-deck coverage can run about $4.50 to $7.50 per square foot because the crew handles substantially more material and labor. These figures describe the shield installation scope, not the entire roof replacement.
What changes the number on your proposal
A contractor should explain the quantity and placement, not just list “ice and water shield” as a vague upgrade.
- Roof shape: Multiple valleys, hips, dormers, and intersecting sections increase cutting, lapping, and detailing.
- Penetrations: Chimneys, skylights, plumbing stacks, and wall transitions require careful integration with flashing.
- Deck condition: Tear-off may reveal soft plywood, rot, or damaged sheathing that must be replaced before the membrane can bond.
- Access: Steep roof planes, limited staging, and difficult material handling add labor.
- Coverage depth: A second course or extended run at an overhang changes the material quantity.
- Surface choice: Granular and smooth-faced products can differ in handling and cost.
A typical proposal should show whether the price covers only eaves or also valleys and penetrations. It should identify deck repairs separately and state whether full-deck coverage is included or optional.
Bundle the membrane with a complete roof replacement when possible. The crew already has the deck exposed, so adding protection during the tear-off and shingle installation is more efficient than attempting a piecemeal upgrade later.
Warning Signs Your Home Needs Better Eave Protection
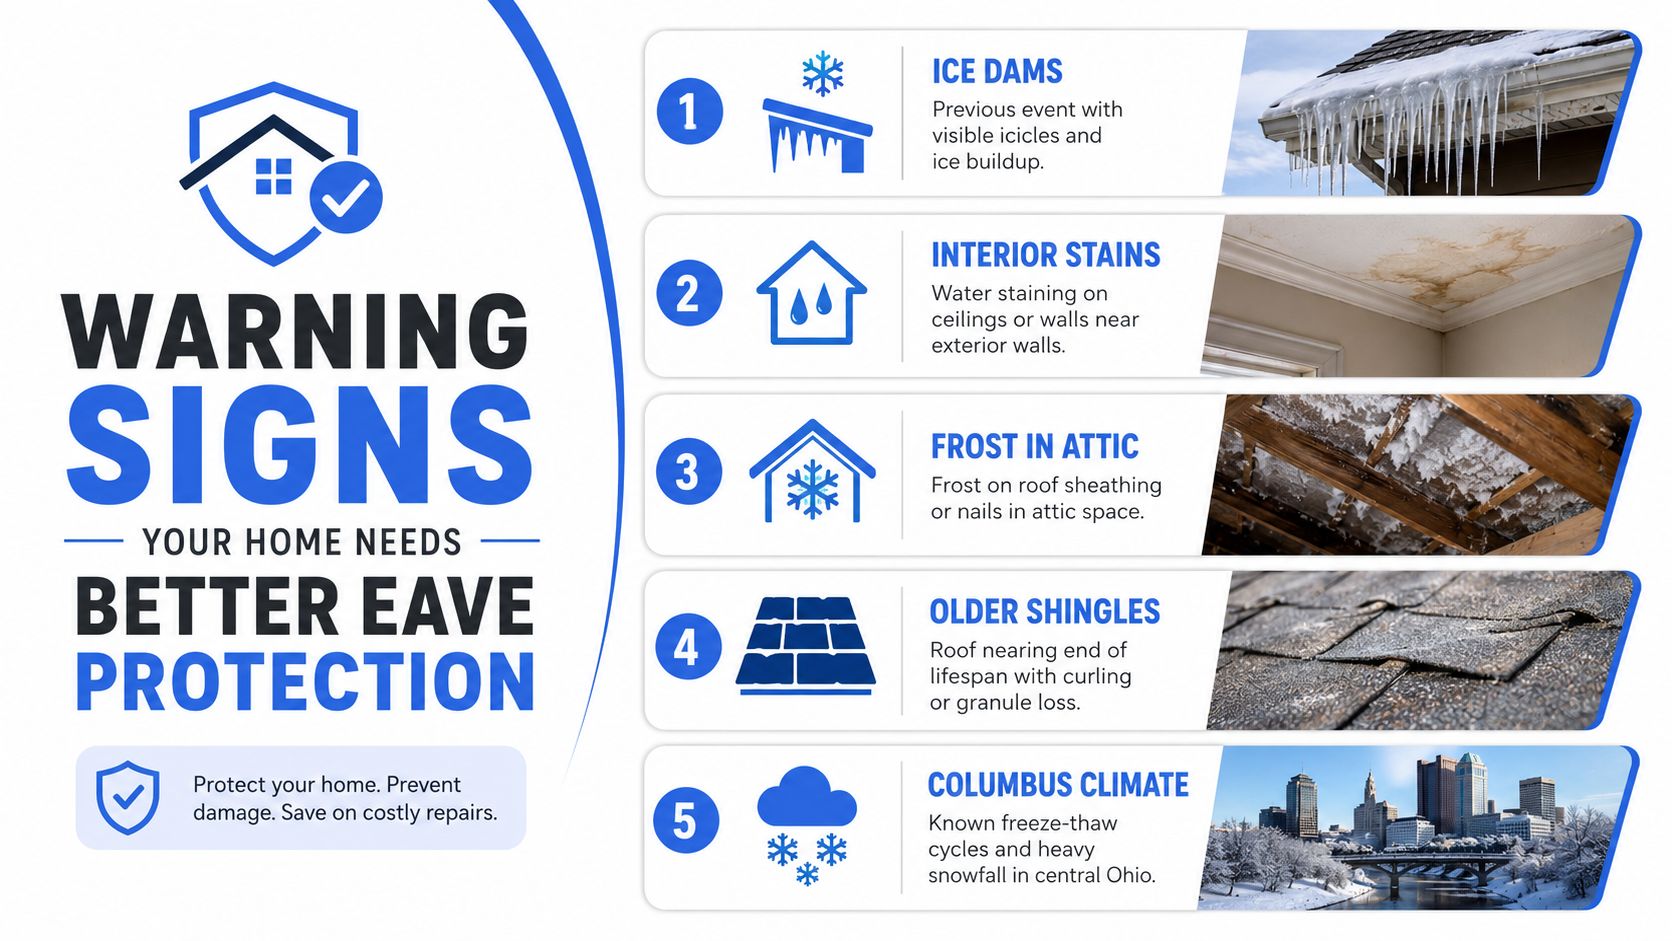
The most useful warning signs often appear before a roof replacement becomes urgent. A previous ice dam with ceiling or soffit staining is the clearest one. It tells you water has already found a route beneath the shingles, and the replacement scope should address that route rather than just install new shingles over it.
Signals outside the roof
Look for patterns, not isolated winter events:
- Repeated icicles at one eave: Consistent ice formation points to a recurring drainage or heat-loss condition.
- Curling or granular loss: Aging shingles can leave the first course and exposed transitions less capable of shedding water.
- Rot or rust at the edge: Decayed decking or rusted nail heads near a gutter line suggest prolonged moisture exposure.
- Darkened sheathing near penetrations: Discoloration around a chimney or plumbing stack can identify a flashing and underlayment problem.
- Soffit staining: Water near the overhang may indicate backup under the lower shingle courses.
A roof inspection should include the attic. High humidity, frost on roof sheathing or nails during January cold snaps, and darkened wood near penetrations can reveal ventilation or condensation problems that membrane placement alone won't solve.
If you find an interior stain, don't assume the visible mark identifies the entry point. Water can travel along rafters and decking before appearing indoors. A practical guide to how to find ceiling leak sources can help you document what you see before a roofer arrives, but roof access and repair decisions belong with a qualified professional.
What to request before reroofing
Ask the contractor for photos of the eaves, valleys, and decking after tear-off. Those images should show damaged wood, existing underlayment, flashing conditions, and the proposed membrane layout.
Ask this directly: “Show me how far the shield will extend from each eave, and show me how you'll handle every valley and penetration.”
That question separates a documented roof system from a generic line item.
Why Contractor Choice Matters More Than the Product Label
A premium roll can't rescue careless installation. The membrane needs a clean, dry roof deck, correct preparation, and disciplined sequencing. Dust, frost, dew, and sawdust can interfere with adhesion before the crew ever installs a shingle.
Porous OSB may require the primer specified by the manufacturer. The installer should align the membrane with the eave and drip edge, sequence laps correctly through valleys, and integrate the sheet around every plumbing boot, chimney, skylight, and other penetration. Wrinkles and fishmouths aren't cosmetic defects. They create channels and prevent the sheet from sitting tightly against the deck.
Details that decide performance
The crew should also respect the product's application limits. Installing below the manufacturer's rated surface temperature can lead to weak adhesion, lifted edges, and bubbles. Overdriven fasteners in the membrane zone can damage the seal around the penetration, while careless cuts can leave exposed seams at the exact places water concentrates.
Look for a contractor who can provide:
- A written placement map: The scope identifies eaves, valleys, penetrations, and any full-deck areas.
- Deck preparation: The crew explains how it will clean and dry the substrate before peel-and-stick application.
- Documented credentials: Licensing, insurance, and manufacturer credentials create accountability beyond the product label.
- Photographic records: Progress photos show whether the membrane covers the promised zones.
- Warranty alignment: The proposed materials and installation follow the applicable manufacturer requirements.
Homeowners should also plan for winter safety around the property. If snow and ice accumulate on walkways or lower roof edges during the project, Pine Country Window Cleaning snow removal offers a separate way to address hazardous buildup while the roofing work stays focused on the roof assembly.
HIBCO ROOF LLC is one Columbus-area option for licensed and insured inspections, repairs, and roof replacements using manufacturer-backed materials and documented installation practices. The company also handles related exterior work, including gutters and skylights, which can matter when the membrane must connect cleanly with drainage and flashing components.
The product matters. Installation matters more. Ask who will prepare the deck, how the crew will handle cold weather, where the laps will fall, and what photos you'll receive before shingles cover the work.
HIBCO ROOF LLC provides Columbus-area roof inspections, leak diagnosis, storm assessments, repairs, and full replacements with documented attention to eaves, valleys, penetrations, and roof-deck protection. Visit HIBCO ROOF LLC to request a free, no-pressure estimate and discuss the right ice and water shield scope for your home.