
You notice a brown mark near the rake edge after a season of hard rain. The shingles look intact, the gutter is still attached, and a quick bead of caulk seems like it should solve the problem. Then an inspection reveals the actual issue: the metal, underlayment, and wall flashing were each present, but they were installed in an order that gave water a path behind the fascia.
Roof edge flashing installation succeeds or fails as a system. Drip edge, underlayment, shingles, step flashing, and kick-out diverters must overlap so water consistently moves outward and downward. A component that looks correct on its own can still leak when the layer beneath it directs water into a joint instead of over it.
Table of Contents
- Why Flashing Sequence Matters More Than You Think
- Materials and Tools for Lasting Flashing Performance
- Installing Drip Edge at Eaves and Rakes Correctly
- Common Mistakes That Create Hidden Roof Leaks
- Meeting Code Requirements and Maintaining Your Flashing
Why Flashing Sequence Matters More Than You Think
A brown stain at the rake edge after spring rain does not prove the shingles failed. The shingles may still be serviceable while the drip edge, underlayment, and wall flashing create a concealed route into the roof edge. Water takes the easiest path. An uphill-facing lap, a short flange, or a membrane edge that drains behind the fascia can pull moisture into the assembly instead of sending it outside.
The governing rule is simple: water must shed over the layers, not into them. Roof edges need flashing where the drainage plane is interrupted, and the PNNL guide to step and kick-out flashing applies the same water-shedding logic to roof-wall transitions. A correct sequence matters because each layer must hand water to the next one without creating an uphill joint.
Eaves and rakes work differently
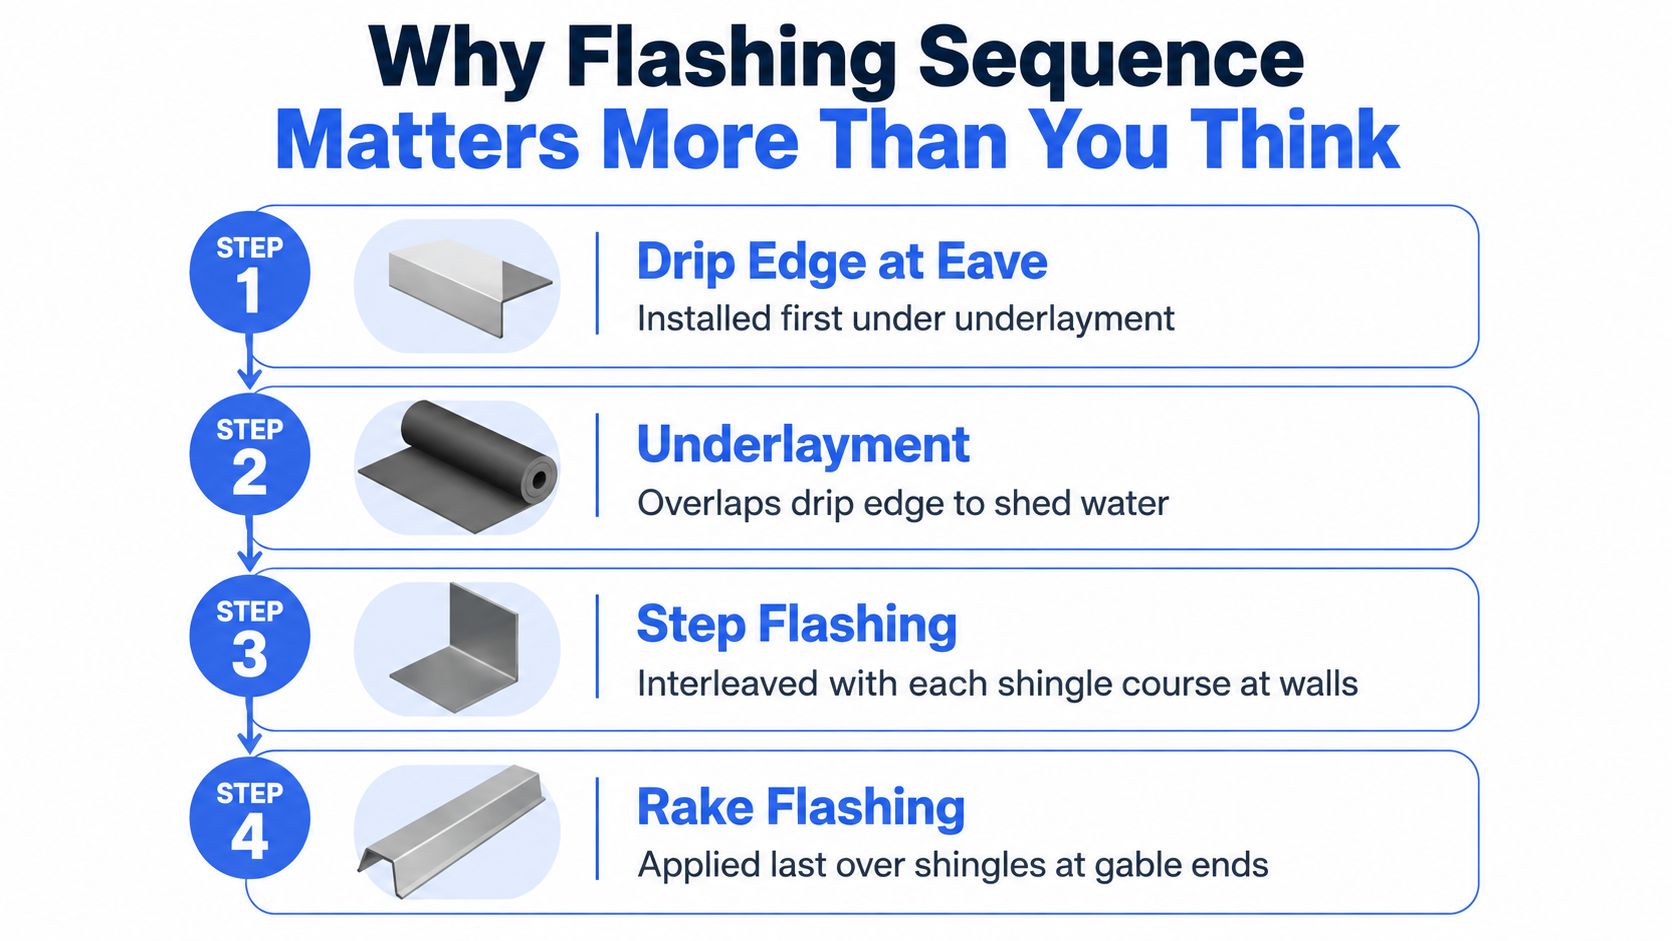
At an asphalt-shingle eave, install the drip edge beneath the underlayment. The underlayment then overlaps the metal, allowing water descending the drainage plane to reach the flashing and move toward the gutter. At a rake, install the underlayment first, then place the rake drip edge over it. That arrangement protects the exposed edge from wind-driven rain and helps prevent the membrane from lifting.
A rake detail copied from an eave can therefore send water behind the fascia, even when both pieces of metal appear properly fastened. Adjacent flashing pieces also require directional laps. The upper piece must shed onto the lower piece, not drain into an open seam. At roof-wall intersections, step flashing must interleave with each shingle course, while a kick-out diverter moves concentrated runoff away from the wall termination.
Practical rule: A flashing detail is complete only when every layer passes water to the next layer. Sealant should not carry the drainage load.
The same sequencing principle applies at other exterior transitions. The guide to how to install deck flashing shows why an upper layer must overlap the lower one, while what goes under roof shingles helps place underlayment within the wider roof assembly. A roof edge is not merely a trim line. It is where the entire drainage plane must terminate outside the wall and fascia.
Materials and Tools for Lasting Flashing Performance
Start with material compatibility, not the color of the metal. Galvanized steel, aluminum, and copper can all serve in appropriate assemblies, but they don't behave the same way. Galvanized steel provides rigidity and is widely used in residential work. Aluminum is light and easy to shape, but it must be paired with compatible fasteners. Copper offers exceptional durability, though its cost and appearance make it a specialized choice rather than a default for asphalt-shingle reroofing.
For residential flashing, many code and standard packages specify corrosion-resistant metal with at least 26-gauge steel. The FORTIFIED steep-slope flashing guidelines also emphasize manufacturer instructions, applicable code, corrosion resistance, and edge fastening. The right gauge gives the installer enough stiffness to maintain a straight drainage line without making ordinary cuts and folds unnecessarily difficult.
Choose fasteners as part of the metal system
Don't pair aluminum flashing with whatever nails are already in the truck. Incompatible metals can accelerate galvanic corrosion, especially where moisture remains trapped at laps or fastener heads. Use compatible, corrosion-resistant fasteners and follow the flashing and roofing manufacturer requirements for the assembly.
A practical tool kit includes:
- Aviation snips: Cut cleanly without crushing the profile or leaving a ragged edge that traps water.
- A chalk line and measuring square: Keep long runs straight and verify that laps remain consistent.
- A hammer and nail set: Drive fasteners securely and finish exposed heads without deforming the metal.
- A utility knife: Trim underlayment and membrane cleanly around corners and transitions.
- A folding tool or hand seamer: Make controlled bends at eaves, rakes, and corner returns.
- A tape measure: Confirm the roof-deck extension before shingles conceal the flange.
The tool that saves the most rework is often the measuring square. A flashing piece can look aligned from the ground while its overlap narrows at the far end. Check the actual lap, the edge projection, and the fastener line before covering the work.
Where edge protection intersects with membranes, the ice and water shield installation guide can help clarify how the protective layers should meet. Don't use membrane, caulk, or roofing cement to compensate for a misplaced metal profile. Sealants can support a detail, but they can't replace a drainage path.
Installing Drip Edge at Eaves and Rakes Correctly
A roof edge can look properly flashed and still leak when the layers were installed in the wrong order. Water follows the underlayment, metal laps, and fascia line together, so each piece must hand runoff to the next without creating an uphill joint or concealed channel.
Start at the roof deck. Remove loose debris, inspect the sheathing edge, and confirm that the substrate provides continuous support for the metal. Measure the flange before fastening. The drip edge should extend a minimum of 2 inches onto the roof sheathing and project at least 1/4 inch below the sheathing, dimensions covered by the IRC 2024 drip-edge reference.
At the eave
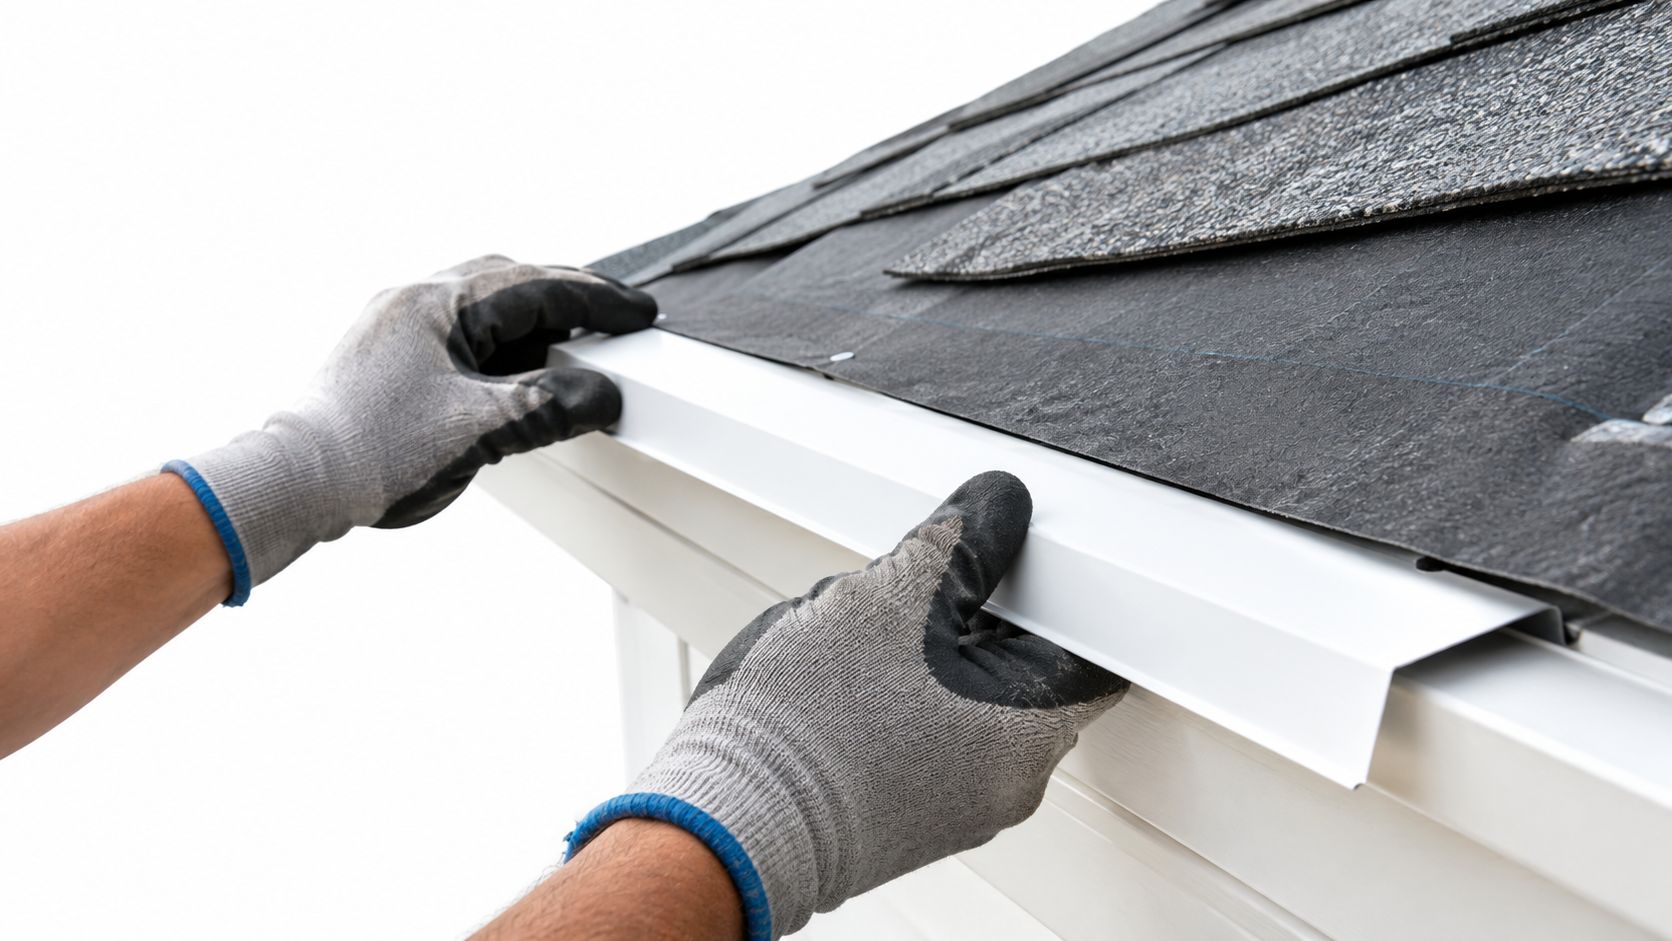
Install the eave drip edge on the bare deck before laying the underlayment. Set the lower flange to discharge water into the gutter line, not behind the fascia. Keep the metal straight and fasten it without crushing or bending the profile. A distorted edge can hold water even when the roof slope is correct.
Lap each succeeding piece by at least 2 inches, as specified for asphalt-shingle drip-edge details in the IRC reference. Position the joint so the upper piece sheds onto the lower piece. A tight-looking seam can still admit wind-driven rain if its overlap faces into the drainage flow.
Then lay the underlayment over the eave metal. Do not tuck it behind the flashing. That sequence preserves the intended drainage plane and prevents runoff from traveling behind the fascia.
At the rake
The rake handles side exposure and wind-driven rain, so its sequence reverses. Install the underlayment first, then place the rake drip edge over it. The metal clamps the membrane edge, while the shingles later cover the upper flange.
Dry-fit the corner before cutting. The rake piece must direct water down into the eave detail without leaving an open notch at the fascia. Mark overlaps, make clean cuts, and form the transition deliberately. For context on the component receiving this runoff, see this guide to drip edge on a house.
Standard installations often use fasteners at 12-inch intervals. FORTIFIED guidance recommends fastening metal flashing at a maximum of 6 inches on center at the edges with compatible corrosion-resistant fasteners. Choose the pattern required by the applicable code, manufacturer instructions, and wind exposure.
The gutter apron is an essential home gutter component, but it cannot correct a reversed lap or misplaced drip edge. Inspect the handoff between eave metal, underlayment, rake metal, shingles, and gutter before those layers disappear under the finished roof.
Common Mistakes That Create Hidden Roof Leaks
A flashing failure often starts with a reasonable-looking shortcut. The metal is visible, the joint is sealed, and the roof passes a casual inspection. Water still gets behind the assembly because the installer treated flashing as a collection of patches rather than a sequence of overlapping drainage surfaces.
Industry summaries place most roof leaks at flashing details, with cited estimates ranging from roughly 80 to 90 percent to about 95 percent, depending on the source and definition of failure. Those figures appear in the Penn Roofing discussion of flashing failures. The useful lesson isn't the precise percentage. It's that edge, wall, penetration, and transition details deserve more scrutiny than a broad field of intact shingles.
Caulk can't replace a lap
Sealant has a role at selected joints, but it isn't a substitute for properly lapped metal. A bead may cover an exposed seam for a while, yet it can shrink, split, or detach as the materials move. Caution is warranted, as caulk doesn't correct an uphill lap or redirect water that has already entered behind the flashing.
During an inspection, look for thick, irregular sealant lines around otherwise misaligned metal. That pattern often signals a repair attempt over a failed detail. The durable fix usually requires exposing the layers, correcting the lap, and replacing damaged material rather than adding another surface bead.
Step flashing must move with the roof
Roof and wall assemblies experience movement. Nailing through step flashing in a way that locks it to both the wall and the shingle course can block that movement and damage the seal. Step flashing should be installed as individual pieces, interleaved with each shingle course, without creating a rigid bridge that compromises the wall transition.
Don't rely on a continuous strip where the assembly calls for individual steps. At a sidewall, inspect whether each flashing piece remains properly covered by the next shingle and whether fasteners have been placed where they won't create an exposed leak path.
Incompatible metals quietly corrode
A roof edge can appear sound while corrosion develops at a contact point between dissimilar metals. Check fastener heads, laps, gutter connections, and cut edges for staining, pitting, or powdery corrosion. Replacing only the visibly rusted fastener won't solve the problem if the surrounding metal has already lost its protective surface.
Missing kick-out flashing concentrates runoff
At the point where a roof meets a vertical wall, water can leave the roof in a concentrated stream. Without a kick-out diverter, that stream can run behind siding or into the wall assembly. Look for a properly formed termination that sends water away from the wall and into the gutter or clear of the cladding.
A clean roof edge can hide a wet wall. Inspect where water finishes its journey, not only where it starts.
If moisture has reached the fascia, sheathing, or wall framing, spot repairs may leave damaged wood and concealed wet materials in place. Remove enough roofing and cladding to inspect the actual drainage path, then rebuild the transition with the correct sequence.
Meeting Code Requirements and Maintaining Your Flashing
Code requirements establish a baseline, but they do not replace the product manual or a sound installation sequence. The International Residential Code included step flashing and kick-out diverters at roof-wall intersections in the 2009 and 2012 editions, with the requirements continued under updated section references in the 2015 and 2018 editions. During a reroof, confirm the provisions adopted by the local authority having jurisdiction.
The local code official may enforce one set of requirements, while the shingle manufacturer, flashing manufacturer, and a supplemental program such as FORTIFIED add others. Follow the strictest applicable instruction where requirements overlap. Before shingles cover the work, document the product information, drip-edge and step-flashing layout, fastener compatibility, and concealed laps. A compliant component can still fail if the drip edge, underlayment, and flashing were installed in the wrong order.
Inspect the details, not just the surface
Seasonal checks should focus on movement, corrosion, and changes in drainage:
- Lifted edges: Look for metal separating from the deck or fascia, especially after high winds.
- Corroded fasteners: Rust around heads or joints can indicate incompatible metals or trapped moisture.
- Separated laps: Open seams at corners and transitions can direct water behind the fascia.
- Fascia staining: Dark streaks, peeling paint, or soft wood suggest runoff is missing the gutter.
- Wall-side gaps: Check roof-to-wall terminations for missing step flashing or kick-out diverters.
A post-storm inspection makes sense for Columbus-area homeowners when wind or hail may have disturbed shingle edges or exposed flashing. Use binoculars from the ground where possible. Climbing onto a roof to inspect a suspected failure can cause more damage and creates a safety risk.
Patch repairs suit a limited bent section when the surrounding layers remain sound. Replace the flashing when corrosion is widespread, the original sequence is wrong, or water has damaged the substrate. Keep photographs and written notes before work begins. Those records support maintenance planning, warranty discussions, and insurance documentation.
For a professional assessment, HIBCO ROOF LLC provides roof inspections, flashing repair, leak diagnosis, storm-damage documentation, and full roof replacement in Columbus and central Ohio, using manufacturer-backed materials and documented installation practices.
HIBCO ROOF LLC can inspect roof edges, trace concealed water paths, and repair or replace flashing as part of a complete roofing system. Visit HIBCO ROOF LLC to request a Columbus-area inspection or a free written estimate before a small edge detail becomes concealed structural damage.